Introduction
Mighty LMS is a powerful, modern, and comprehensive Learning Management System (LMS) built with Flutter and Laravel. It is designed for educational institutions, training centers, online academies, instructors, and organizations that want to deliver, manage, and scale digital learning experiences efficiently.
The platform enables administrators and educators to create and manage courses, lessons, quizzes, assignments, live classes, certificates, and student enrollments through a centralized and user-friendly interface. Students can access learning materials anytime, track their progress, complete assessments, and interact with instructors from any device.
Mighty LMS supports multi-role management, course categorization, online examinations, attendance tracking, progress monitoring, payment integration, notifications, and detailed reporting tools. Its flexible architecture makes it suitable for schools, colleges, universities, coaching centers, corporate training programs, and e-learning businesses.
With a responsive Flutter-based mobile application and a robust Laravel-powered backend, Mighty LMS delivers a seamless learning experience across web and mobile platforms while ensuring high performance, security, and scalability.
Whether you are launching an online learning platform, managing institutional education, or providing professional training programs, Mighty LMS offers all the essential tools needed to create an engaging, efficient, and successful digital learning environment.
Installation on Live Server
📌 Before You Begin — Placeholder Values in This Guide
Wherever you see text highlighted like this, it is a generic example, not a literal value. Replace it with the equivalent value from your own server, domain, or hosting account before running any command or entering any path.
| Placeholder | Replace with |
|---|---|
| yoursite.com | Your actual domain name |
| api.yoursite.com | Your actual API subdomain |
| lms_db | The database name you choose in your hosting panel |
| lms-api-code.zip | The exact filename of the ZIP shipped in your download package |
| htdocs/lms-api | Your local server's project folder path |
Step 1 — Download Script From Envato
Login to your Envato (CodeCanyon) account. Navigate to Downloads → Click Download → All Files & Documentation. Extract the downloaded ZIP file on your computer.
⚠️ IMPORTANT LICENSE VERIFICATION
During installation, the installer verifies your Envato purchase code by securely contacting our external licensing server. This license and domain verification is required to activate your installation.
Please ensure your server has outbound internet access during installation. The installation process depends on this external license verification service. If the licensing server cannot be reached, activation cannot be completed.
Disclosure: the specific domain contacted for this check is
codenichebd.com. Your server must be able to reach this domain
over outbound HTTPS during installation and, periodically, during normal
operation, for license/domain validation to succeed. If your hosting
provider restricts outbound connections (common on some managed or
security-hardened hosts), allowlist this domain before installing.
💳 Cost disclosure: license/domain verification itself is included with your purchase and carries no separate charge. However, any hosting, bandwidth, or outbound-connection allowances required by your hosting provider to reach this domain (or any other external service referenced in this documentation) are the buyer's responsibility. Fuedevs does not cover third-party hosting, API, or service costs.
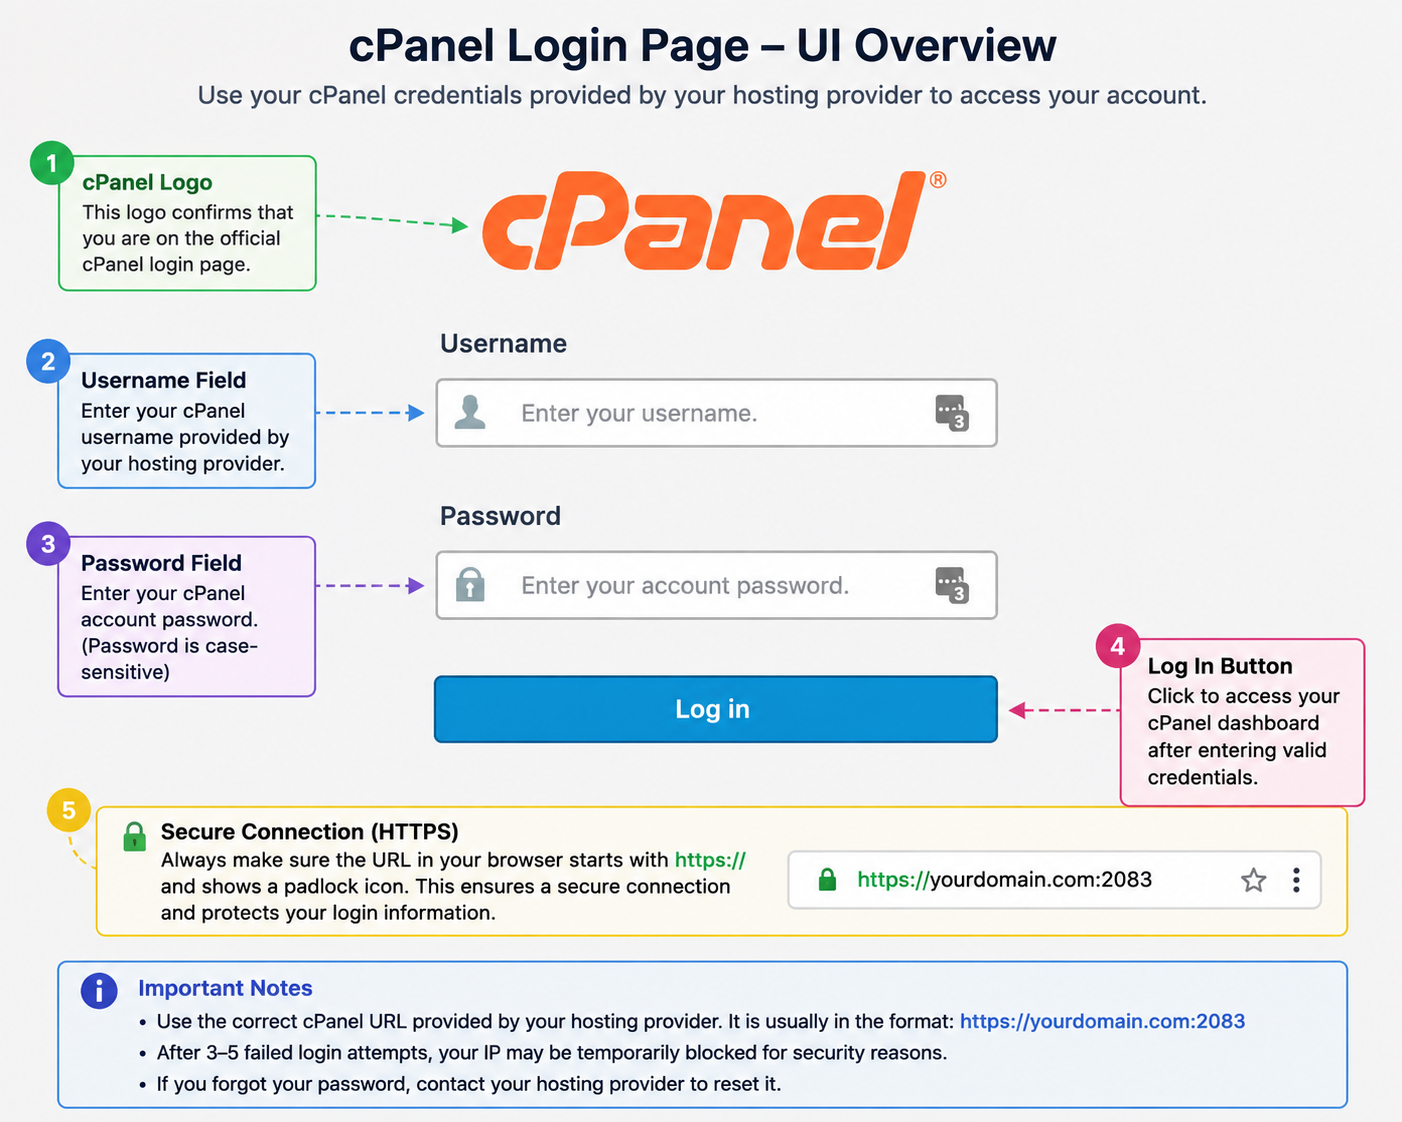
Step 2 — Login To Hosting Control Panel
Login to your hosting control panel (cPanel or DirectAdmin). This panel will be used to manage domains, files, and databases.
Step 3 — Server Requirements Check
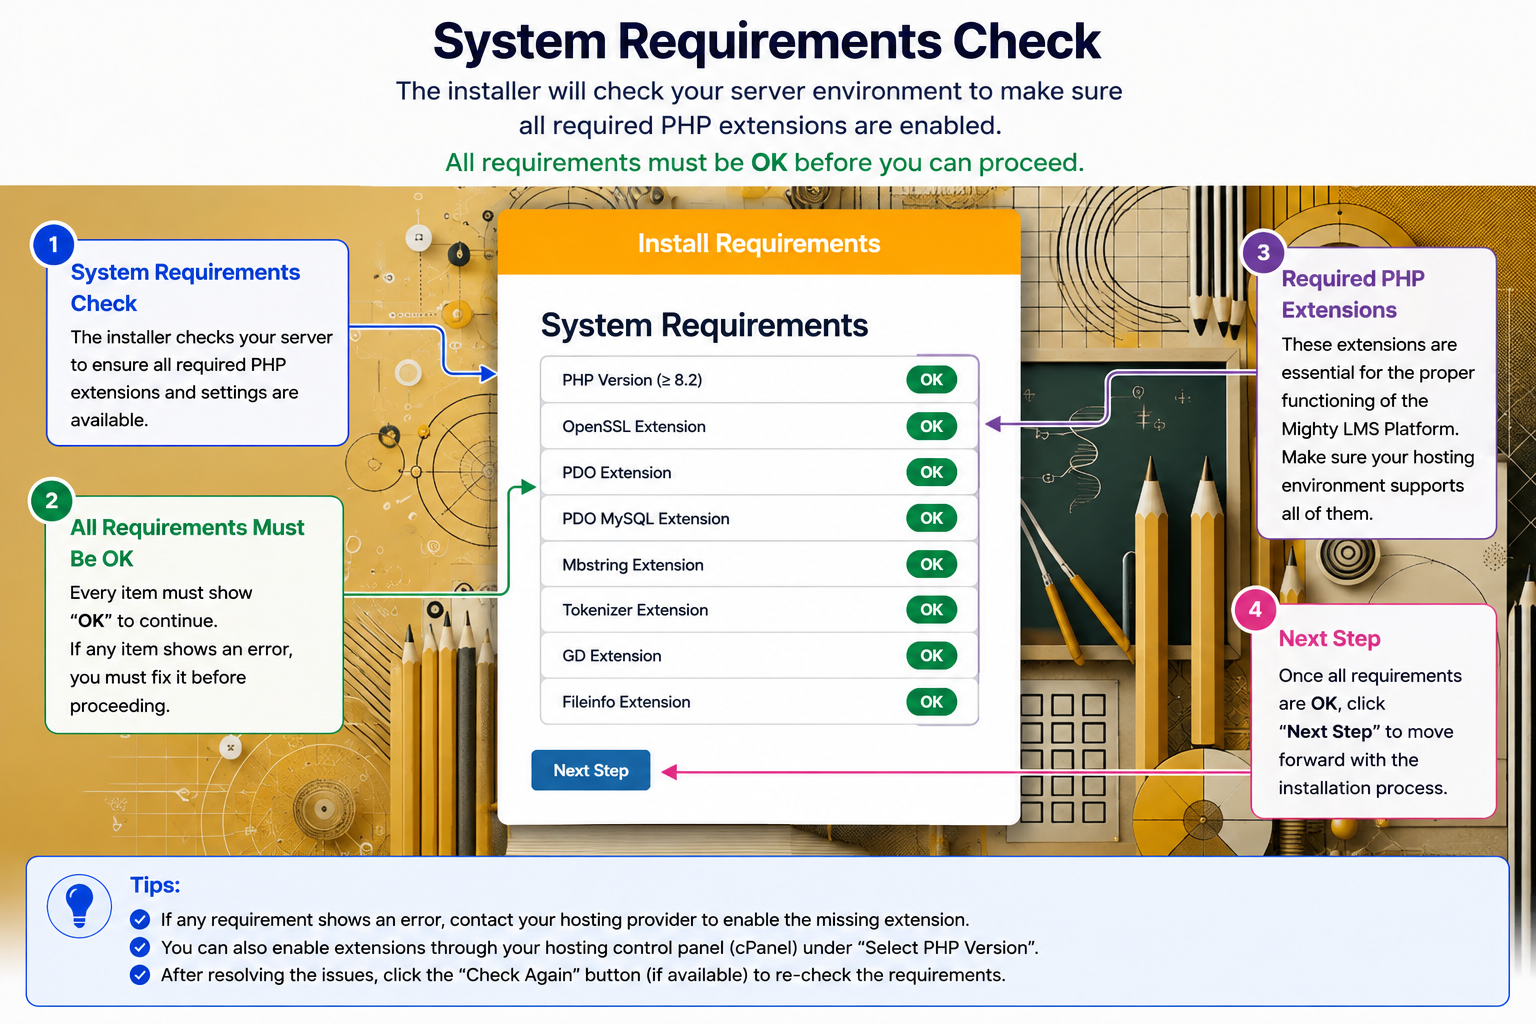
Make sure your server meets the following minimum requirements:
- PHP Version: 8.2 or higher
- MySQL Version: 5.7+ or MariaDB
- Required PHP Extensions:
- Fileinfo
- GD
- JSON
- OpenSSL
- PDO
- XML
- Mbstring
- CURL
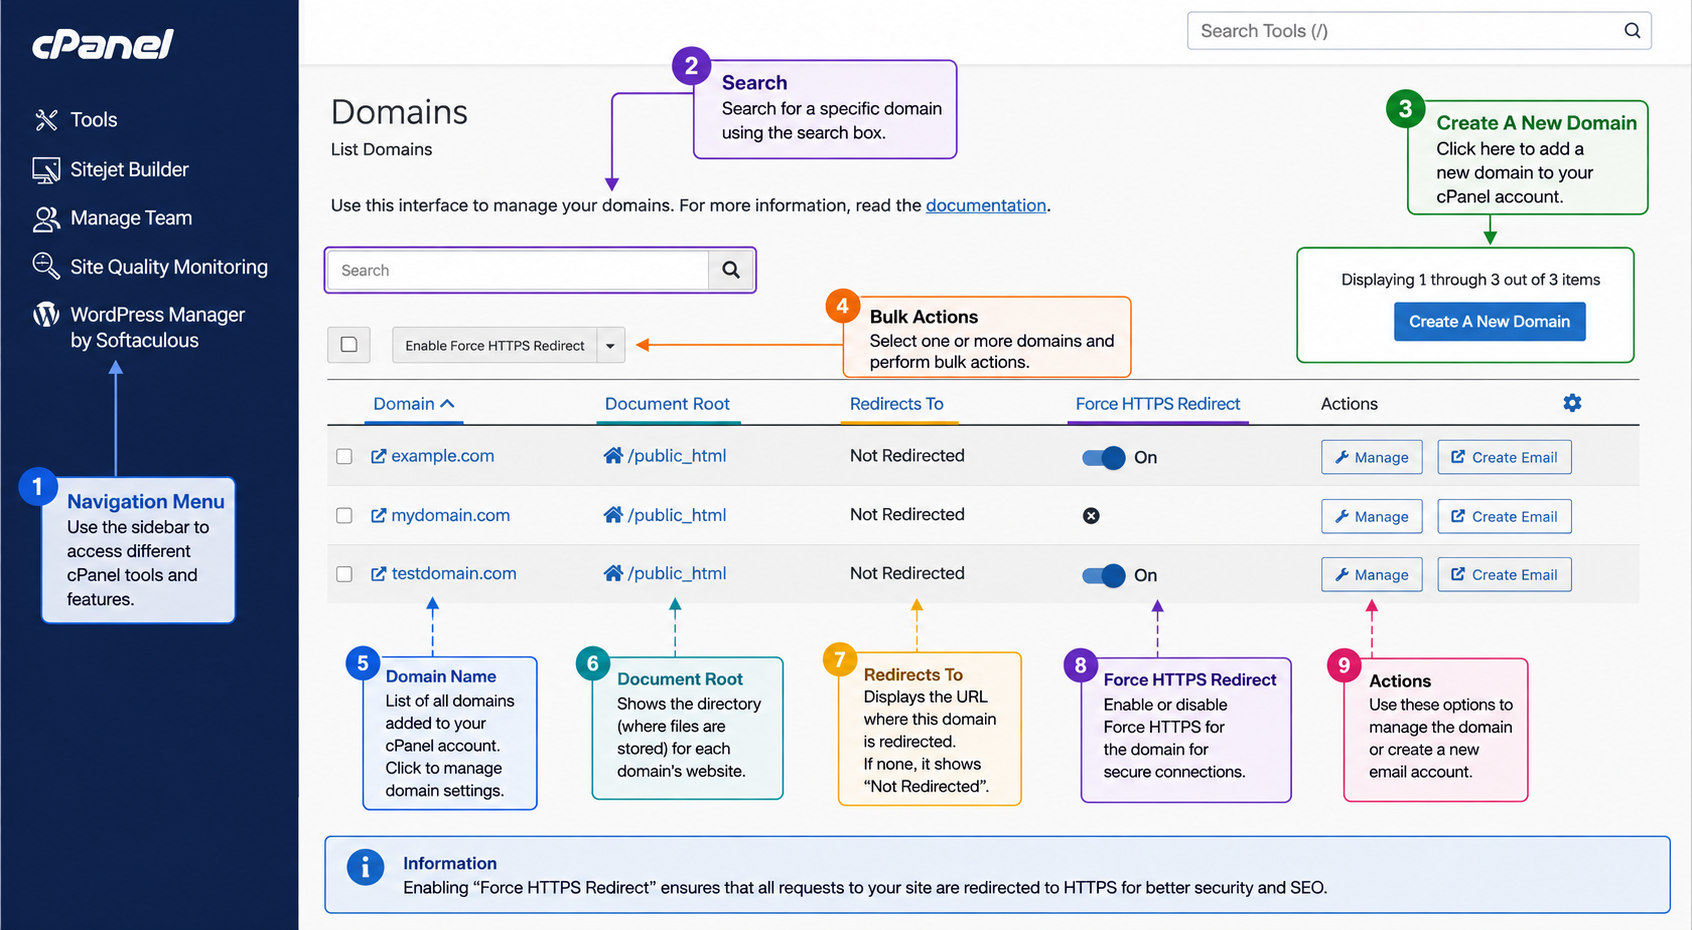
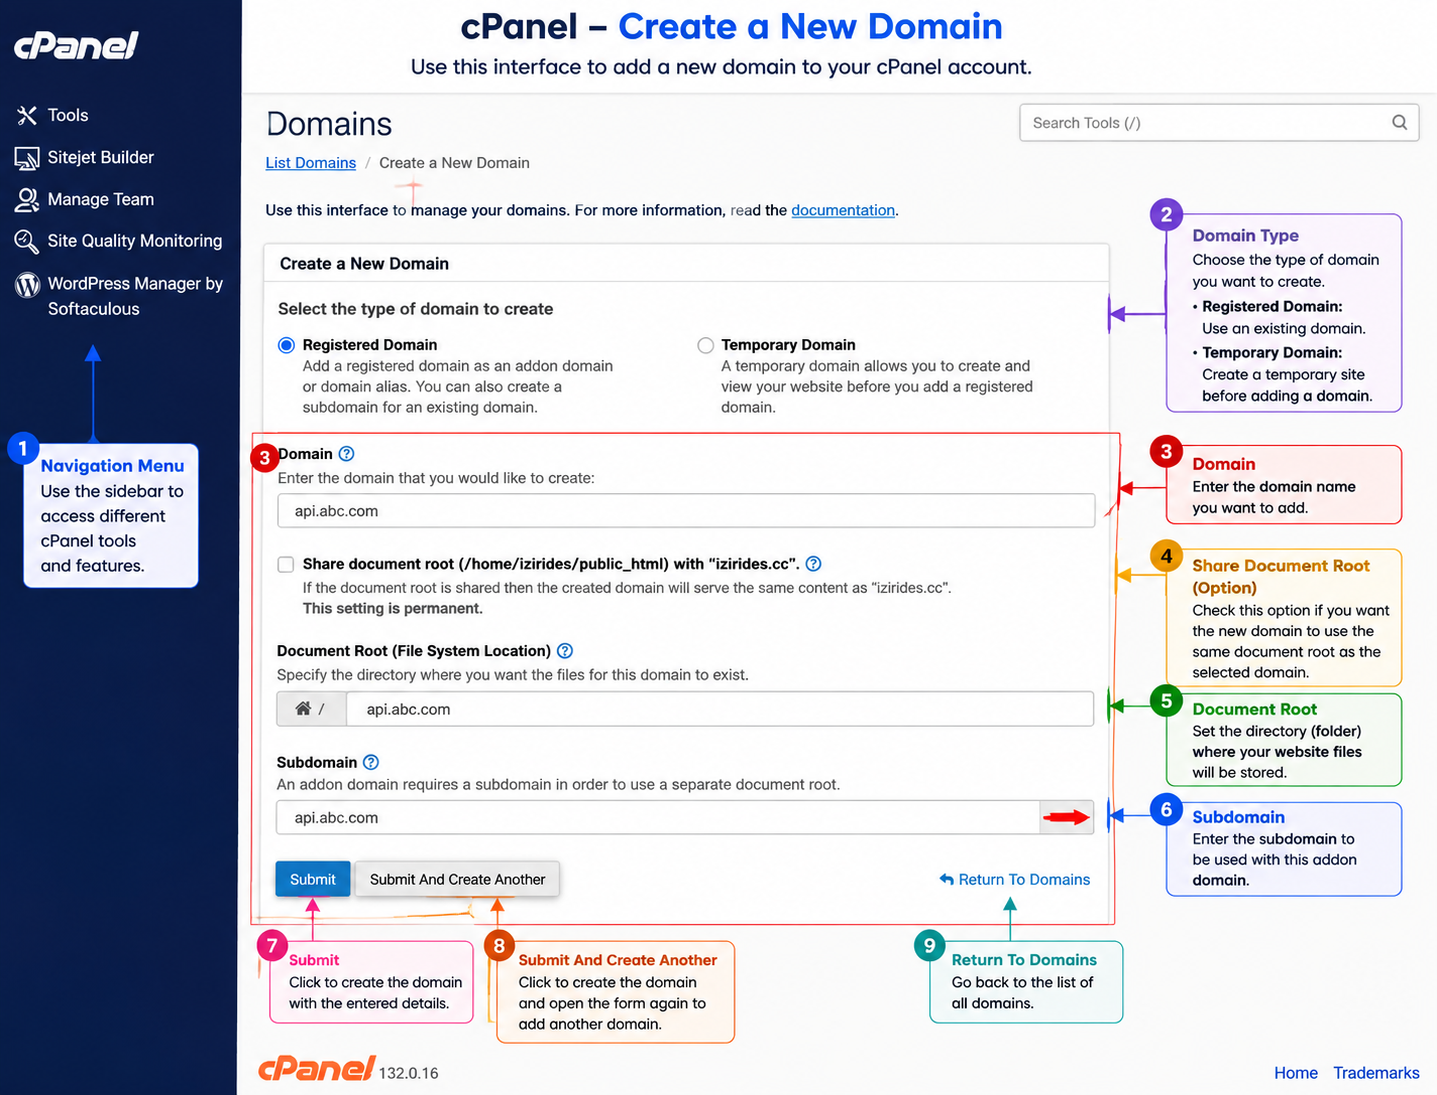
Step 4 — Create Subdomain For API
Go to Domains section and create a subdomain for API usage.
api.yoursite.com
⬆️ Replace this: yoursite.com is a generic example. Substitute your
own registered domain name here (e.g. if your domain is mycollege.com,
your subdomain would be api.mycollege.com).
Using a separate API subdomain improves security and performance.
Step 5 — Select Subdomain Directory
Select the installation directory for API files. Recommended folder:
public_html/api
ℹ️ This is a recommended folder name, not a fixed requirement — you may use a different directory name as long as it matches how your hosting panel created the subdomain's document root.
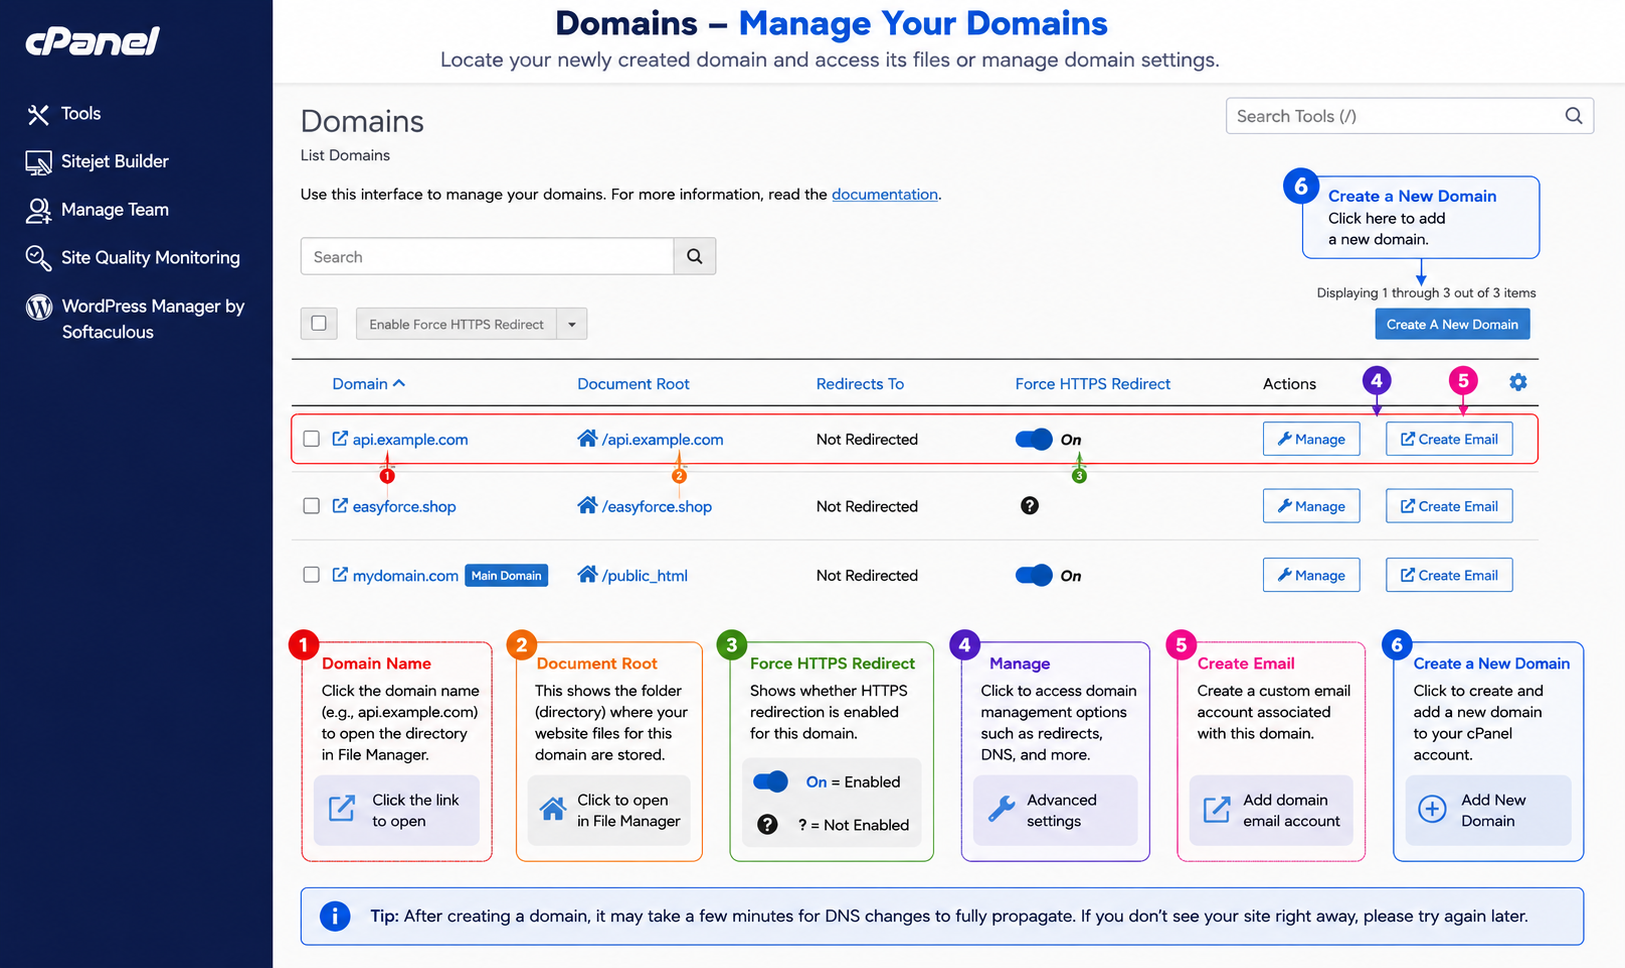
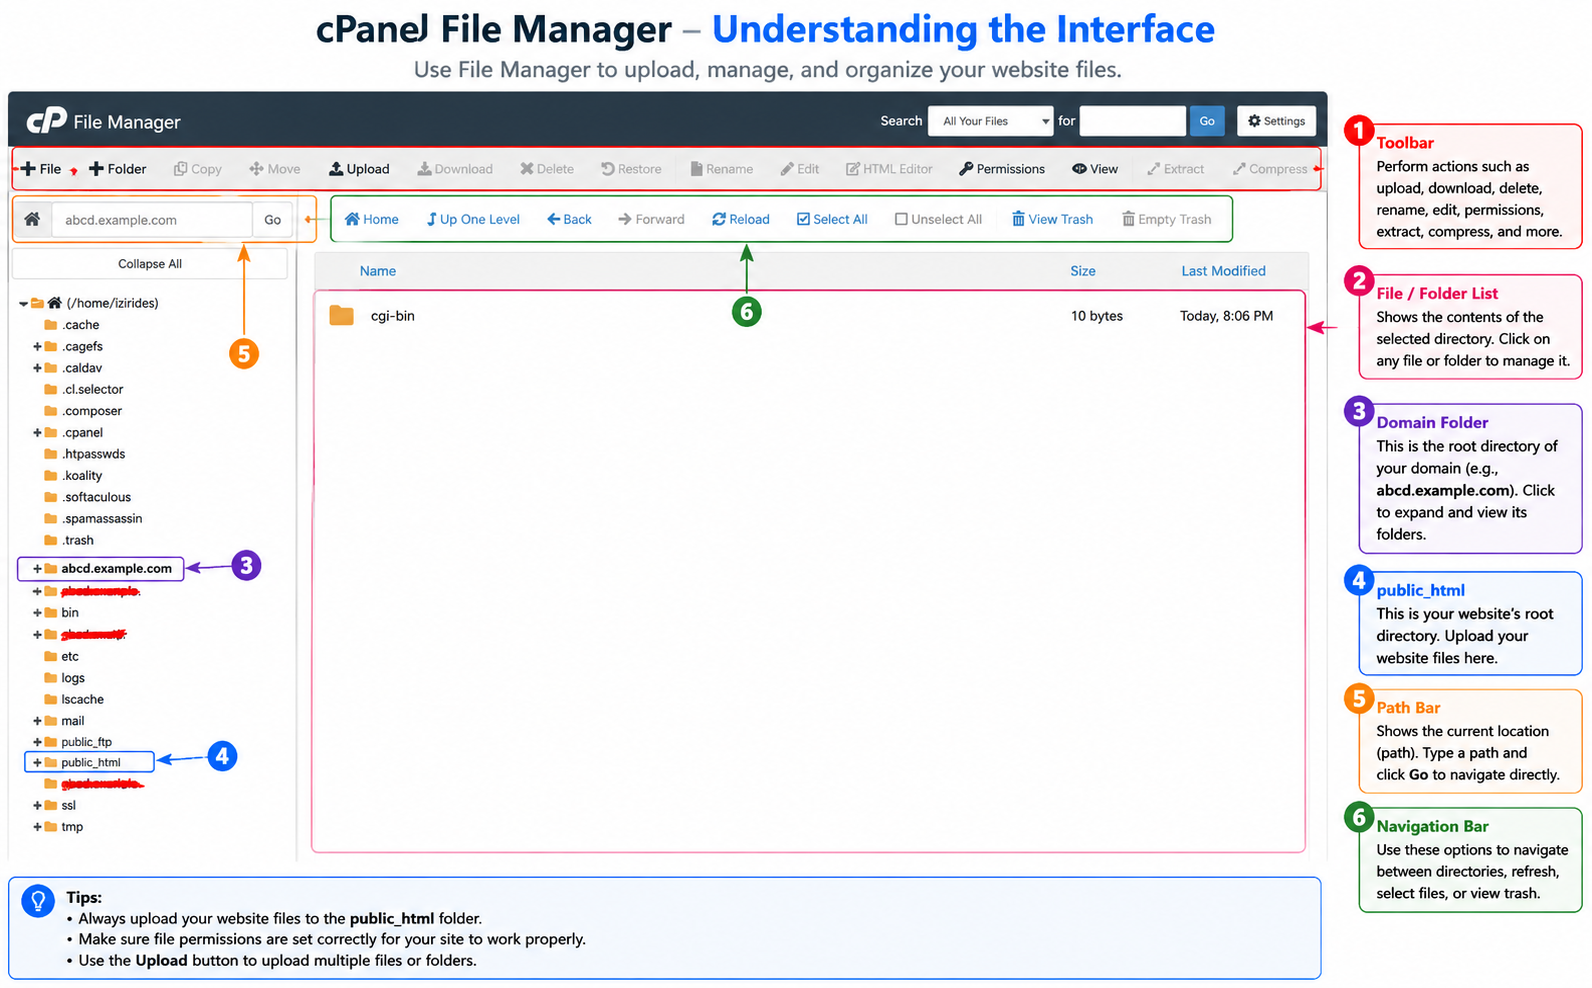
Step 6 — Open API Folder
Open the API folder from File Manager. This is where system files will be uploaded.
Step 7 — Upload System Files
Upload the following file into the API folder:
lms-api-code.zip
ℹ️ Use the exact ZIP filename included in your downloaded Envato package — the name shown here is illustrative and may differ slightly (e.g. include a version number) in your actual download.
After upload completes, extract the ZIP file.
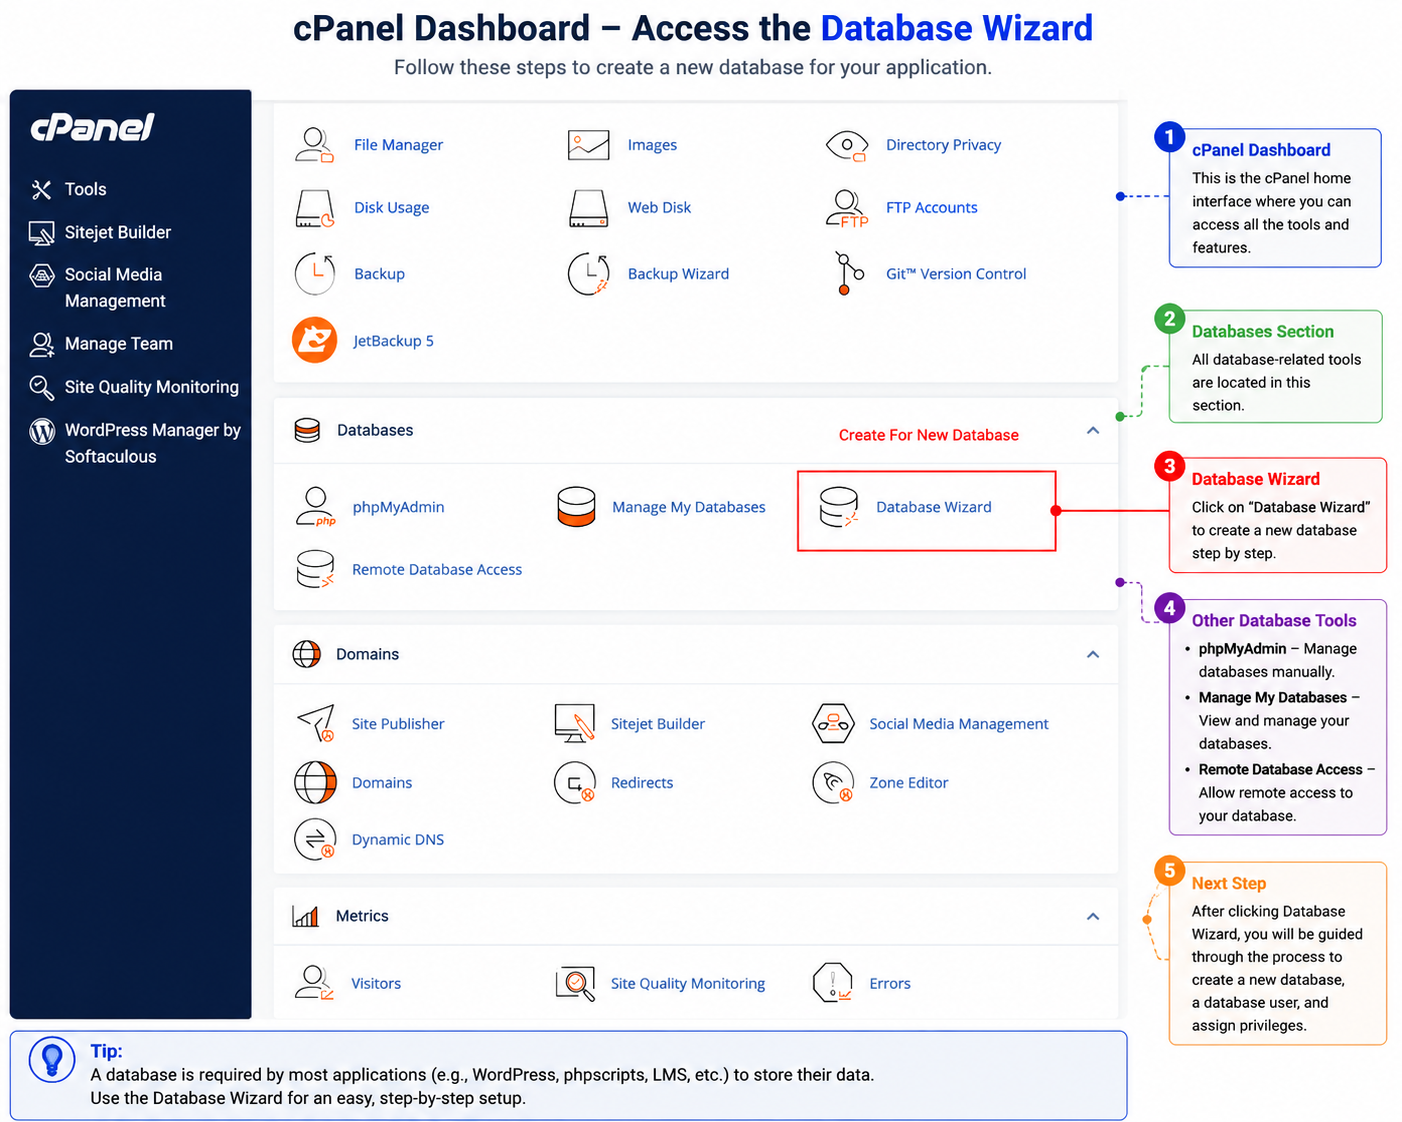
Step 8 — Create Database
Open MySQL Database Wizard from cPanel.
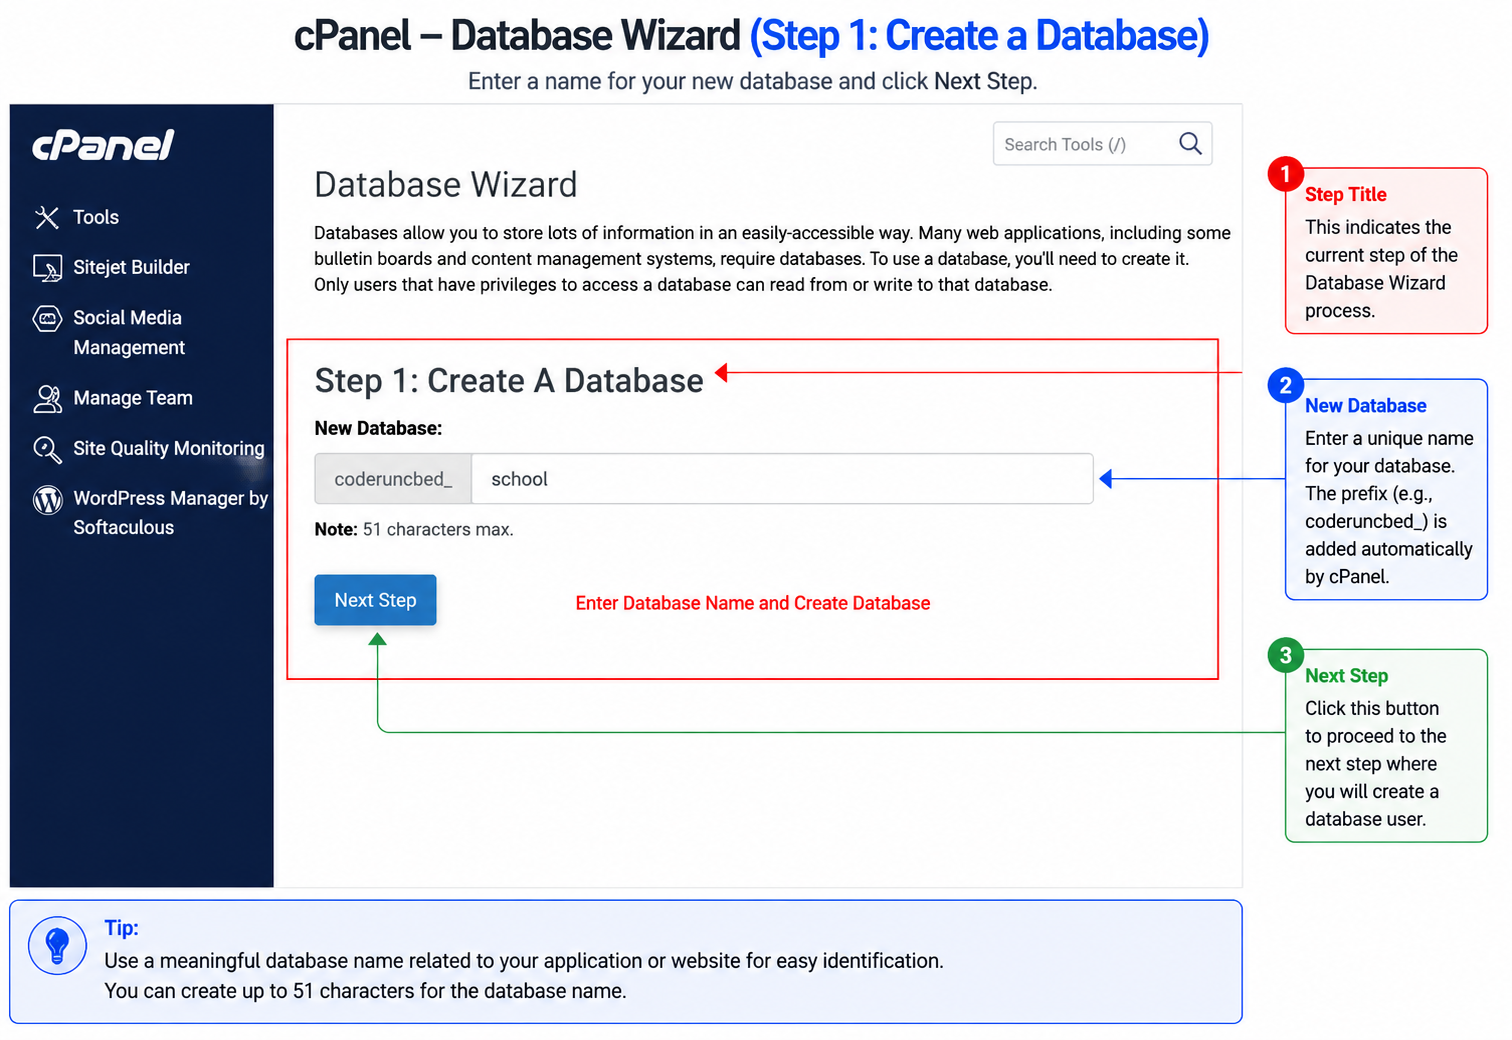
Step 9 — Create Database Name
Enter database name and click Next.
lms_db
⬆️ Replace this: lms_db is only a suggested name. Choose any
database name you like — just remember it, since you'll enter it again during
installation (Step 16). Note that many hosts automatically prefix it with your
cPanel username (e.g. cpaneluser_lms_db).
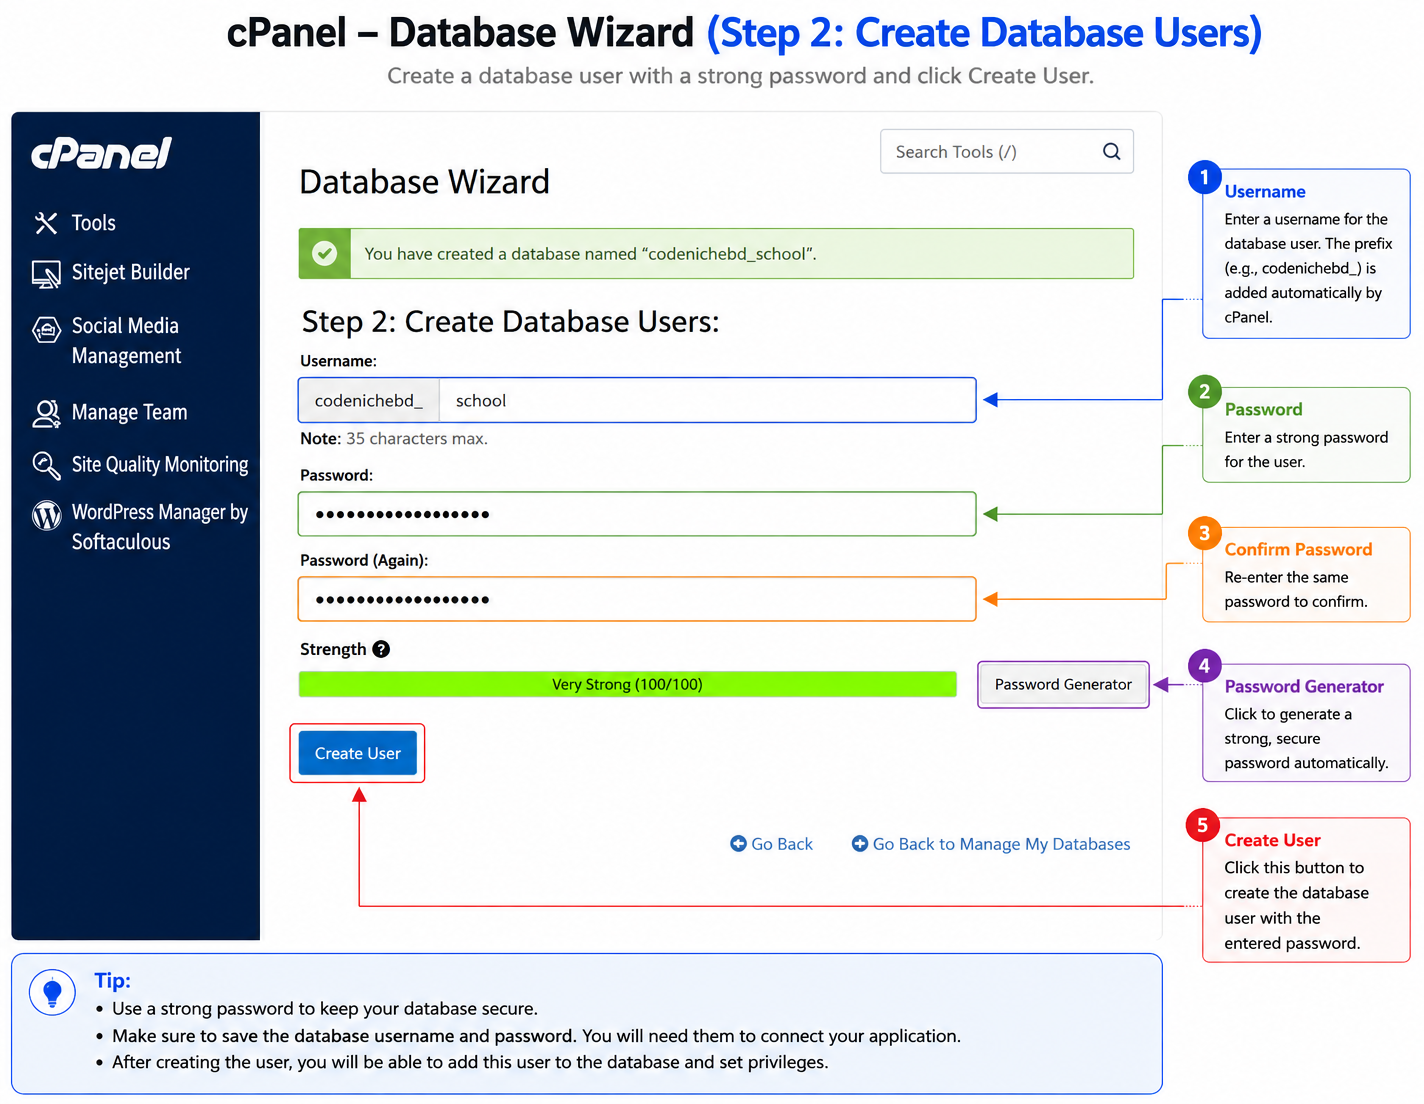
Step 10 — Create Database User
Create database username and password. Save these credentials safely.
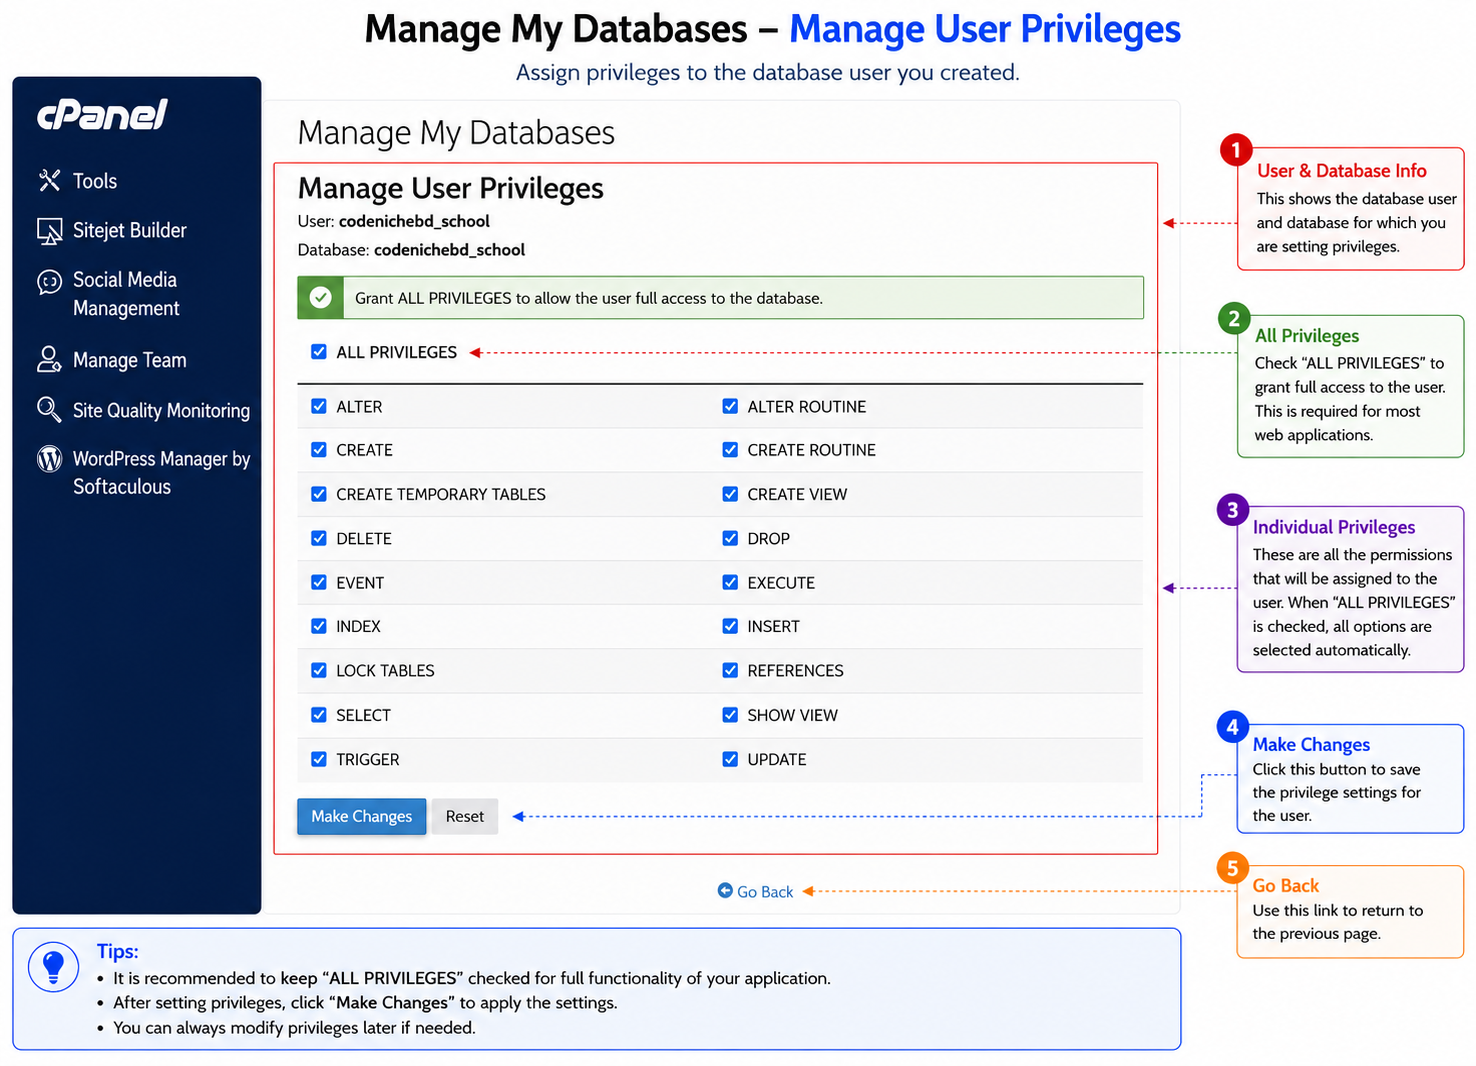
Step 11 — Assign Database Privileges
Select ALL PRIVILEGES and continue.
Step 12 — Open Installation Wizard
Open your browser and visit:
https://api.yoursite.com/install
⬆️ Replace this: swap yoursite.com for your own domain — this
should match the subdomain you created in Step 4.
Step 13 — Set Folder Permissions
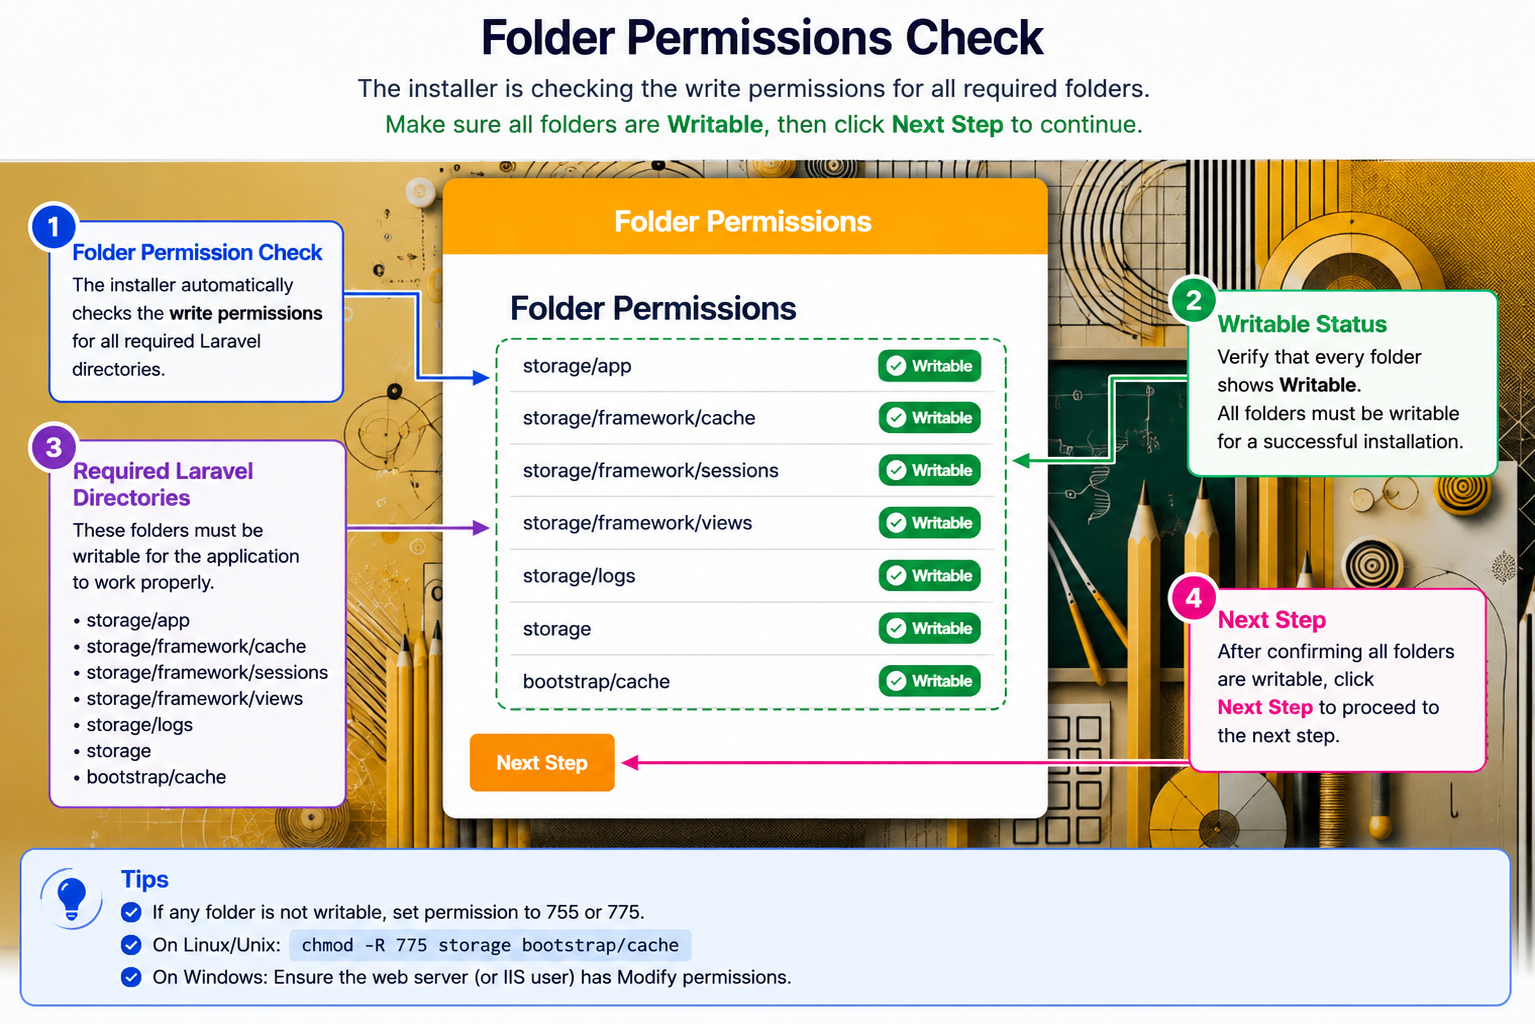
Set following folders permission to 775:
- storage
- bootstrap/cache
These permissions are required for Laravel caching, logs, sessions and uploads.
Step 14 — Server Requirement Verification
Installer will automatically verify:
- PHP Version
- Required PHP Extensions
- Writable Folder Permissions
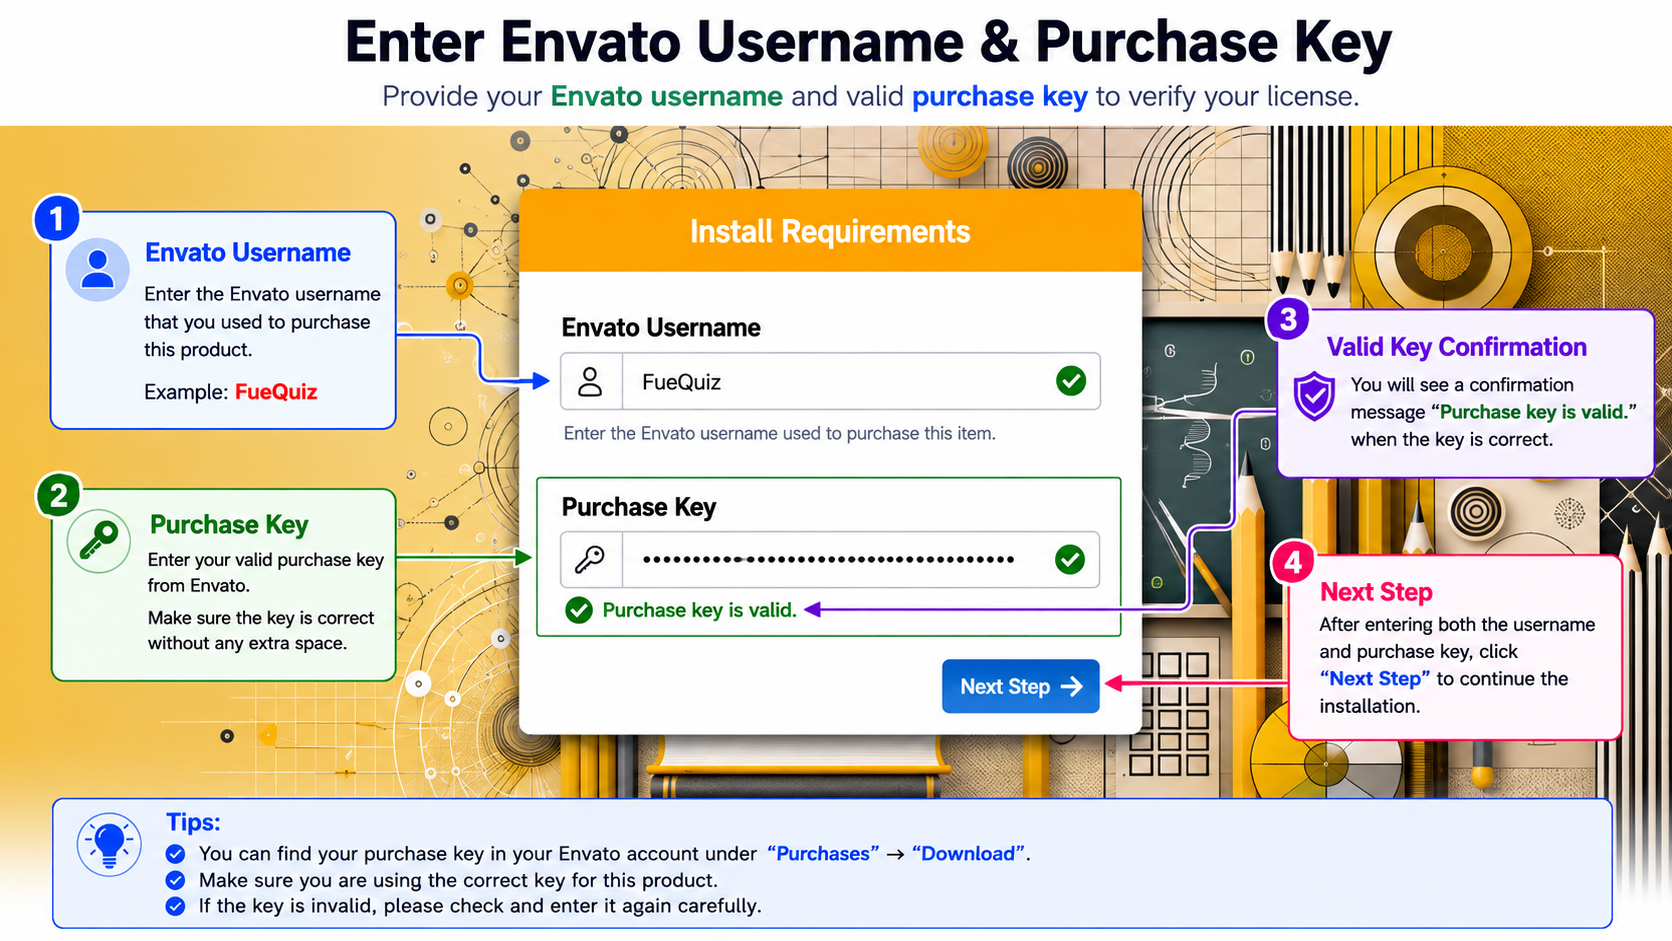
Step 15 — Purchase Code Verification
Enter your Envato purchase code and username to activate your license.
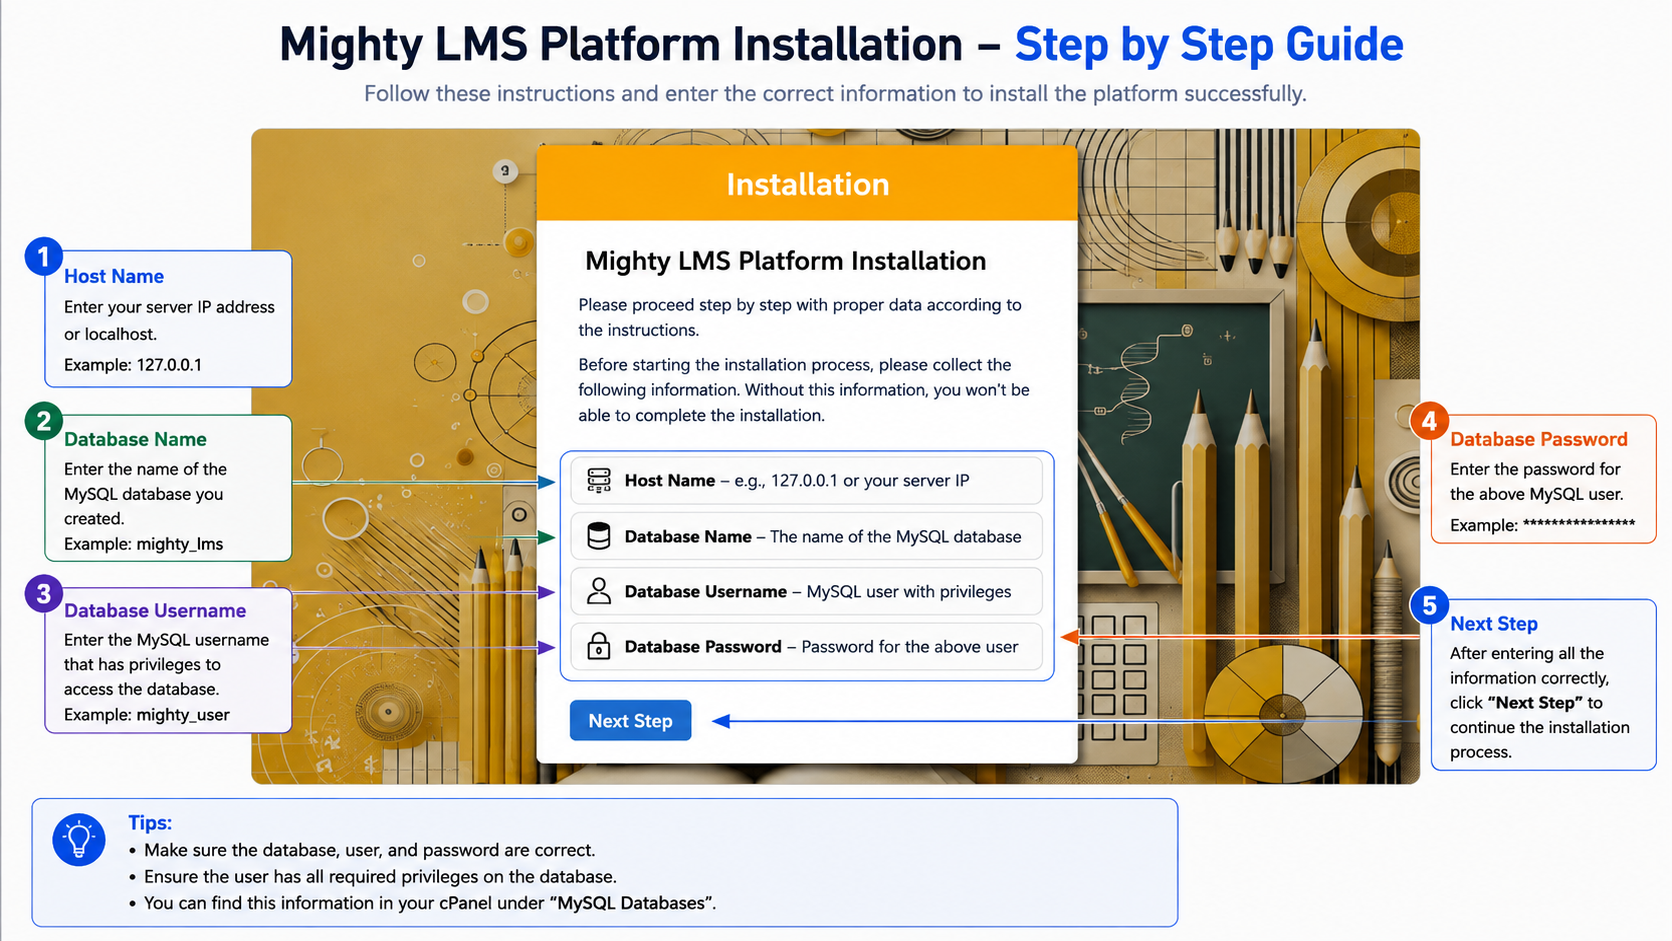
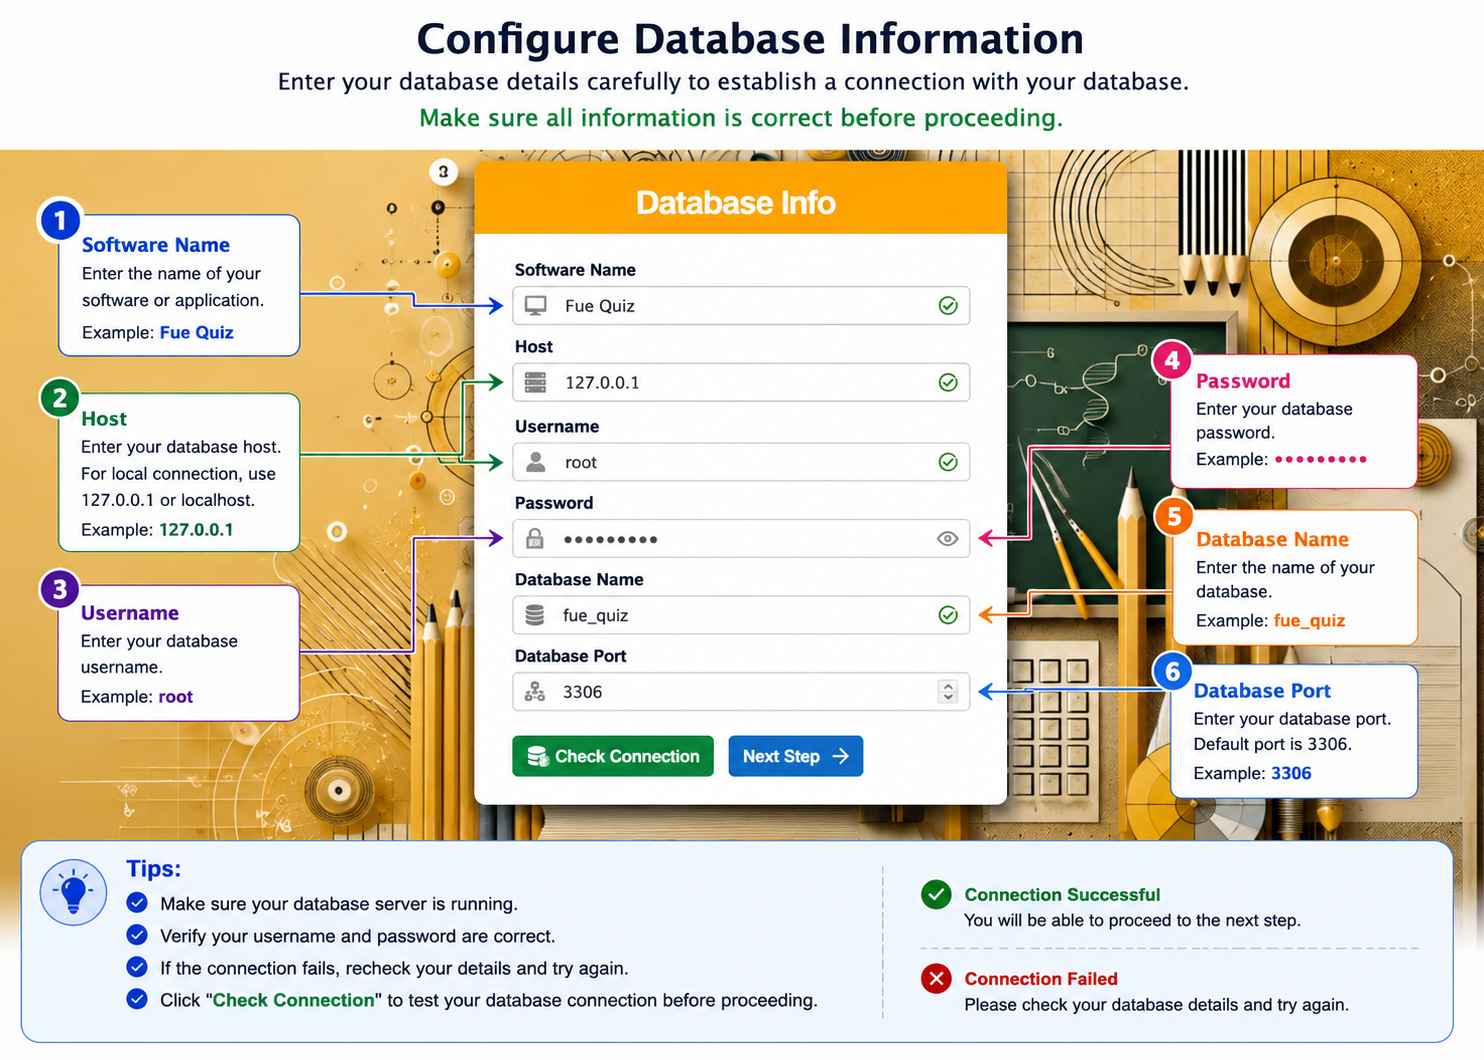
Step 16 — Database Configuration
Enter your database credentials:
- Database Name — the value you set in Step 9
- Database Username — the value you set in Step 10
- Database Password — the value you set in Step 10
- Database Host (usually
localhost)
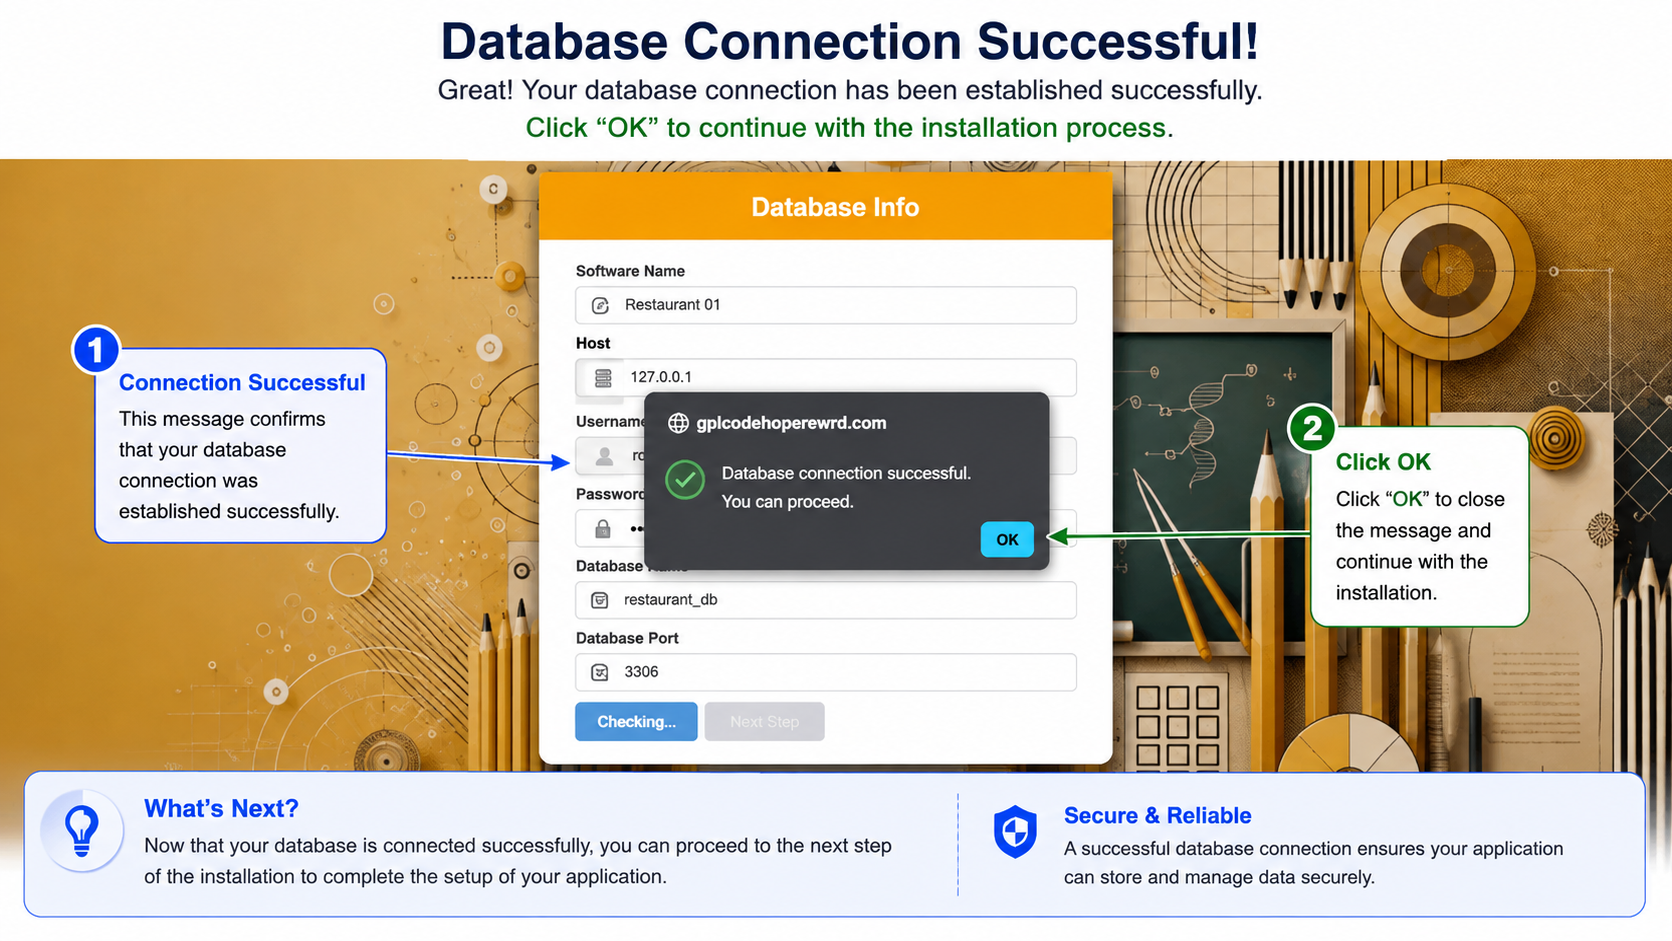
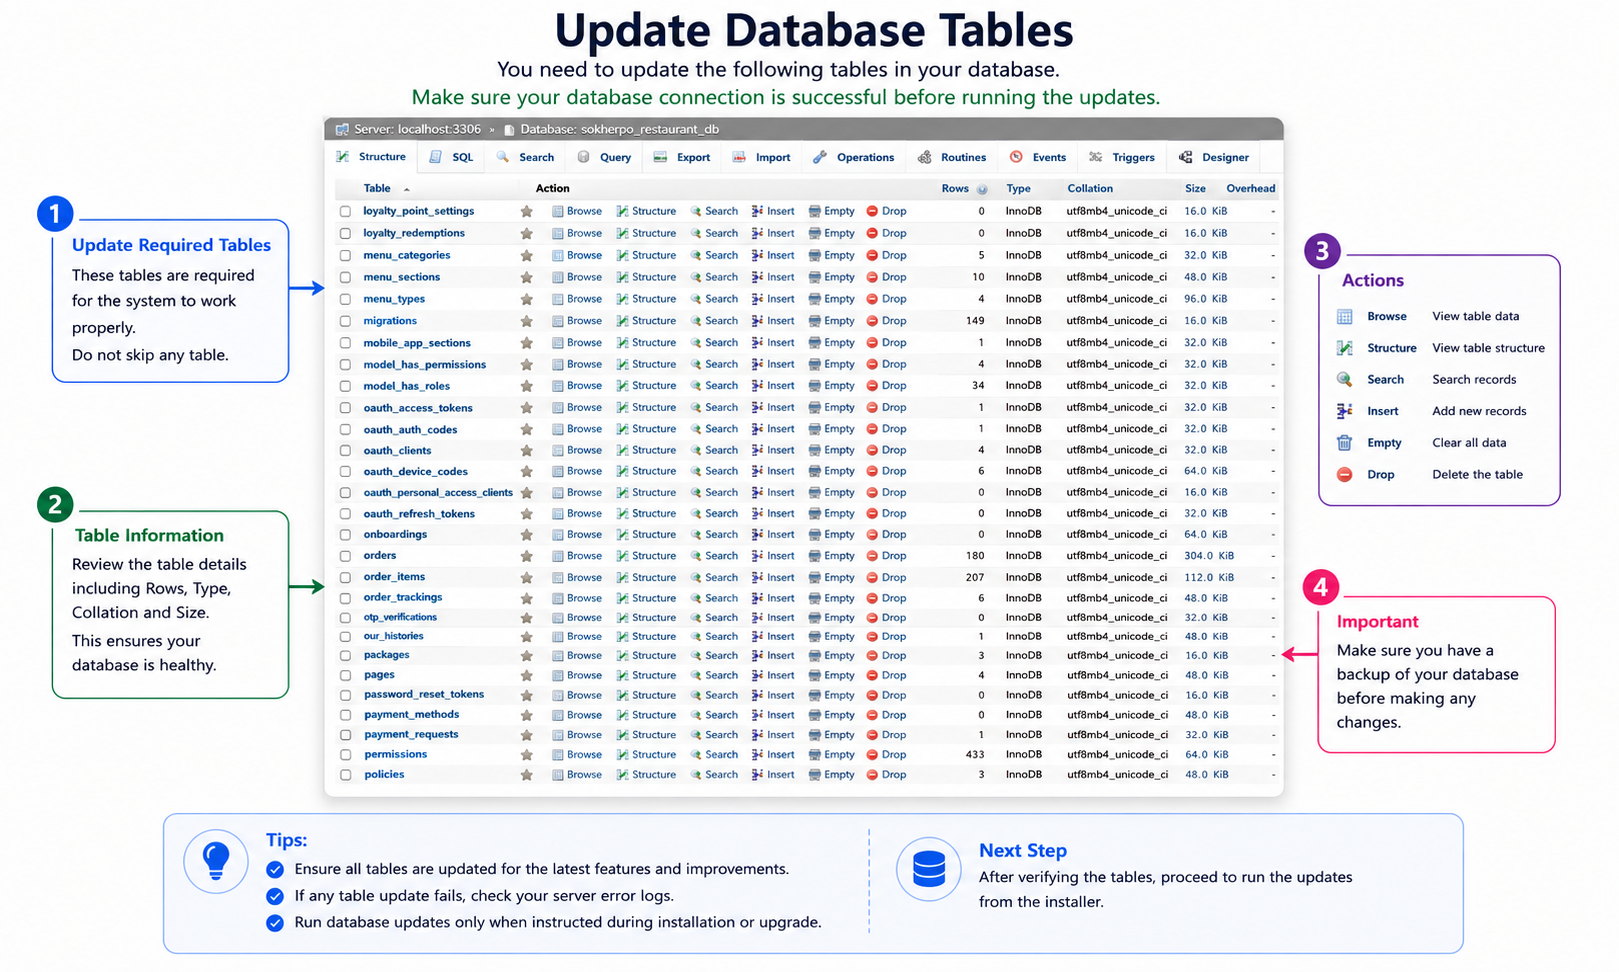
Step 17 — Test Database Connection
Click Test Connection. If successful, continue to next step.
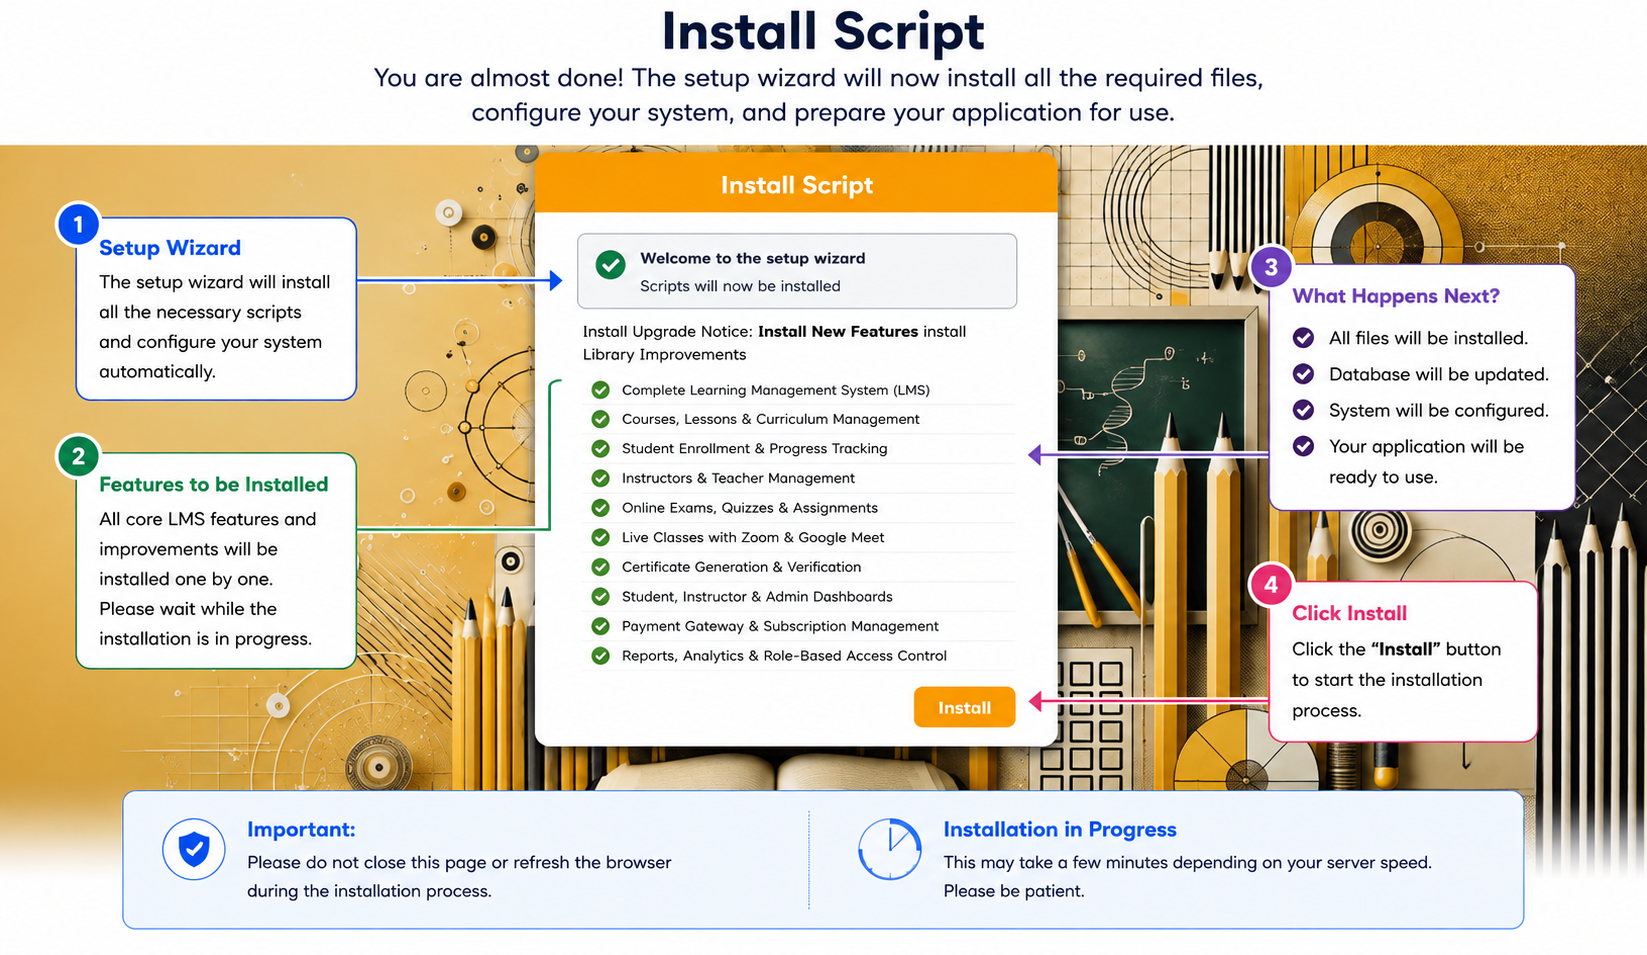
Step 18 — Installation Processing
System will now:
- Create database tables
- Insert demo data
- Generate application key
- Optimize configuration
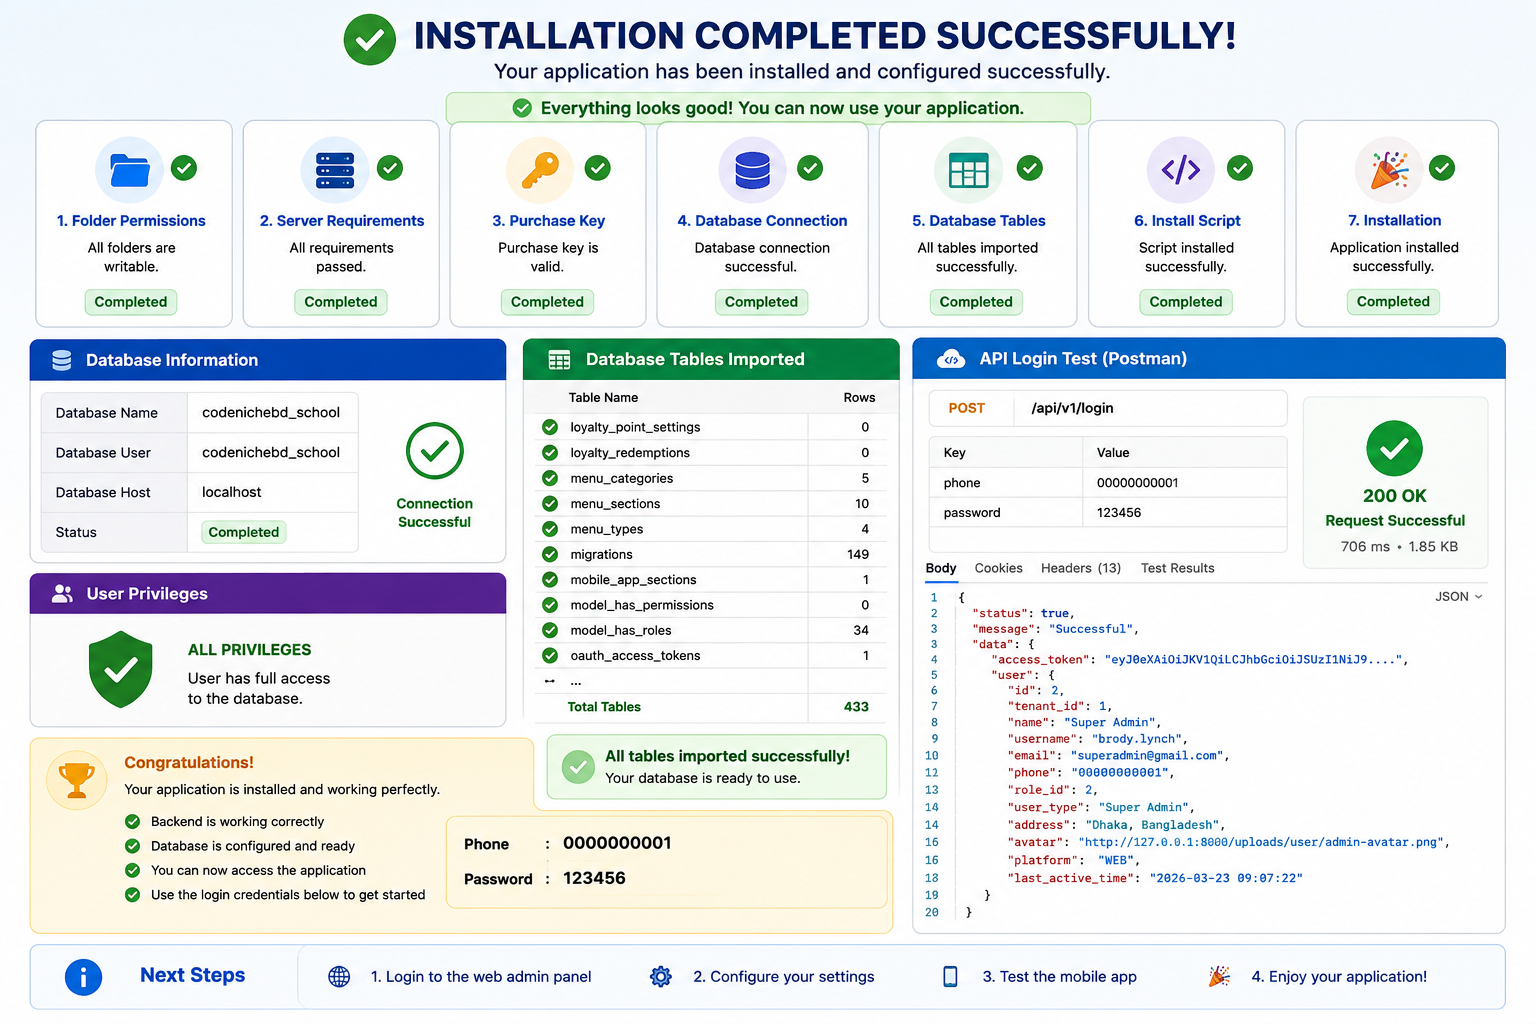
Step 19 — Installation Completed Successfully
Installation completed successfully. You can now login to the admin panel and start using the system.
Step 20 — Test API Using Postman
Import the provided Postman collection and verify that all API endpoints are working correctly. The collection ships directly inside the delivered package — see Postman Collection for its exact location and import steps.
⚠️ Important Post-Installation Notes
-
Storage & File Permission Setup:
If you face file upload or access issues, set proper permissions for thestorageandbootstrap/cachedirectories.
Recommended:chmod -R 775 storage bootstrap/cache
(or660 / 600depending on your server configuration) -
Laravel Passport Key Permissions:
Ensure proper permissions are set for Passport OAuth keys:storage/oauth-private.keyandstorage/oauth-public.key
Recommended:chmod 600 storage/oauth-private.key
chmod 644 storage/oauth-public.key
If keys are missing, generate them using:php artisan passport:install -
Storage Link:
Make sure the storage link is created correctly:php artisan storage:link
Also verify that files are accessible from thepublic/storagedirectory. -
First Domain Setup (Important):
After installation, manually update your primary domain in the database.
Go to theshopstable and set your current domain in thedomaincolumn.
This step is required only for the first-time setup.
Installation on Local Server (XAMPP / Laragon / WAMP)
Follow the steps below for localhost installation:
- Install XAMPP, Laragon or WAMP
- Start Apache and MySQL services
- Ensure PHP version is 8.2+
Create database using phpMyAdmin:
http://localhost/phpmyadmin
Extract project files into:
htdocs/lms-api
⬆️ Replace this: lms-api is just a suggested folder name — you can
name this folder anything you like, but you must use the same name consistently
in the install URL below.
Open installer:
http://localhost/lms-api/public/install
⬆️ Make sure lms-api here matches exactly the folder name you used above.
Follow the same installation steps as Live Server.
🖥️ Deployment Environments: Shared Hosting vs VPS
Mighty LMS will run on either shared hosting or a Virtual Private Server (VPS), but the two environments behave differently once you have real students, instructors, and traffic on the platform. This section explains what each option gives you, what it takes away, and how to configure Mighty LMS correctly on each.
Quick Comparison
| Factor | Shared Hosting | VPS / Cloud Server |
|---|---|---|
| Setup difficulty | Low — cPanel/DirectAdmin wizards handle most steps | Higher — you provision PHP, MySQL, a web server, and SSL yourself (or via a control panel) |
| Cost | Low, fixed monthly fee | Starts higher, scales with the resources you choose |
| Control over PHP/MySQL versions | Limited to what the host offers, sometimes via a version switcher | Full control — install and pin any supported version |
| Queues / scheduled jobs (cron) | Usually available but limited in frequency (e.g. every 5–15 min minimum) | Full control — run queue:work as a persistent process (Supervisor) and cron at any interval |
| Outbound connections (license check, webhooks, SMTP) | Sometimes restricted by the host's firewall — may need domains allowlisted | Generally unrestricted, but you manage your own firewall (ufw/iptables/security groups) |
| Performance under load | Shared CPU/RAM with other tenants on the same server | Dedicated resources for your instance; scales with concurrent students/quiz-takers |
| Server maintenance | Handled by the host | Your responsibility — OS updates, PHP patching, security hardening |
| Best fit | Small institutions, pilots, low-to-moderate concurrent users | Larger student bases, live classes, frequent quiz spikes, multi-tenant setups |
Configuring Mighty LMS on Shared Hosting
The Installation on Live Server steps above already assume a typical cPanel/DirectAdmin shared-hosting environment. A few extra points specific to shared hosting:
-
PHP version selector: most shared hosts expose a "Select PHP Version" or
"MultiPHP Manager" tool in cPanel. Make sure it's set to PHP 8.2 or higher
and that the required extensions (see Step 3) are enabled there —
extensions enabled in
php.iniglobally don't always apply per-domain. -
Cron jobs: shared hosts typically restrict the minimum cron interval (often
5 minutes). Set the Laravel scheduler to run every 5 minutes via cPanel's Cron
Jobs tool. Replace the path below with your own account's home directory and
installation folder:
* * * * * cd /home/YOUR_USERNAME/public_html/api && php artisan schedule:run >> /dev/null 2>&1
-
Queues: shared hosts rarely allow long-running background processes
(
php artisan queue:work). Instead, setQUEUE_CONNECTION=syncin.envso jobs (emails, notifications) run inline, or use the cron-drivenqueue:work --stop-when-emptypattern triggered every minute if your host permits it. - Outbound HTTPS: confirm the licensing domain (see the notice in Step 1), your SMTP provider, and any payment webhook endpoints are not blocked by the host's outbound firewall — this varies between providers and is worth checking with support before you install.
-
Resource limits: shared hosts often cap PHP memory (
memory_limit), execution time (max_execution_time), and concurrent processes. If large quiz imports or bulk certificate generation time out, ask your host to raise these limits or move to a VPS.
Configuring Mighty LMS on a VPS
On a VPS you're responsible for the full stack, but you gain the ability to run persistent queue workers, tune PHP-FPM, and scale resources as your student base grows.
Option A — Use a Server Control Panel
Panels such as CloudPanel, ServerAvatar, RunCloud, or Plesk give you a cPanel-like experience on top of a raw VPS (domain/SSL management, PHP version switching, one-click MySQL databases) while still letting you SSH in for anything the panel doesn't cover. This is the easiest path if you're used to shared hosting but need VPS-level resources.
Option B — Manual LEMP/LAMP Stack
For full control, provision the stack yourself. A typical Ubuntu-based setup:
-
Install PHP 8.2+, the required extensions, and Composer:
sudo apt update
sudo apt install php8.2 php8.2-fpm php8.2-mysql php8.2-mbstring php8.2-xml \
  php8.2-curl php8.2-gd php8.2-fileinfo unzip -y
curl -sS https://getcomposer.org/installer | php
sudo mv composer.phar /usr/local/bin/composer
-
Install and secure MySQL/MariaDB:
sudo apt install mysql-server -y
sudo mysql_secure_installation
-
Install Nginx (or Apache) and point a server block at
public_html/api/public, then issue a free TLS certificate with Certbot:sudo apt install nginx -y sudo apt install certbot python3-certbot-nginx -y sudo certbot --nginx -d api.yoursite.com
- Upload/clone the Mighty LMS files and follow the same database, permissions, and installer wizard steps described in the Live Server installation section — the installer itself behaves identically once the stack is in place.
-
Run the queue as a persistent worker instead of
syncmode, using Supervisor so it restarts automatically if it crashes or the server reboots. Replace the paths below with your own deployment user and installation directory:sudo apt install supervisor -y
Create/etc/supervisor/conf.d/lms-worker.conf:[program:lms-worker] process_name=%(program_name)s_%(process_num)02d command=php /home/YOUR_USERNAME/public_html/api/artisan queue:work --sleep=3 --tries=3 autostart=true autorestart=true numprocs=2 user=www-data redirect_stderr=true stdout_logfile=/home/YOUR_USERNAME/public_html/api/storage/logs/worker.log
Then reload Supervisor:sudo supervisorctl reread sudo supervisorctl update sudo supervisorctl start lms-worker:*
-
Add the Laravel scheduler to cron at the standard one-minute interval (VPS cron has no
minimum-interval restriction):
* * * * * cd /home/YOUR_USERNAME/public_html/api && php artisan schedule:run >> /dev/null 2>&1
When to Move From Shared Hosting to a VPS
Consider migrating if you notice any of the following:
- Quiz submissions or bulk certificate generation time out or return 500 errors under load
- You need real-time or near-real-time notification delivery (queue workers, not
syncmode) - Concurrent exam sessions regularly exceed a few dozen students at once
- You're running multiple tenants/domains off a single installation
- Your host's PHP/MySQL versions lag behind what a new Mighty LMS release requires
Migrating later is a database + storage directory move — see
Database Backup & Restore for the backup/restore
commands and Multi-Tenant Domain Management for updating the
domain on record once you're live on the new server.
📱 App Setup
MightyLMS allows you to quickly set up and launch your own quiz and online exam application with minimal configuration.
You can easily customize app branding, connect with the backend API, and configure essential settings for managing question banks, quizzes, and exams.
The setup process ensures a smooth deployment experience, enabling you to start creating and conducting exams for students or users in no time.
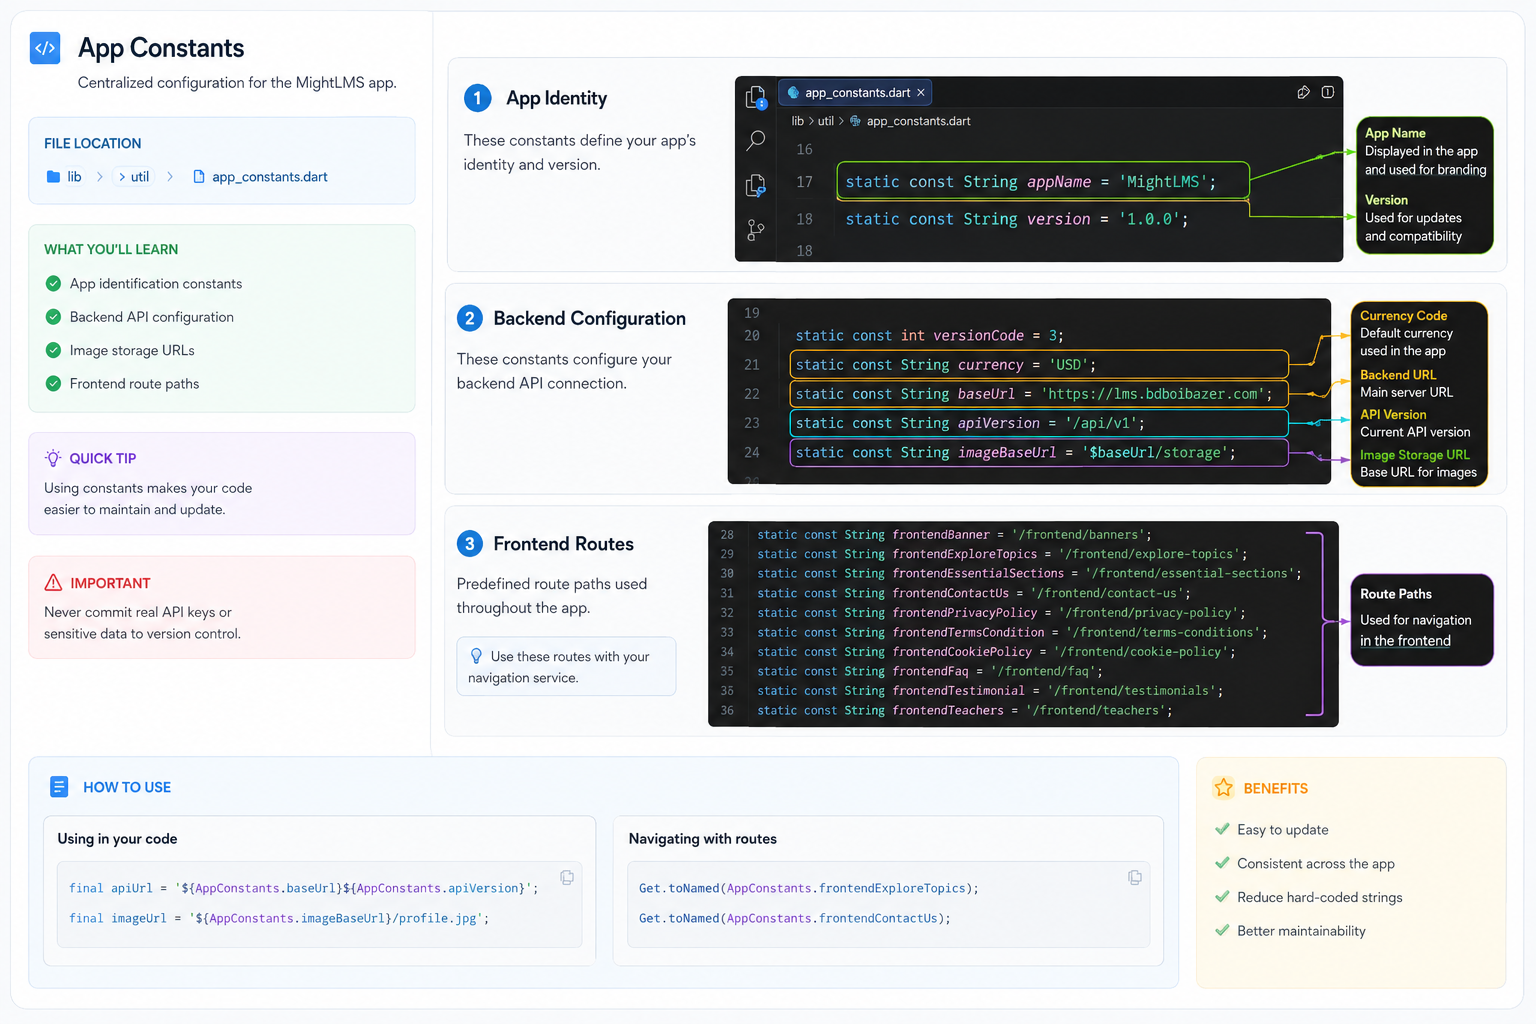
🌐 Set Base URL
Open the following file:
lib/util/app_constants.dart
Update the base URL:
static const String baseUrl = "https://api.domain.com";
The Base URL must be your API server domain, not your website or admin panel domain.
Example:
✅ Correct: https://api.yourdomain.com
❌ Incorrect: https://yourdomain.com
Rebuild the app after updating.
🎨 Theme Configuration
Mighty LMS supports both Light Mode and Dark Mode. Theme settings can be customized from the theme files located in:
lib/theme/
Open the theme files and update colors, text styles, card styles, and other visual properties according to your branding requirements.
Theme Files Location
lib/
 └── theme/
      ├── light_theme.dart
      └── dark_theme.dart
The Light Theme controls the appearance of the application in normal mode, while the Dark Theme controls the appearance when dark mode is enabled.
After making changes, rebuild the application:
flutter clean
flutter pub get
flutter run
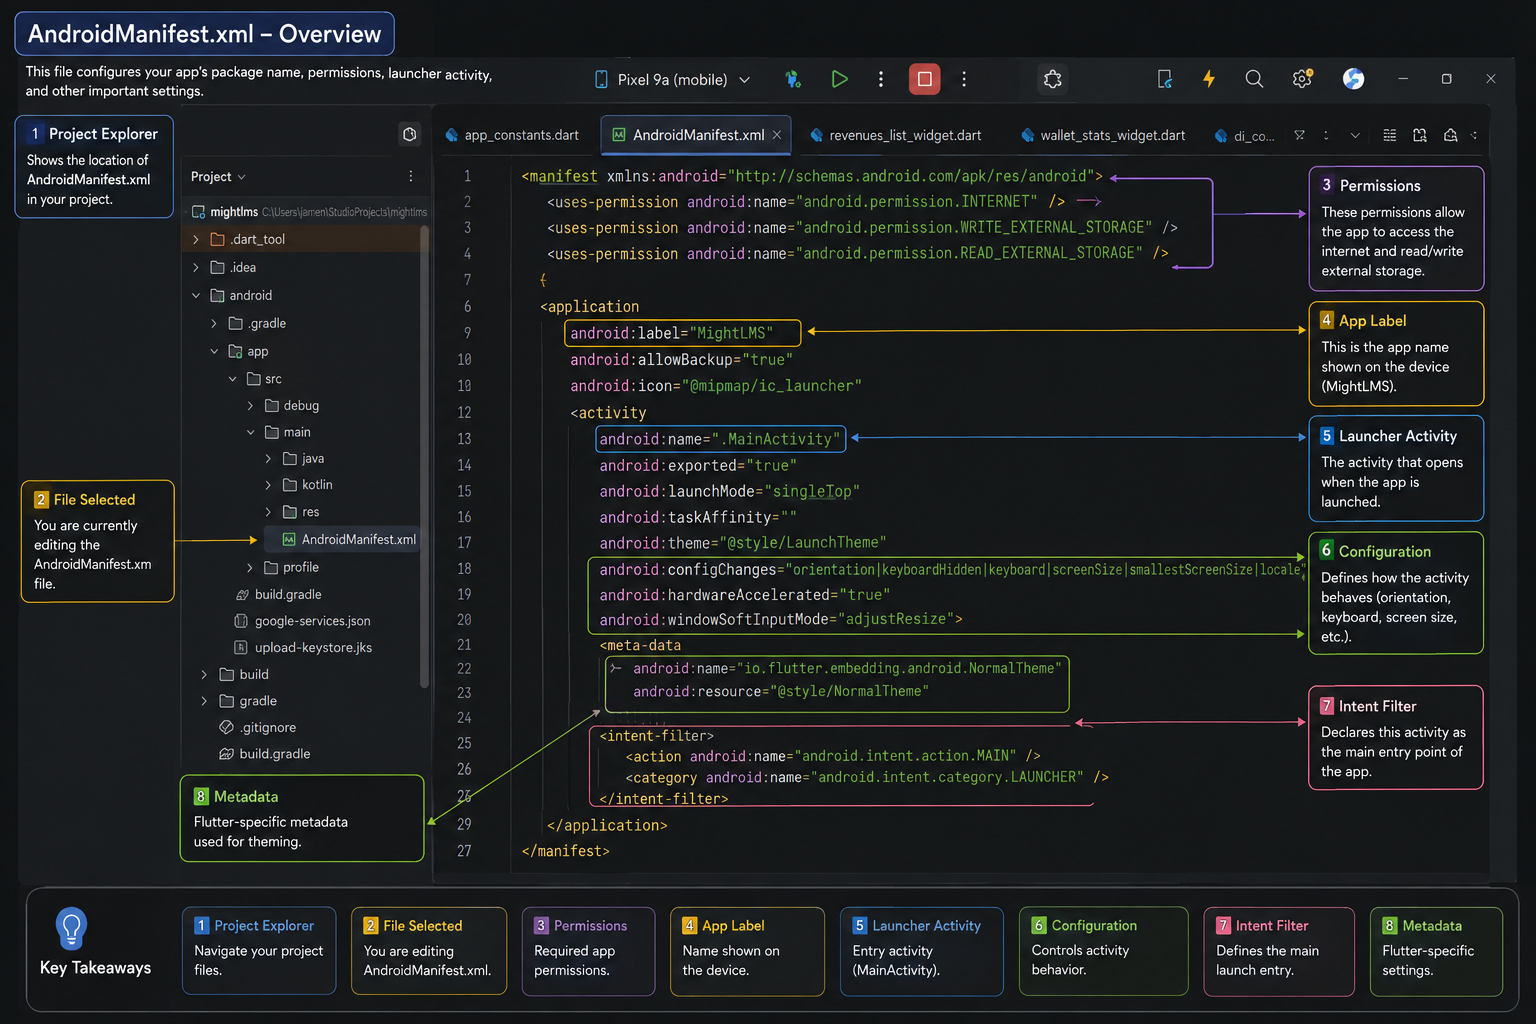
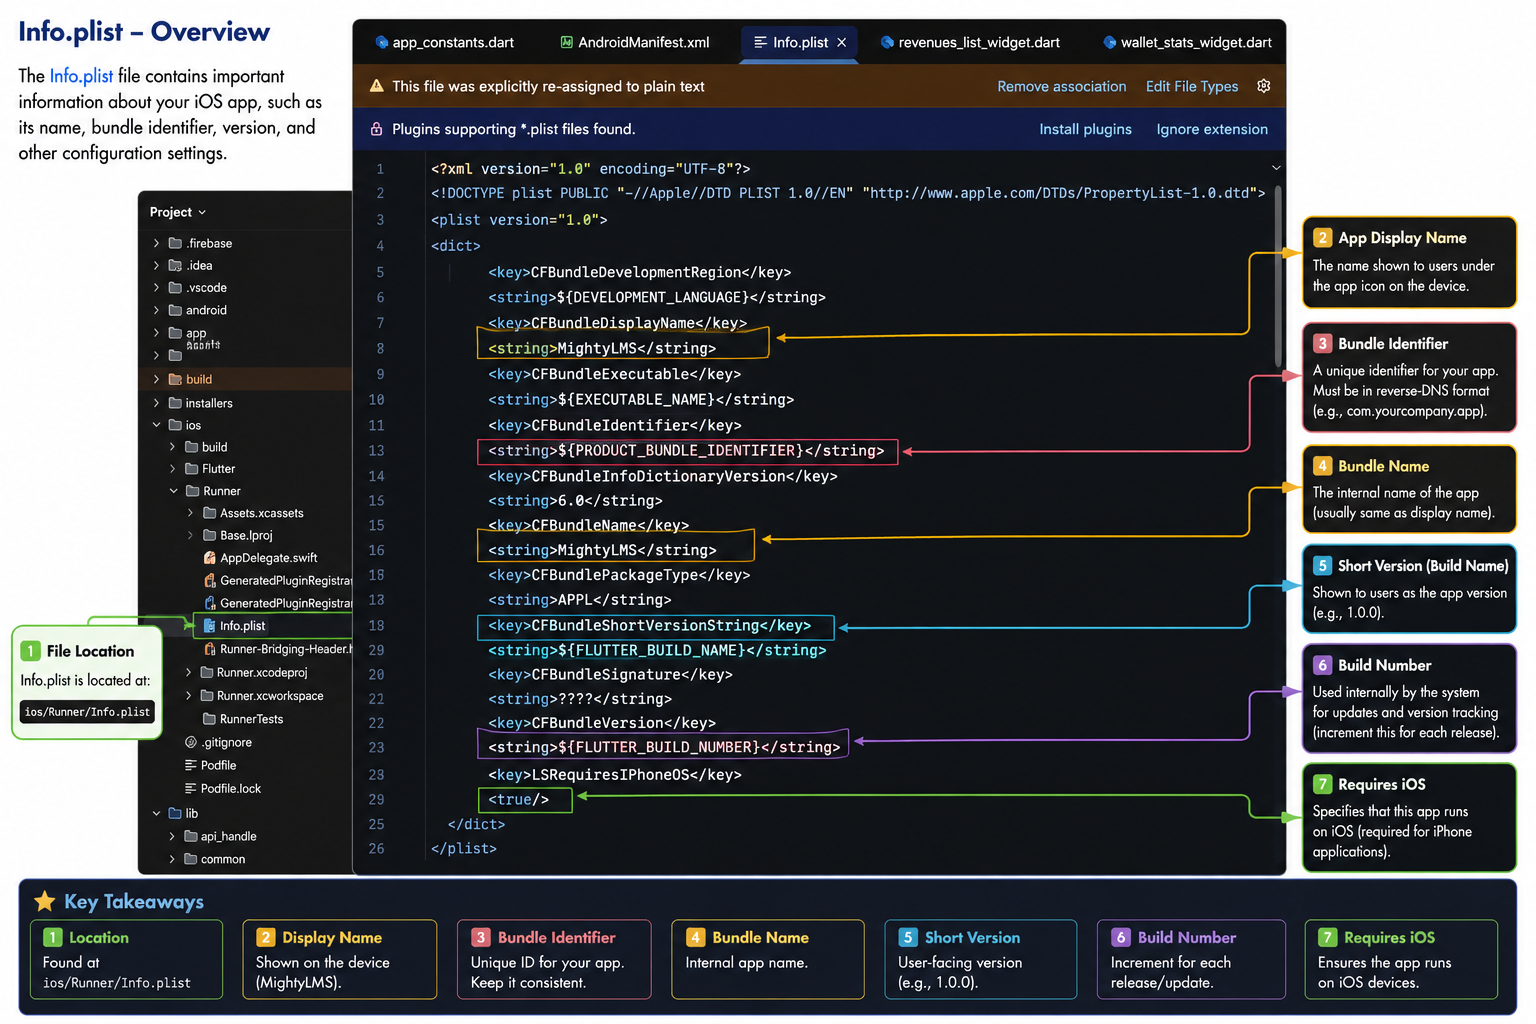
Change App Name
- Edit
appNameinlib/util/app_constants.dart - Update label in
AndroidManifest.xml - Update app name in
Info.plist
Change App Package Name
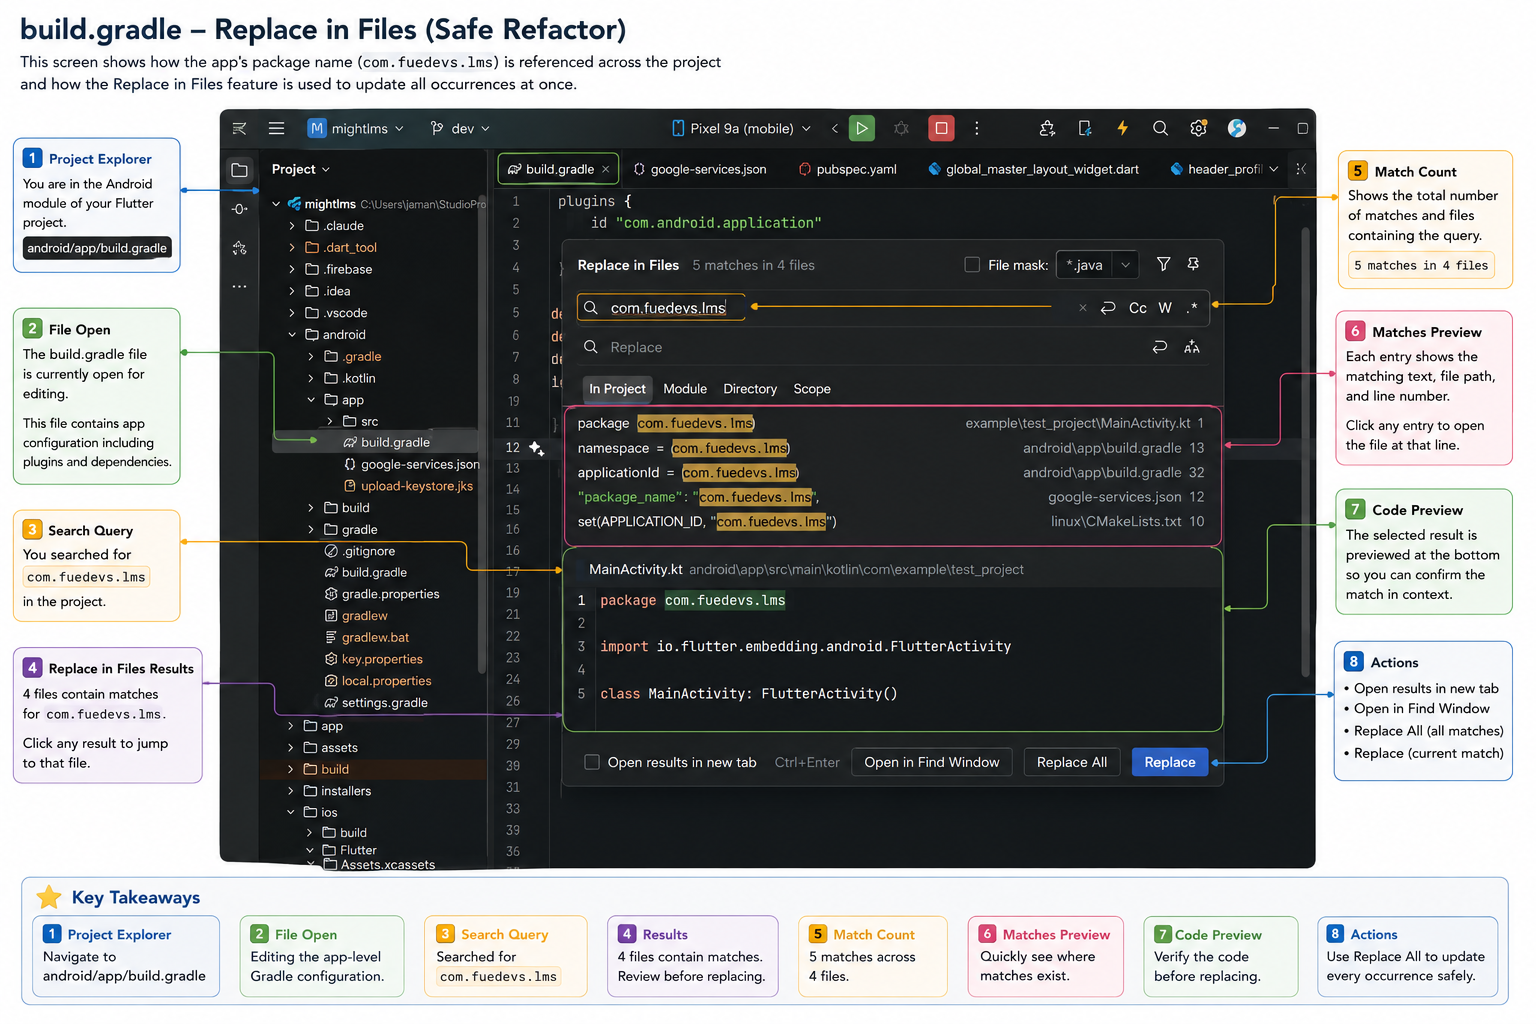
The Android package name should be updated before publishing the application. To begin, open the following file:
android/app/build.gradle
Inside the android section, locate the namespace entry:
android {
    namespace = "com.fuedevs.lms"
}
Select the current namespace value and use the IDE’s global search and replace feature to update it throughout the project.
- Windows / Linux:
Ctrl + Shift + R - macOS:
Command + Shift + R
This ensures that the old package name is replaced consistently in all necessary files and directories.
Files to Review
android/app/build.gradleandroid/app/src/main/AndroidManifest.xmlandroid/app/src/debug/AndroidManifest.xmlandroid/app/src/profile/AndroidManifest.xmlandroid/app/src/main/java/orandroid/app/src/main/kotlin/
After completing the replacement, clean and rebuild the project using:
flutter clean
flutter pub get
flutter run
⚠ Warning: Any incorrect or incomplete package name replacement may result in build errors or integration issues.
Change App Icon
You can personalize the app to reflect your own brand by updating the logo, app icon, splash screens, colors, fonts, and other visual elements. This ensures a consistent and professional look across the entire application.
2. Change App Icon
To replace the app icon, you need to generate all required icon sizes for Android and iOS. A recommended tool for this is: https://www.appicon.co/
- Upload your base icon to the generator and download the generated package.
- Android: Go to
android/app/src/main/resand replace allmipmap-*folders with the corresponding folders from the generated Android icon package. - iOS: Go to
ios/Runner/Assets.xcassetsand replaceAssets.xcassetswith the generated iOSAssets.xcassetsfolder.
Important: Keep the folder structure and file names exactly as in the generated package. Incorrect replacement may cause icons not to appear in the app.
3. Apply Changes
After updating the logo and icon, run the following commands to apply changes properly:
flutter clean
flutter pub get
flutter run
By following these steps, you can fully customize your app branding with minimal effort.
🔥 Firebase Configuration
Mighty LMS uses Firebase for Push Notifications (FCM) and other Firebase services. Before running the application, you must connect your Flutter project with Firebase.
Firebase setup is required for Push Notifications (FCM) in the Flutter mobile app. Make sure you complete both Android and iOS configuration steps.
Step 1: Create a Firebase Project
- Go to the Firebase Console.
- Click Create a project (or Add project).
- Enter your project name (e.g., "Mighty LMS").
- Optionally enable Google Analytics (recommended for push notification analytics).
- Click Create Project and wait for the setup to complete.
- Click Continue to open the project dashboard.
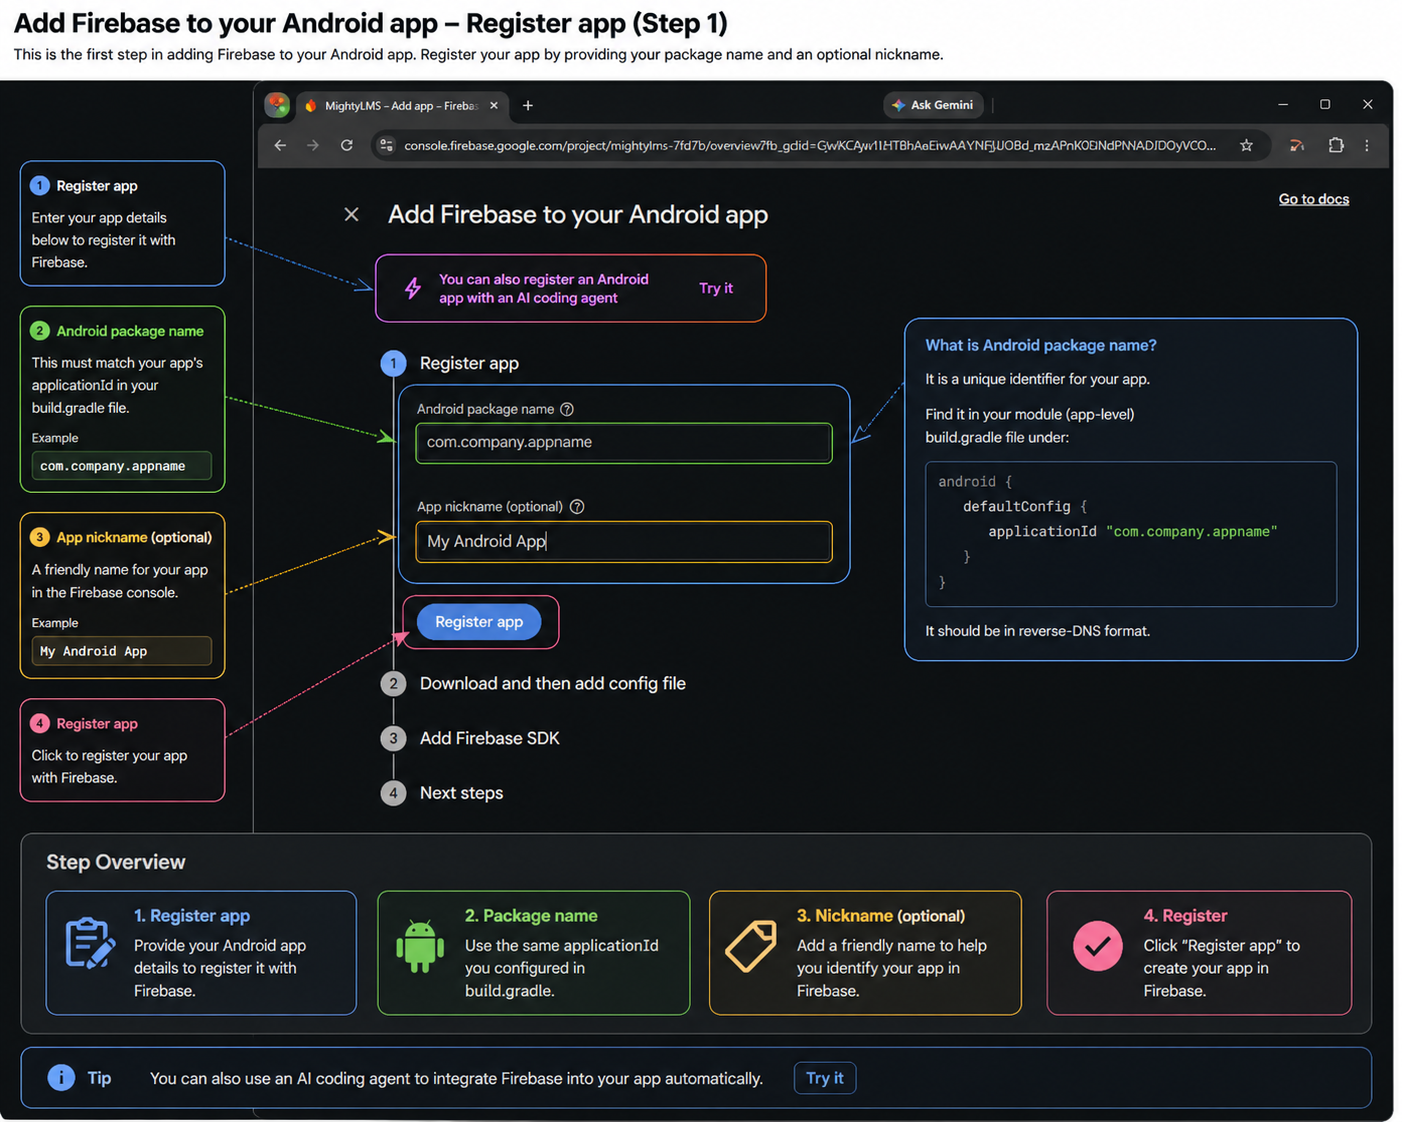
Step 2: Register Android App in Firebase
- On the Firebase project overview page, click the Android icon to add an Android app.
- Enter your Android package name (e.g.,
com.fuedevs.lms). - Optionally enter the app nickname (e.g., "Mighty LMS Android").
- Enter your debug signing certificate SHA-1 (optional, required for Google Sign-In if used).
- Click Register app.
Step 3: Download and Add google-services.json
- Download the
google-services.jsonconfiguration file. - Place it in the following location in your Flutter project:
android/app/google-services.json
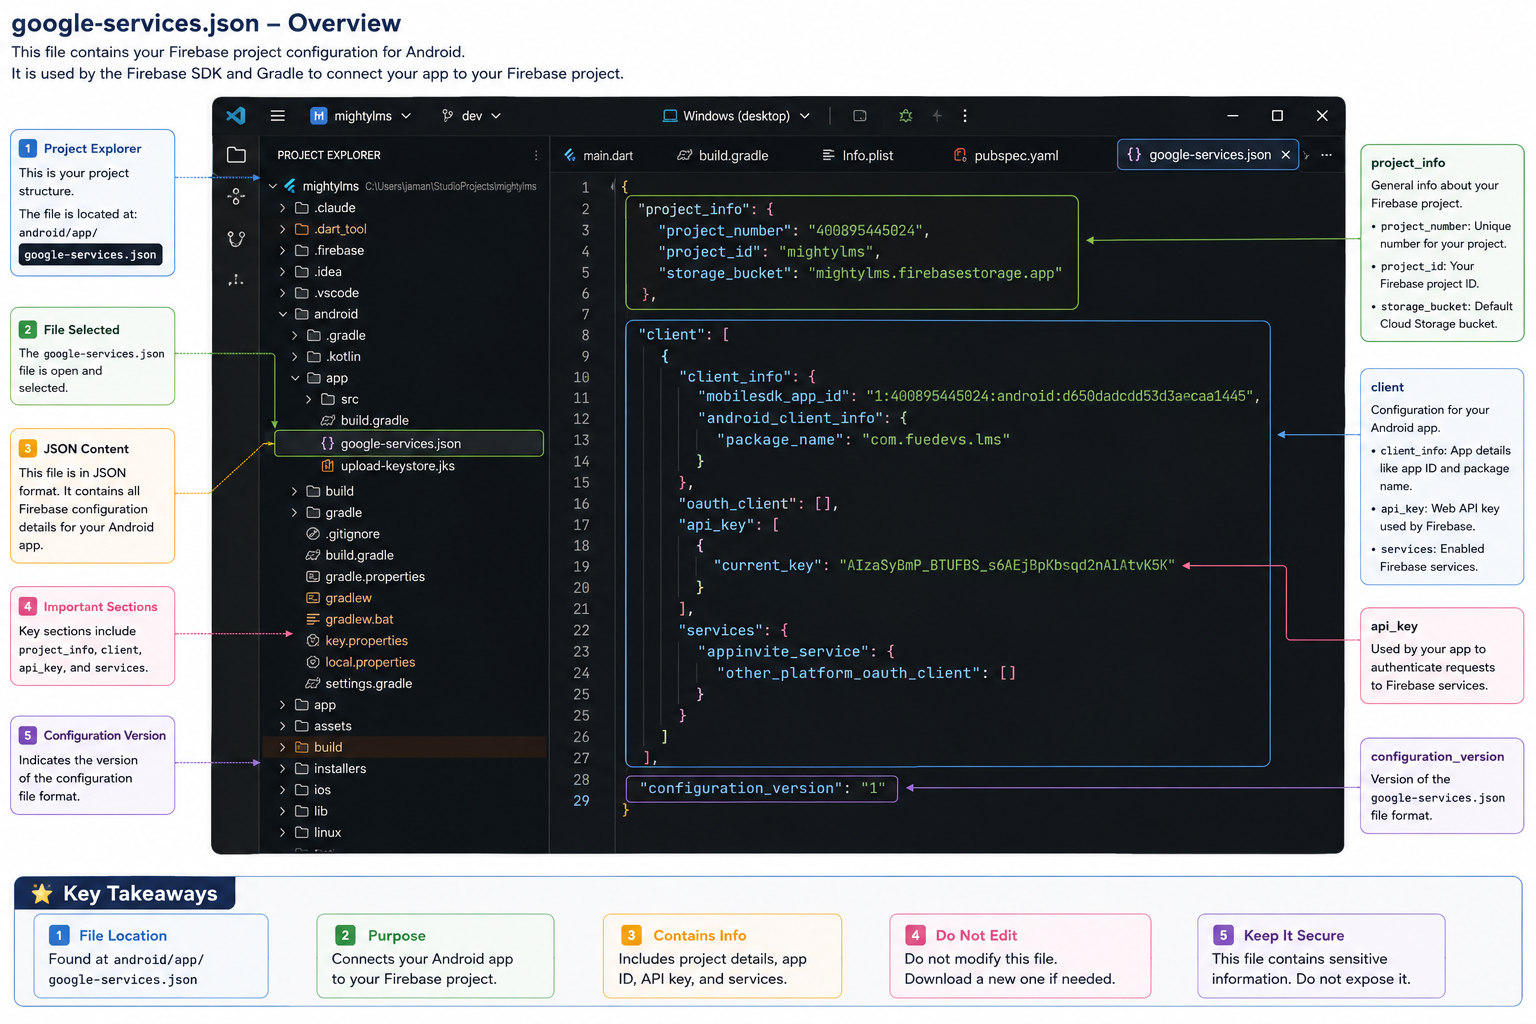
google-services.json file enables your app to connect with Firebase services on Android.
Step 4: Register iOS App in Firebase
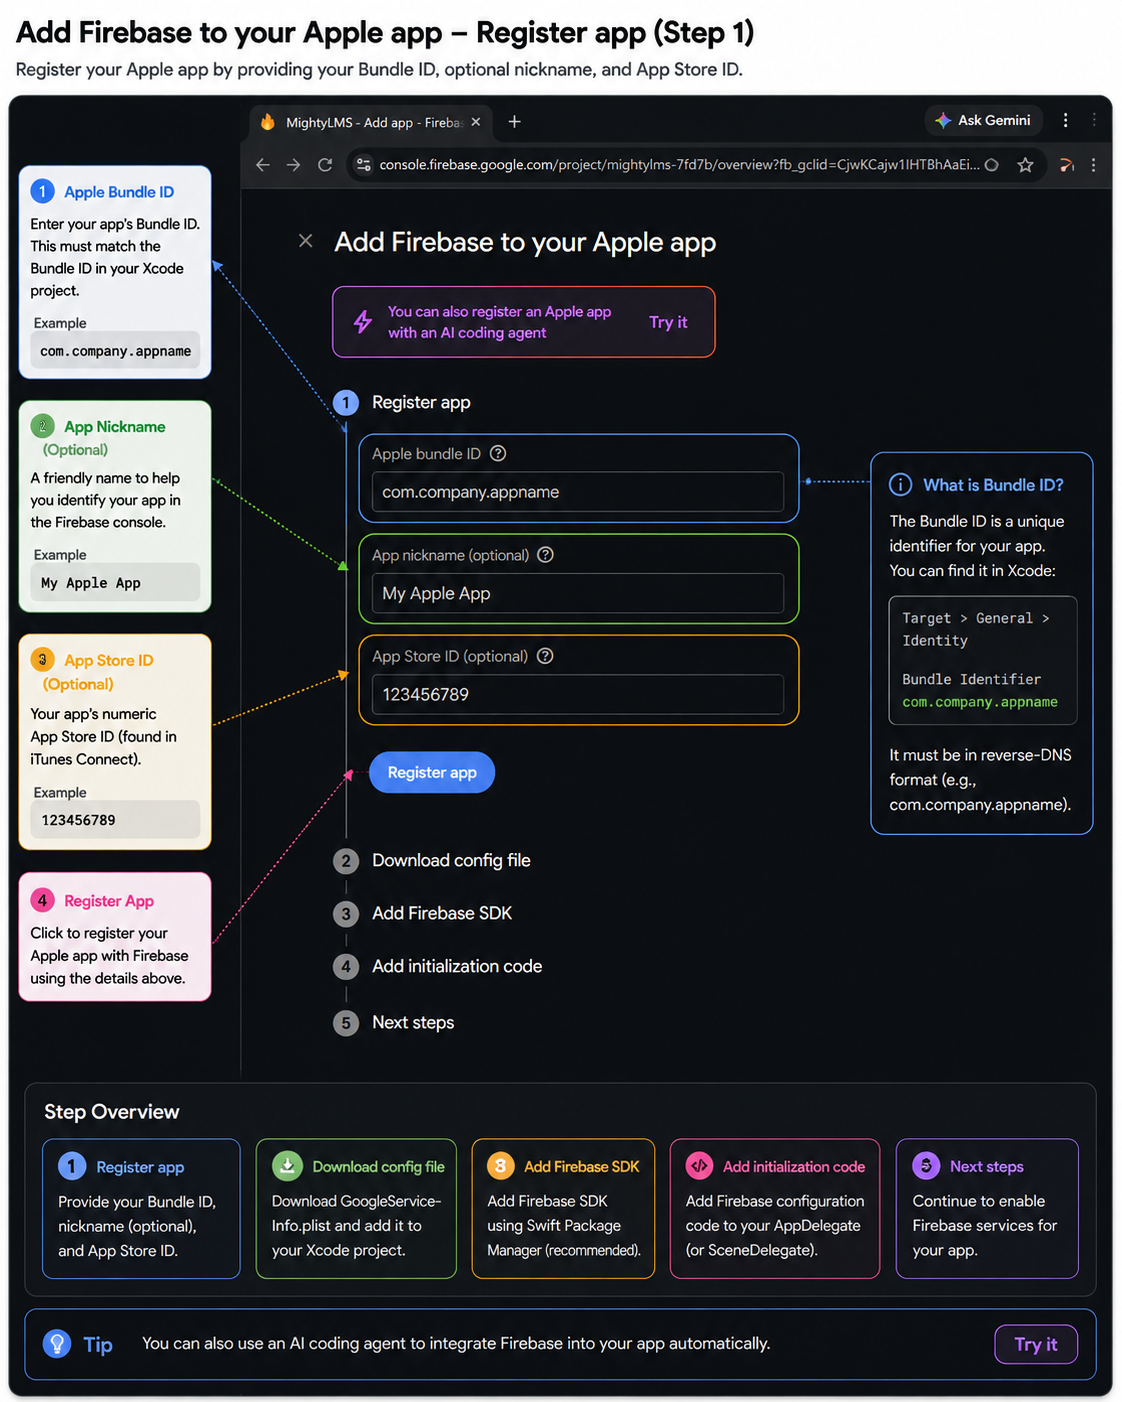
- Back in the Firebase project overview, click the iOS icon to add an iOS app.
- Enter your iOS bundle identifier (e.g.,
com.fuedevs.lms). - Optionally enter the app nickname and App Store ID.
- Click Register app.
Step 5: Download and Add GoogleService-Info.plist
- Download the
GoogleService-Info.plistconfiguration file. - Place it in the following location in your Flutter project:
ios/Runner/GoogleService-Info.plist
Step 6: (Recommended) Configure Firebase Using FlutterFire CLI
The FlutterFire CLI is the recommended way to configure Firebase across all platforms.
It automatically generates the firebase_options.dart file used by the app.
Install FlutterFire CLI
dart pub global activate flutterfire_cli
Log in to Firebase
firebase login
Run Firebase Configuration
flutterfire configure
This command will:
- List your Firebase projects — select the one you created in Step 1
- Detect your Android package name and iOS bundle identifier
- Generate the
lib/firebase_options.dartfile automatically
Step 7: Verify Firebase Initialization
In your Flutter project, Firebase is initialized in the main.dart file.
Ensure it uses the generated options:
void main() async {
  WidgetsFlutterBinding.ensureInitialized();
  await Firebase.initializeApp(
    options: DefaultFirebaseOptions.currentPlatform,
  );
  runApp(const MyApp());
}
If you used FlutterFire CLI (Step 6), this is set up automatically.
Step 8: Enable Firebase Cloud Messaging (FCM)
- In the Firebase Console, go to Project Settings → Cloud Messaging.
- Verify that FCM is enabled for your project.
- Obtain the Server Key and Sender ID — these are needed in your Laravel backend's
.envfile for sending push notifications.
Add the following to your Laravel .env file:
FCM_SERVER_KEY=your_fcm_server_key_here
FCM_SENDER_ID=your_fcm_sender_id_here
Push notifications in Mighty LMS are used for:
- Course enrollment confirmations
- New lesson or course updates
- Quiz and assignment reminders
- Certificate issued notifications
- Payment and invoice notifications
- General system announcements
Step 9: Android Notification Permission (Android 13+)
Android 13 (API level 33) and newer require runtime notification permission.
The Mighty LMS Flutter app already includes the flutter_local_notifications plugin
with the required permission handling. Users will see a system prompt to allow notifications
on first launch.
Step 10: Test Push Notifications
- Build and install the app on a physical device (emulators may not receive FCM reliably).
- Log in to the app.
- In the Firebase Console, go to Cloud Messaging and click Send your first message.
- Compose a test notification and send it to your device.
- Verify the notification appears in the device's notification tray.
Once the Firebase configuration files are in place and the app has been rebuilt, push notifications will be fully operational.
Apply Changes
flutter clean
flutter pub get
flutter run
Build for Android
Once the application setup is complete, you can generate Android build files for testing or production release using Flutter CLI commands.
Generate APK
Run the following command to generate a full release APK:
flutter build apk
This command creates a release APK that supports all major Android device architectures.
Output location:
build/app/outputs/flutter-apk
Generate Split APKs (Smaller Size)
To generate separate APK files for different CPU architectures (recommended for smaller file size), run:
flutter build apk --target-platform android-arm,android-arm64,android-x64 --split-per-abi
This command generates multiple APK files. Use the APK that matches the target device architecture.
Generate App Bundle (Google Play Store)
The Android App Bundle (.aab) is the recommended format for publishing apps on the Google Play
Store.
Step 1 — Configure Signing
Open the following file:
android/app/build.gradle
Inside buildTypes > release, set:
signingConfig = signingConfigs.release
Step 2 — Generate New Keystore (JKS)
Run the following command in your terminal.
macOS / Linux:
keytool -genkey -v -keystore ~/upload-keystore.jks -keyalg RSA \
-keysize 2048 -validity 10000 -alias upload
Windows (PowerShell):
keytool -genkey -v -keystore $env:USERPROFILE\upload-keystore.jks `
-storetype JKS -keyalg RSA -keysize 2048 -validity 10000 `
-alias upload
Step 3 — Create key.properties File
Create a file named:
android/key.properties
Add the following content:
storePassword=YOUR_STORE_PASSWORD
keyPassword=YOUR_KEY_PASSWORD
keyAlias=upload
storeFile=./upload-keystore.jks
The keystore file location may be:
- macOS/Linux: your home directory, e.g.
~/upload-keystore.jks - Windows: your user profile folder, e.g.
%USERPROFILE%\upload-keystore.jks
key.properties.
Step 4 — Build App Bundle
Run the following command:
flutter build appbundleand the output file path is
build/app/outputs/bundle/release/app-release.aab
This command generates the Android App Bundle (.aab), which is required for publishing apps on the Google Play Store.
Build for iOS
iOS applications cannot be installed directly on physical devices in the same way as Android APK files. Apple requires iOS apps to be distributed through official channels such as TestFlight for testing or the App Store for public release.
To install and test the app on an iPhone or iPad, you must configure your Apple Developer Account, set up code signing in Xcode, and upload the build to TestFlight or the App Store.
Certificate Signing Request (CSR) Creation and Installation Guide
Step 1: Create a Certificate Signing Request (CSR)
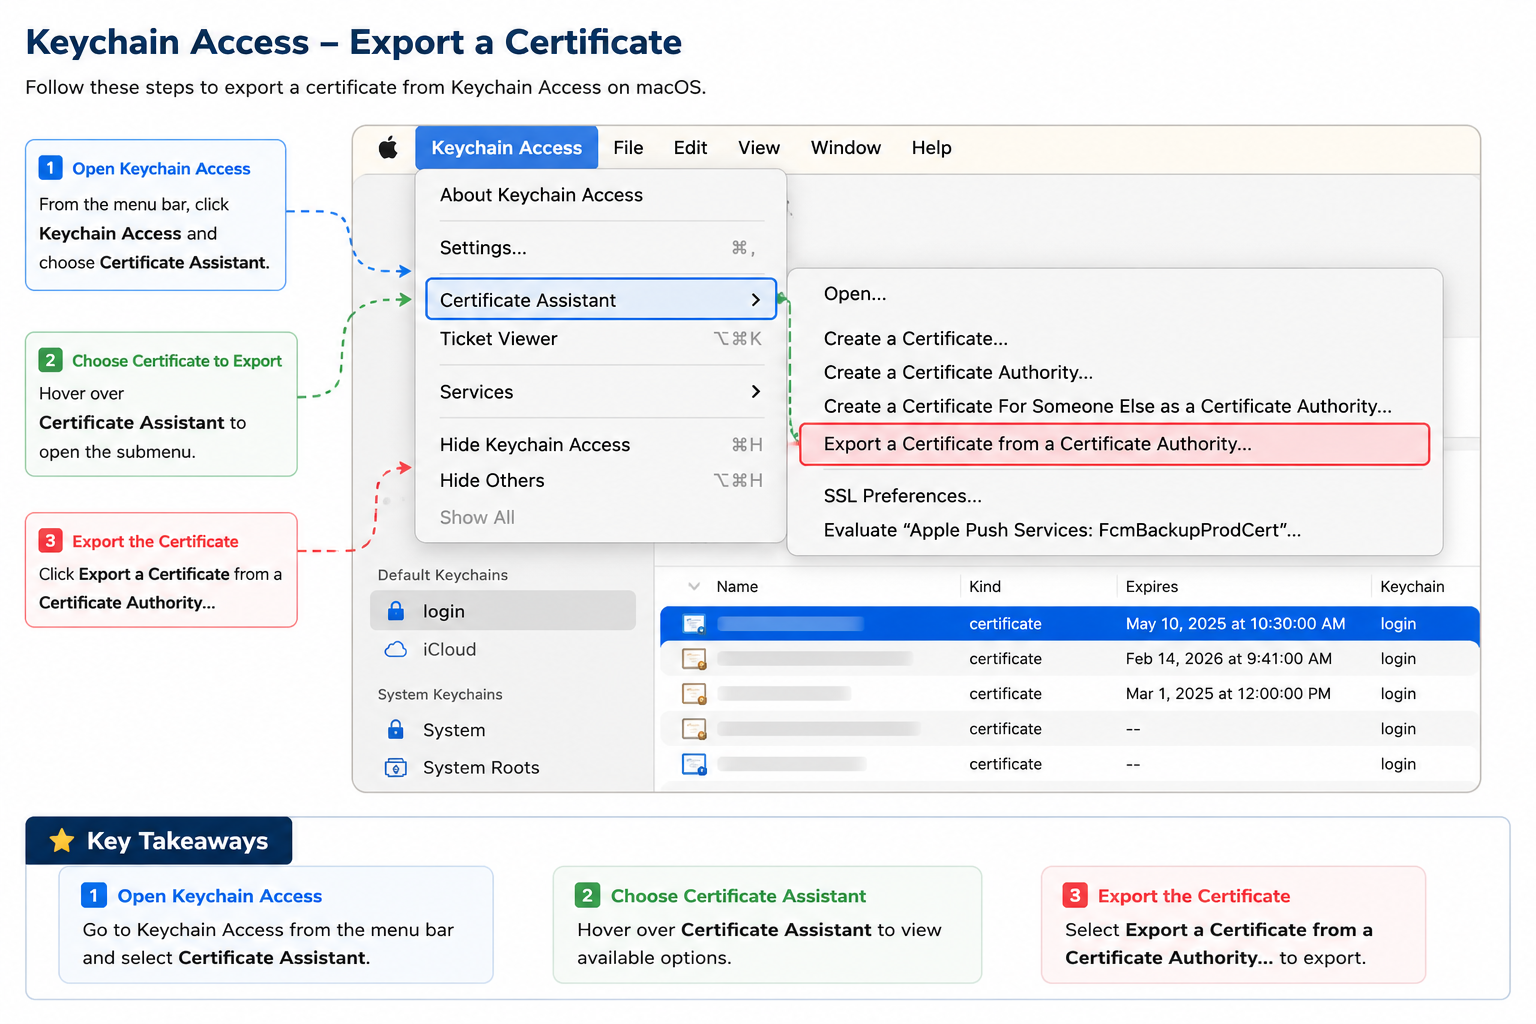
- Open Keychain Access on your Mac.
- Go to Keychain Access → Certificate Assistant → Request a Certificate from a Certificate Authority.
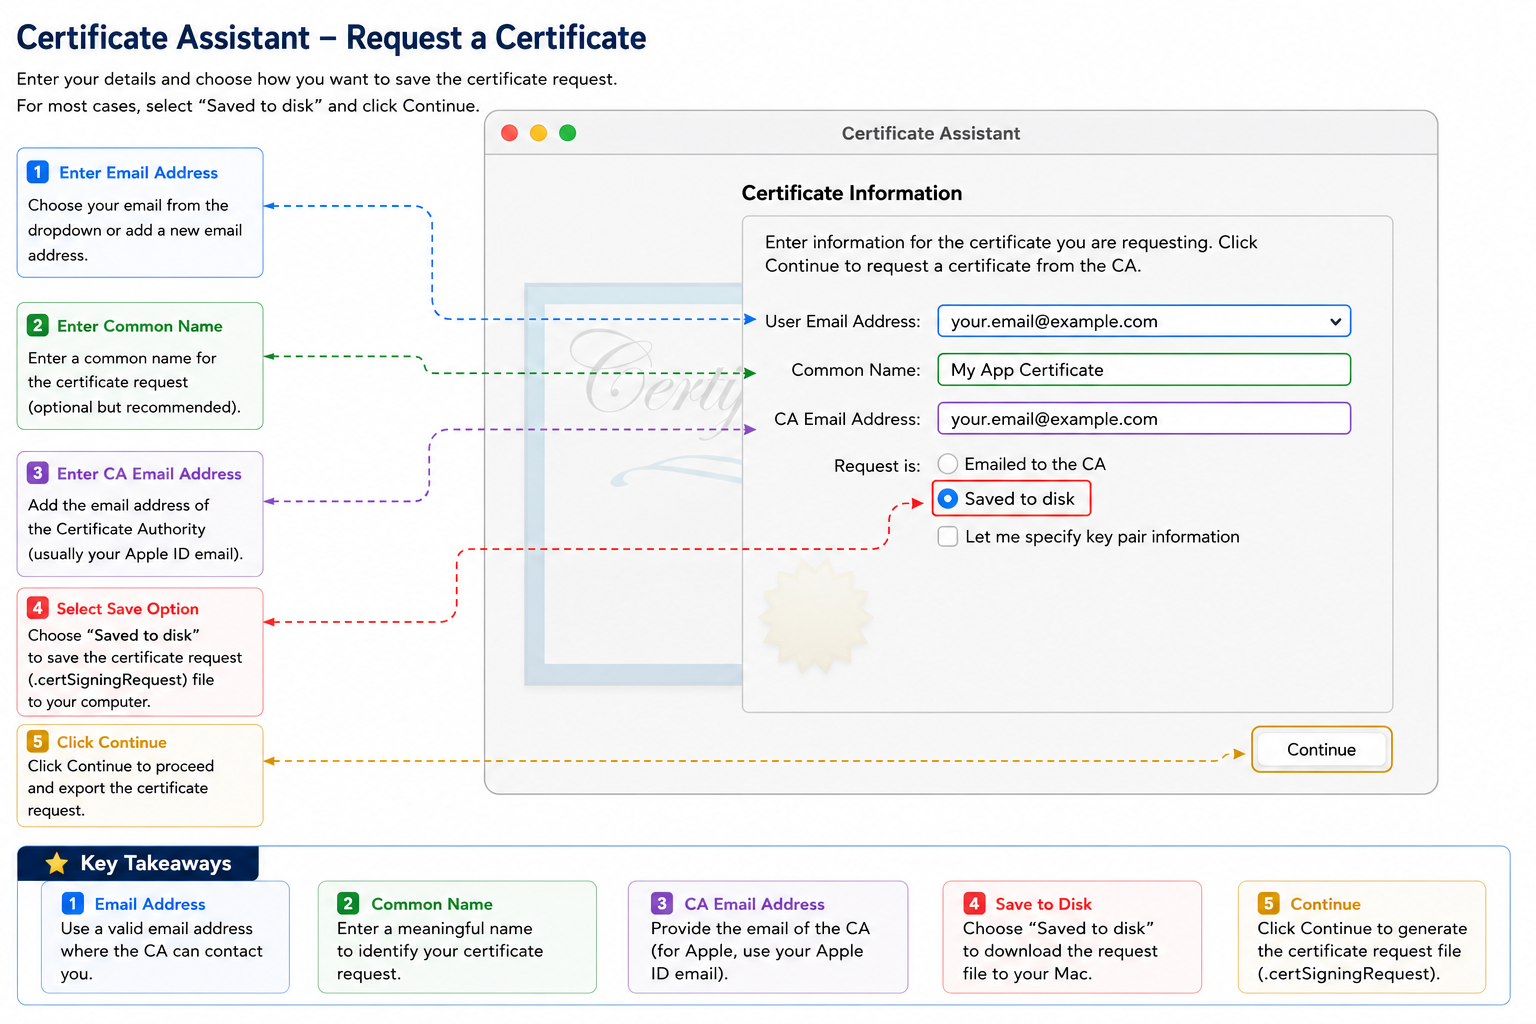
- Enter your email address, CA email address, and a common name (you may use your app name).
- Select "Save to Disk".
- Click Continue and save the CSR file to your computer.
Step 2: Generate the .p12 Certificate
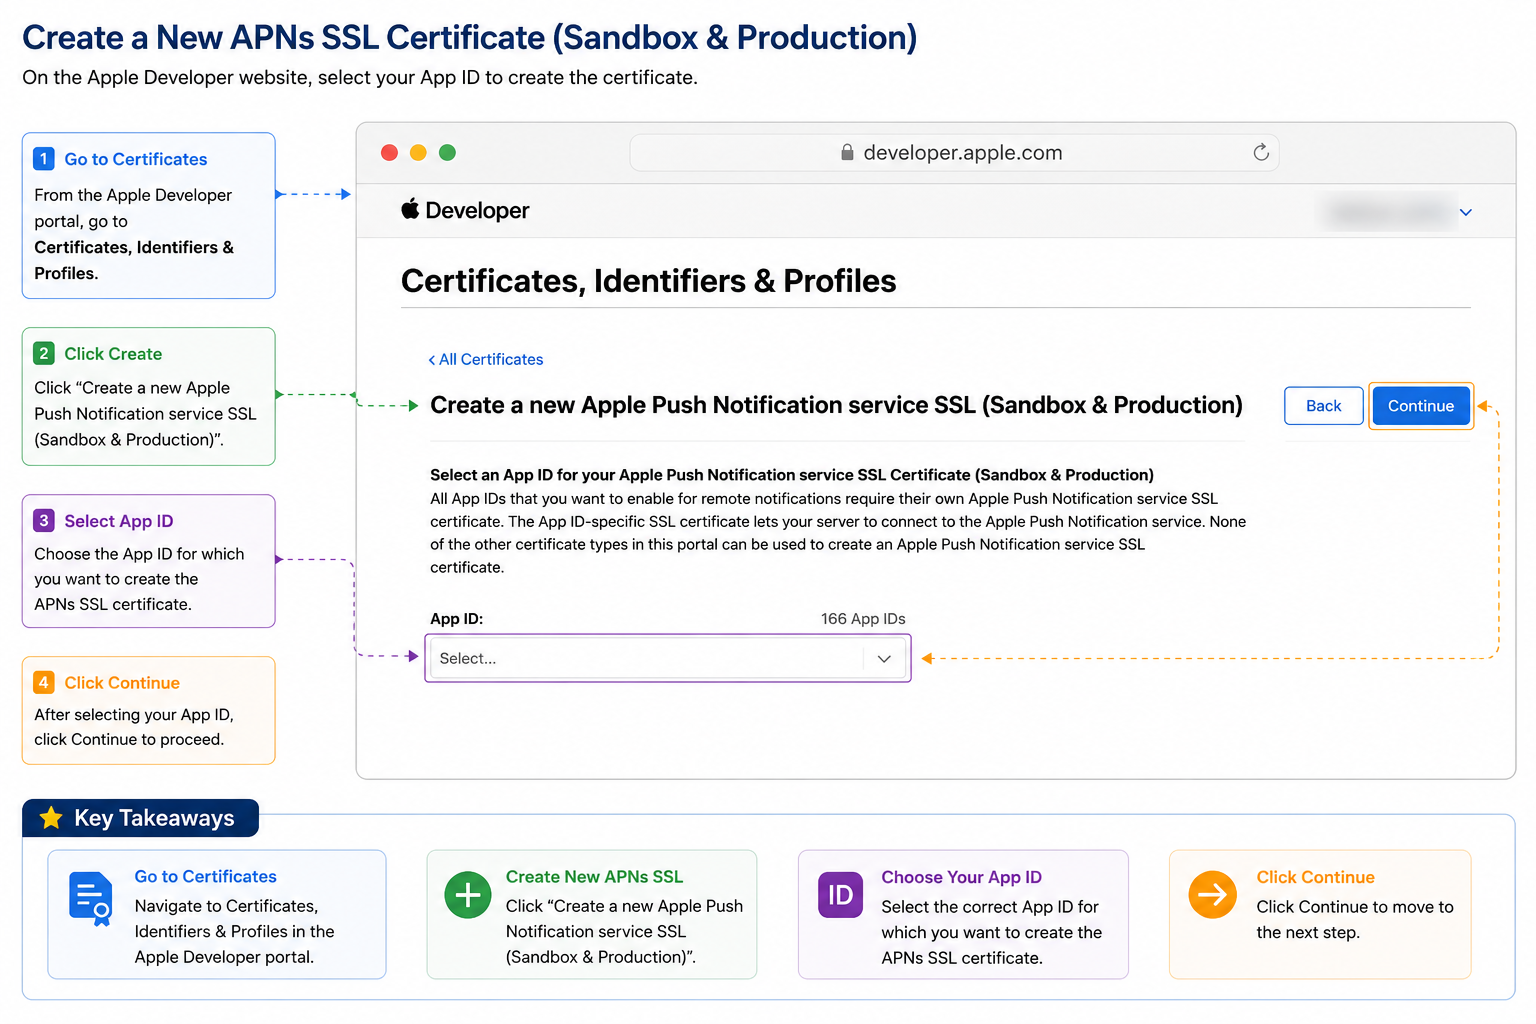
- Go to your Apple Developer Account.
- Navigate to Certificates, Identifiers & Profiles.
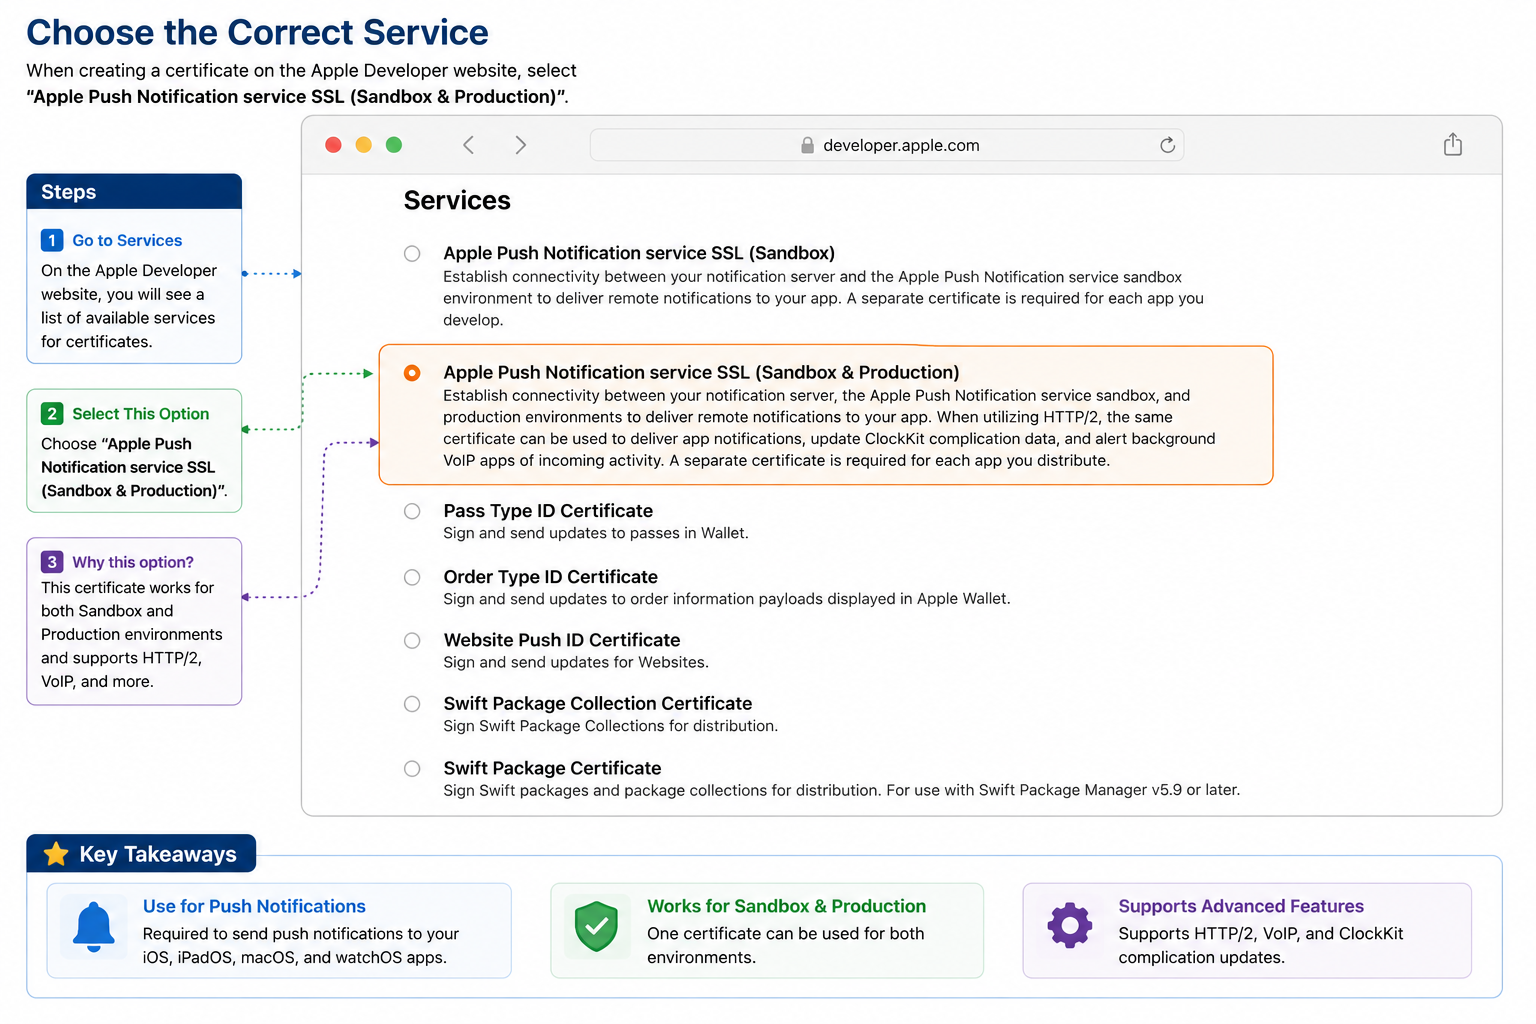
- Click on Certificates and then click the (+) button.
- Select "Apple Push Notification service SSL (Sandbox & Production)".
- Select the appropriate App ID.
- Click Continue and upload the CSR file you created.
- Download the generated certificate.
Step 3: Install the Certificate
- Double-click the downloaded certificate file to install it in Keychain Access.
- Go to Keychain Access → My Certificates.
- Locate the newly installed certificate.
- Right-click the certificate and select Export.
- Choose a location and export the certificate as a .p12 file.
- Set a password for the certificate.
Note: Store the password securely. Xcode may ask for the Keychain password when running the app. If you prefer not to enter the password each time, you may leave it empty.
Open the Project in Xcode
- Open Xcode on your Mac.
- Select File → Open or press Command + O.
- Navigate to your Flutter project directory.
- Open the ios folder.
- Select the .xcworkspace (recommended) or .xcodeproj file.
Xcode will open your Flutter project, allowing you to build, run, and configure your iOS application.
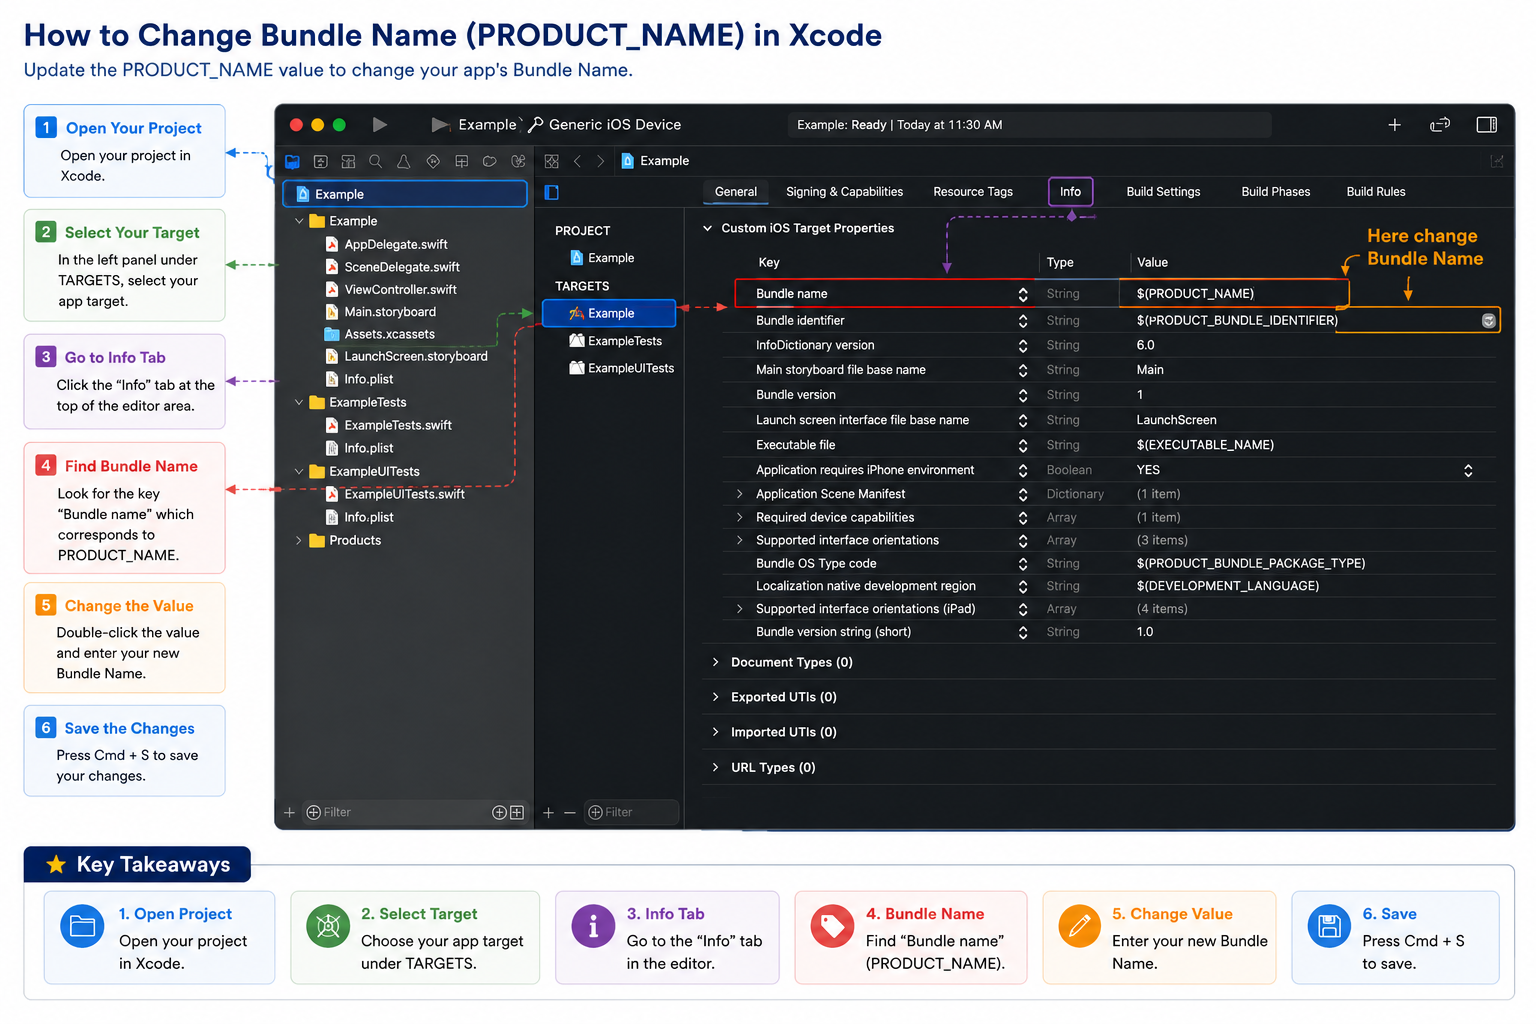
Change Bundle Name
- Select your project in the Xcode project navigator.
- Choose the target from the Targets section.
- Go to the Info tab.
- Scroll to Custom iOS Target Properties.
- Locate Bundle Name and edit its value.
- Save changes using Command + S.
Change Bundle Identifier
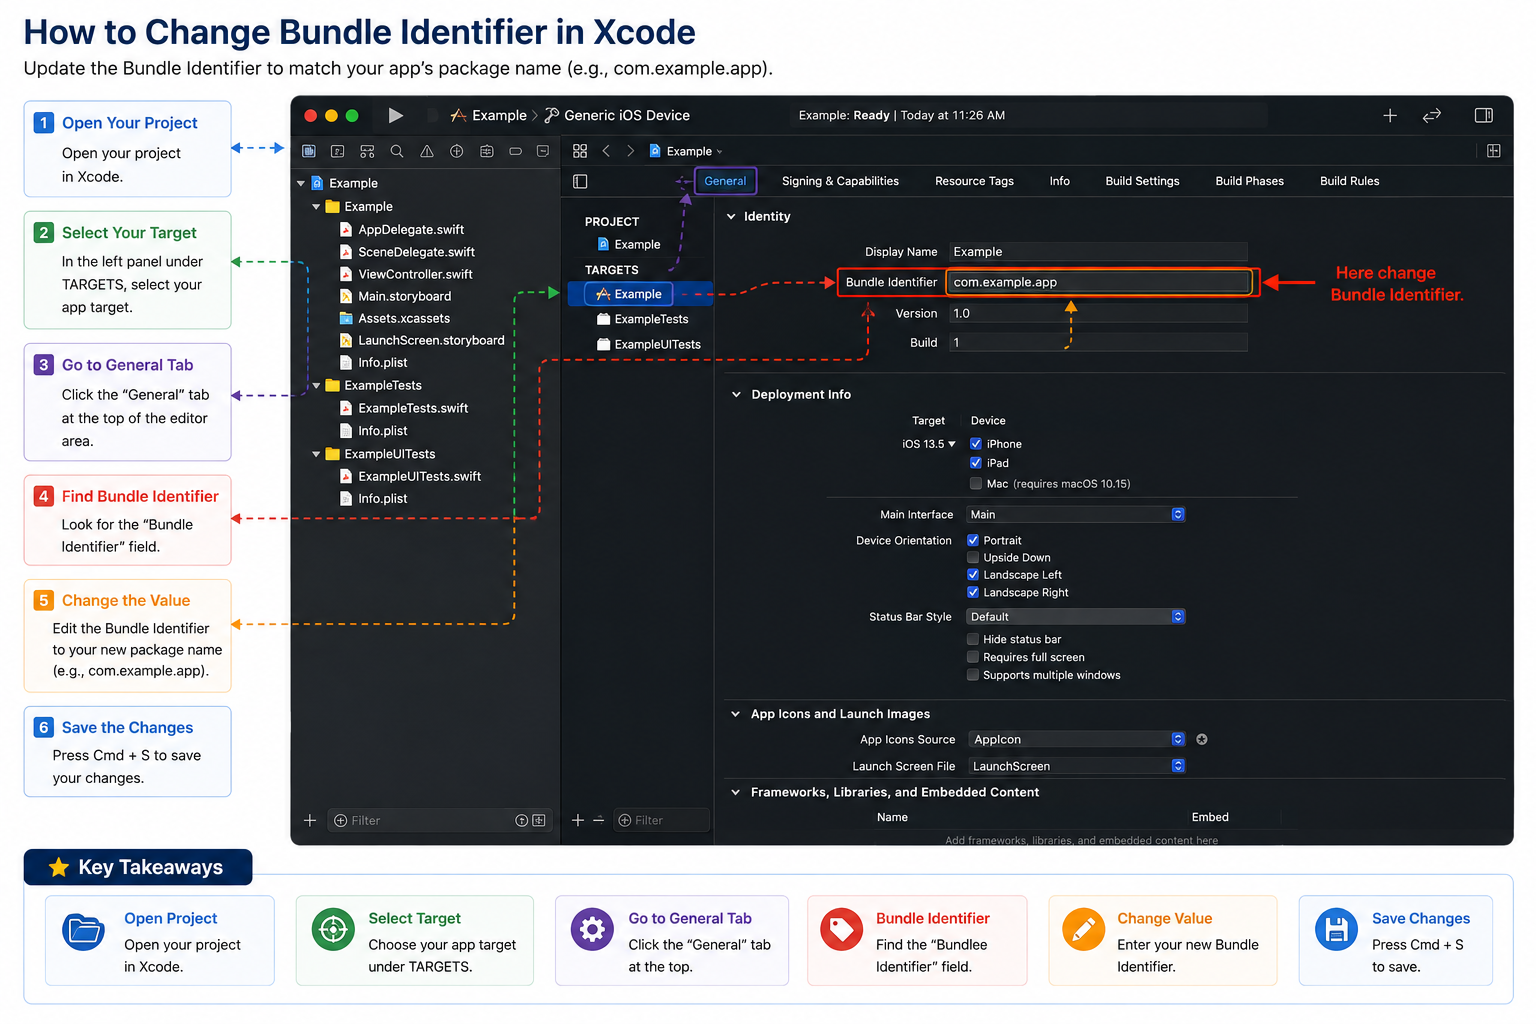
The Bundle Identifier is a unique identifier for your application on iOS and macOS. It must be unique across all apps in the App Store.
- Select your project in Xcode.
- Go to the General tab.
- Under the Identity section, update the Bundle Identifier.
Web Setup
Change Branding
- Logo:
web/logo.png - Header Logo:
web/appbarlogo.png - Favicon:
web/favicon.png - Title & Description:
web/index.html - PWA Name:
web/manifest.json
Build Web
flutter build web
Upload files from build/web/ to your domain (including hidden files).
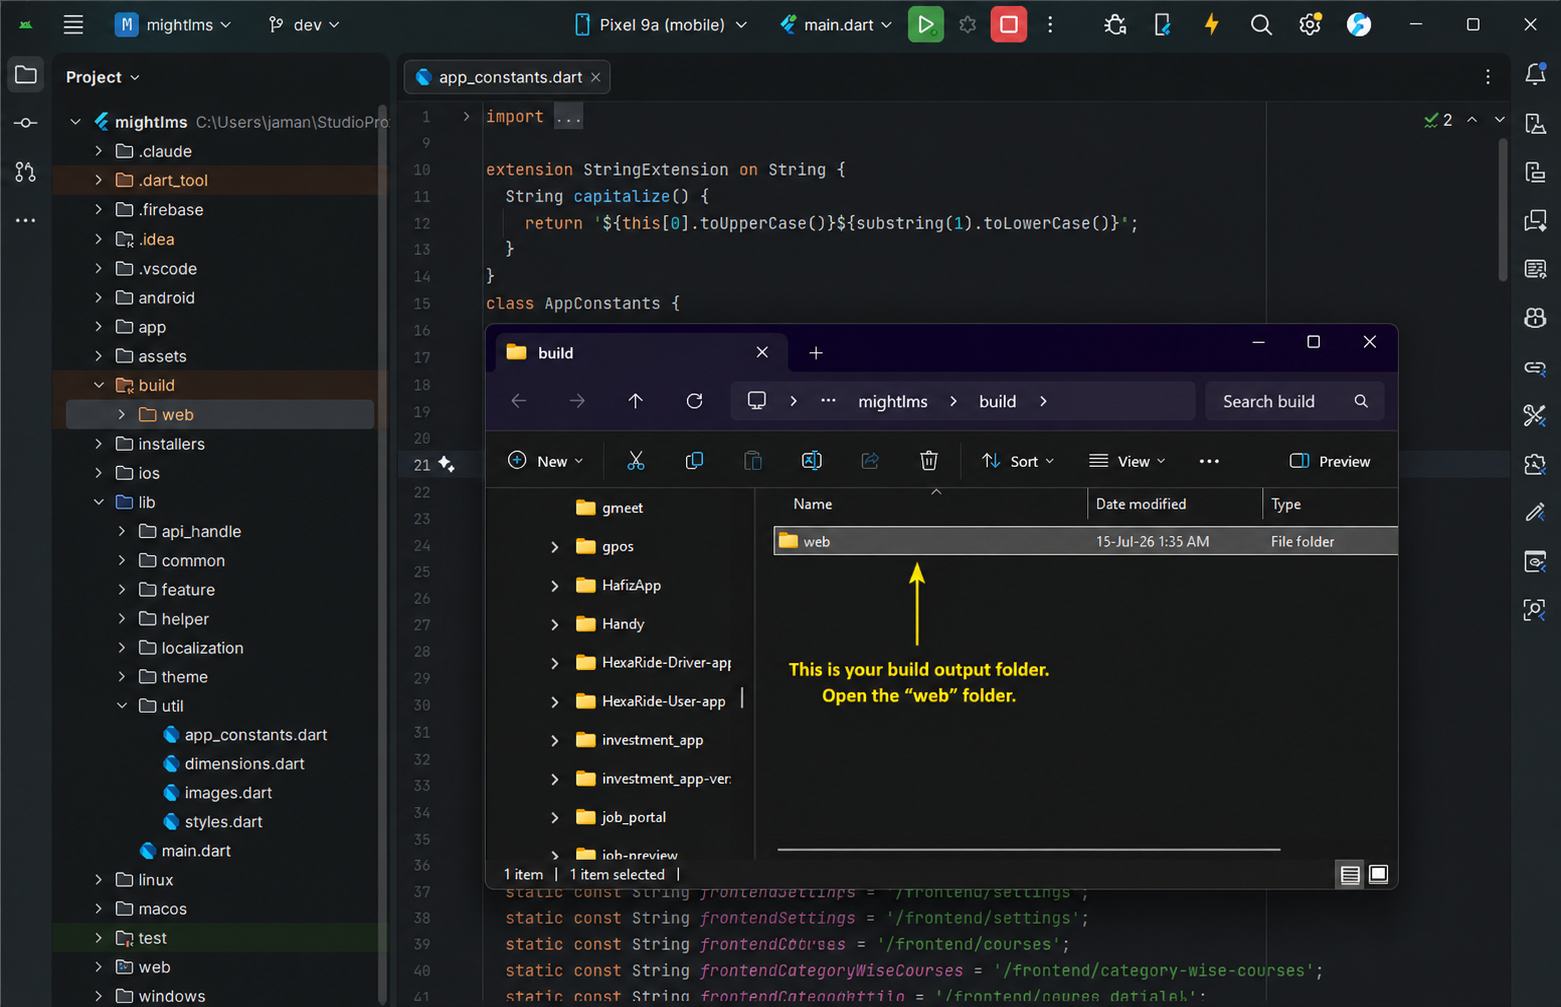
After successfully build. open build/web folder. You will see web folder. Zip it and upload to your server.
Yor are Done! Your web is live now.
📖 User Guide
This guide explains how Administrators, Instructors, and Students can use Mighty LMS after successful setup and login. Administrators and Instructors manage the platform through the Mighty LMS web Admin Panel (accessed from a browser at your site's domain), while Students learn through the Mighty LMS mobile app.
Mighty LMS provides role-based access for Administrators, Instructors, and Students. Each role has dedicated features and permissions to manage and participate in online learning efficiently.
👨💼 Administrator Guide
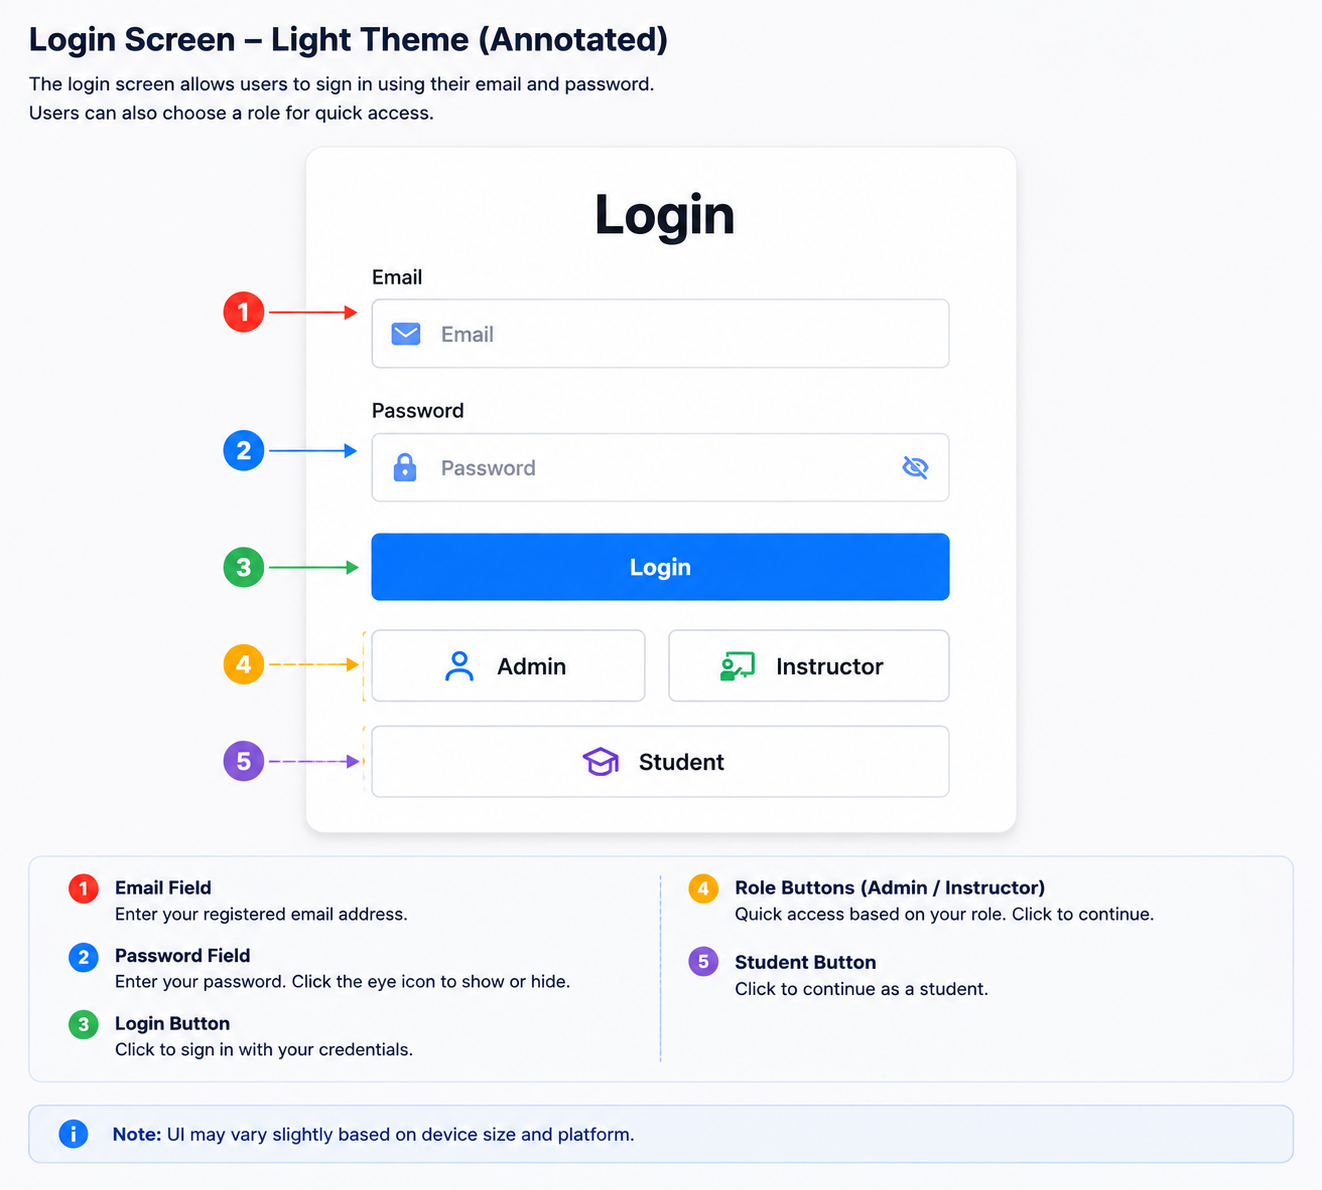
Step 1: Login
- Open a web browser and go to your Mighty LMS Admin Panel URL (e.g.
https://yoursite.com/sign-in). - Enter your Admin Email and Password.
- Click Login.
Step 2: Dashboard Overview
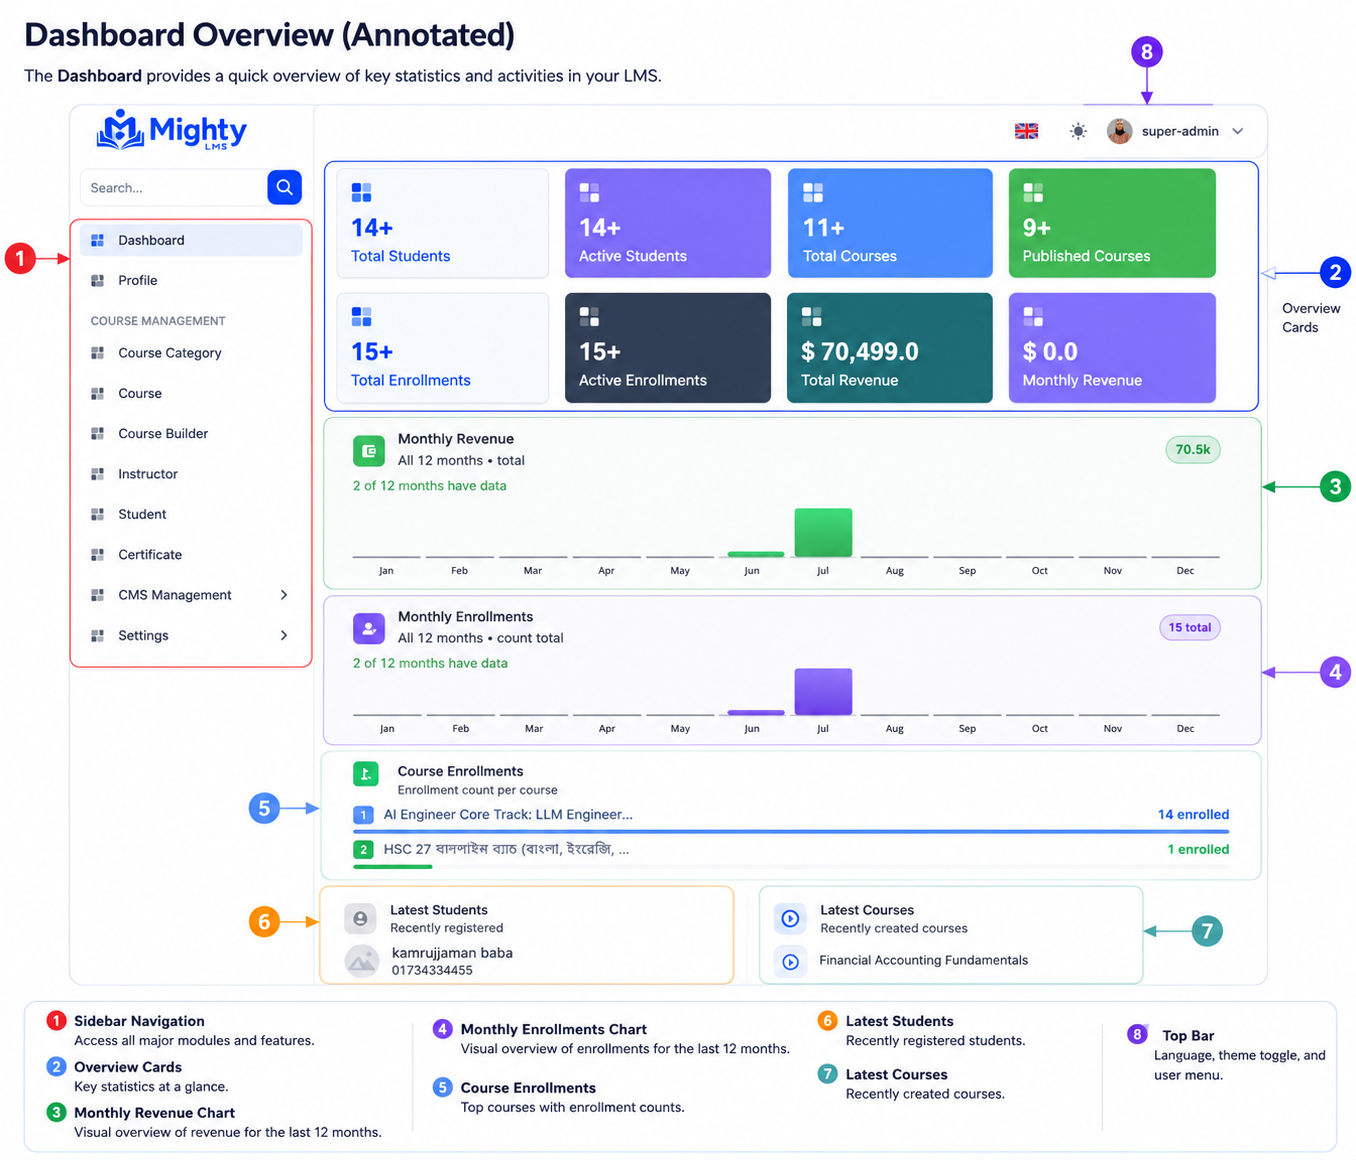
The admin dashboard provides a complete overview of the platform including:
- Total Students, Active Students, Total Courses, and Published Courses (summary cards)
- Total Enrollments, Active Enrollments, Total Revenue, and Monthly Revenue (summary cards)
- A Monthly Revenue chart and a Monthly Enrollments chart, each broken down across the year
- A Course Enrollments breakdown showing enrollment count per course
- Latest Students and Latest Courses feeds, showing the most recently registered students and newly created courses
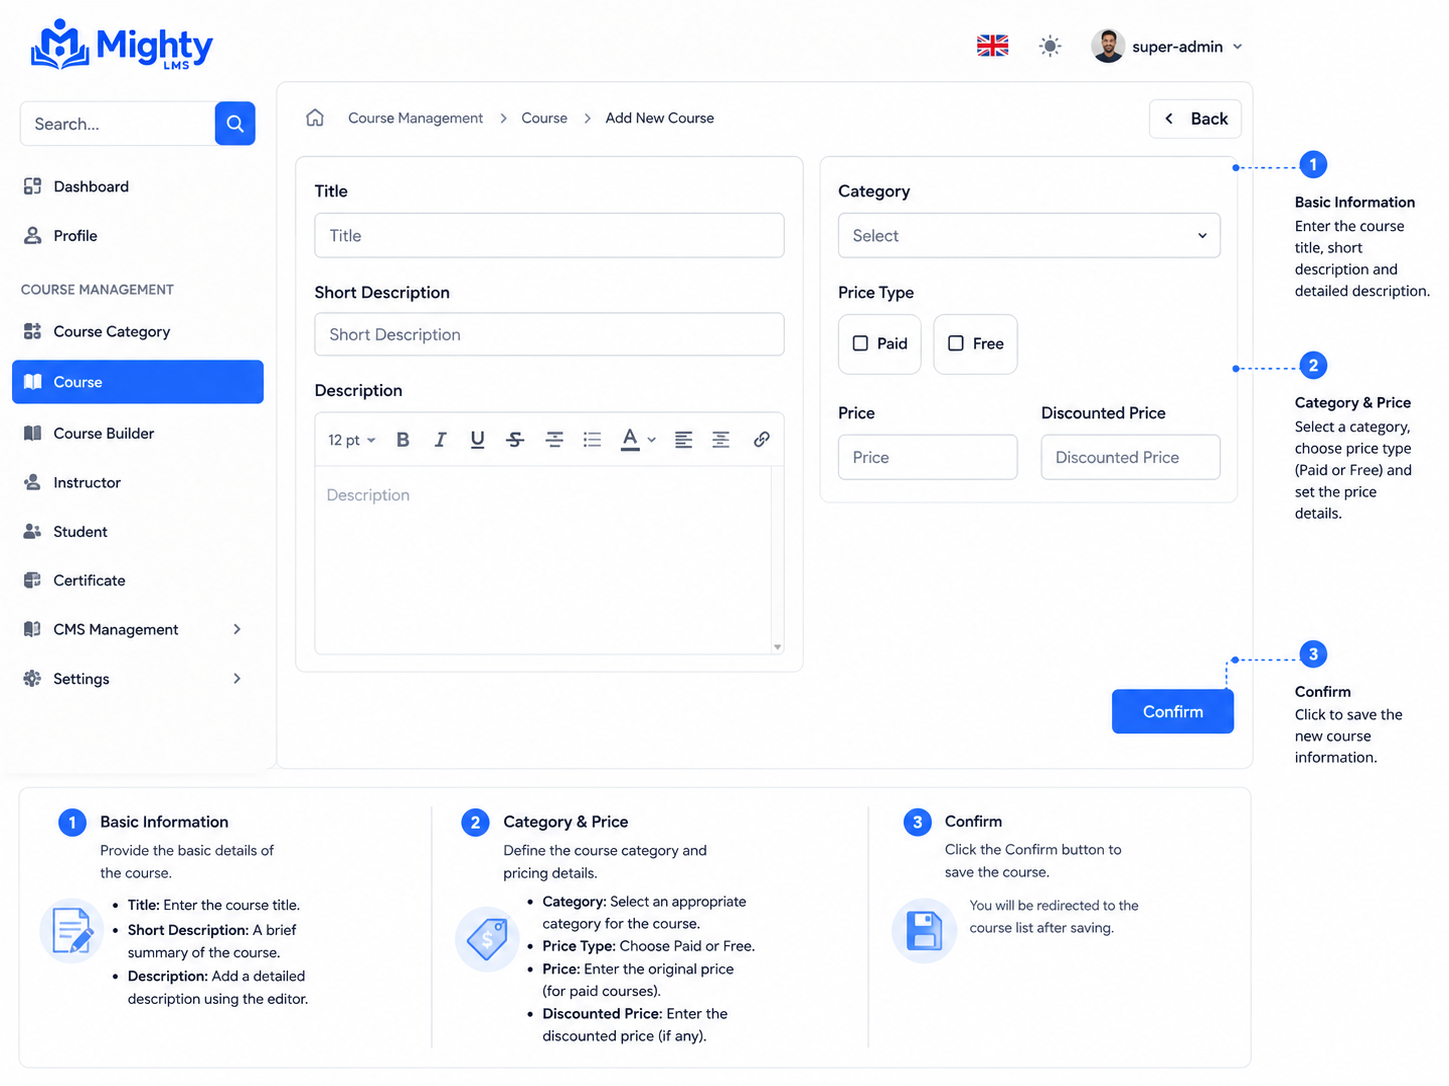
Step 3: Manage Courses
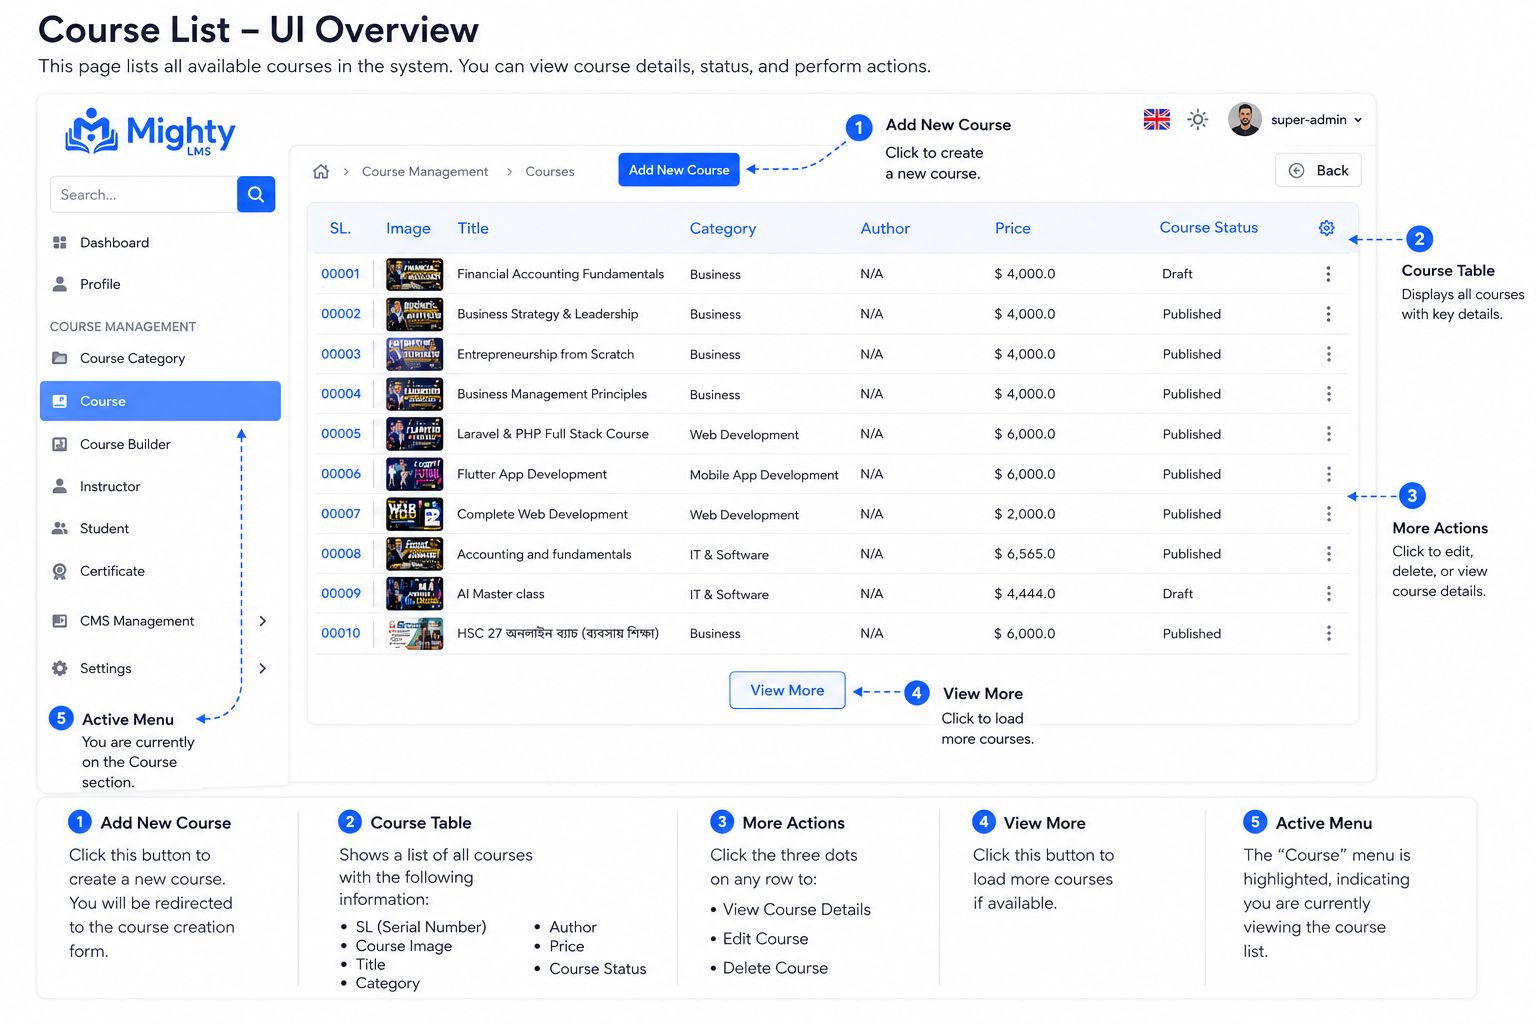
- Navigate to Course from the sidebar menu (under Course Management), or open Course Builder for a guided, step-by-step course creation flow.
- View every course's thumbnail, title, category, author, price, and current status (Draft or Published) in the list.
- Click Add New Course to create a new course, or click a course's row to open and edit it. Use the ⚙ gear menu on a row for further actions, and View More to load additional courses.
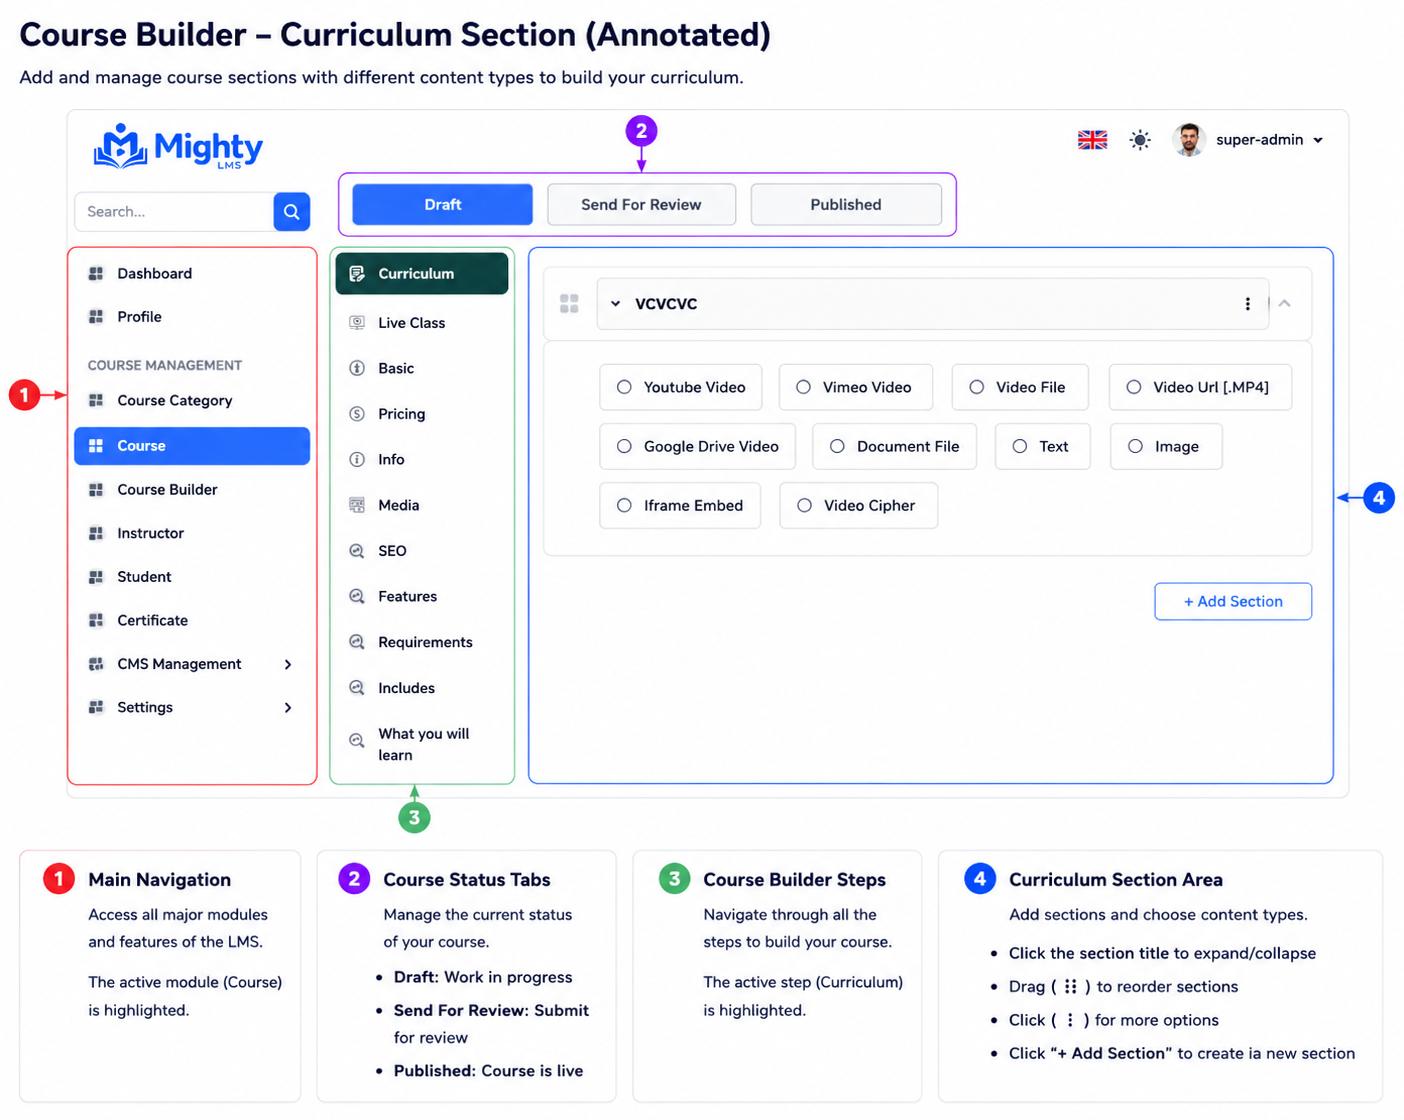
Opening a course loads the Course Builder, where each part of the course — curriculum, live classes, pricing, media, SEO, requirements, and more — is organized into its own tab. A course moves through three states as you work on it: Draft → Send For Review → Published.
Step 4: Manage Instructors & Students
- Navigate to Instructor or Student from the sidebar menu to view each group separately.
- View all registered students and instructors, along with their status.
- Approve new instructors, edit user details, or suspend accounts as needed.
Step 5: Manage Course Categories
- Navigate to Course Category from the sidebar menu.
- Create, edit, or delete course categories.
- Organize courses into logical groups for easy browsing.
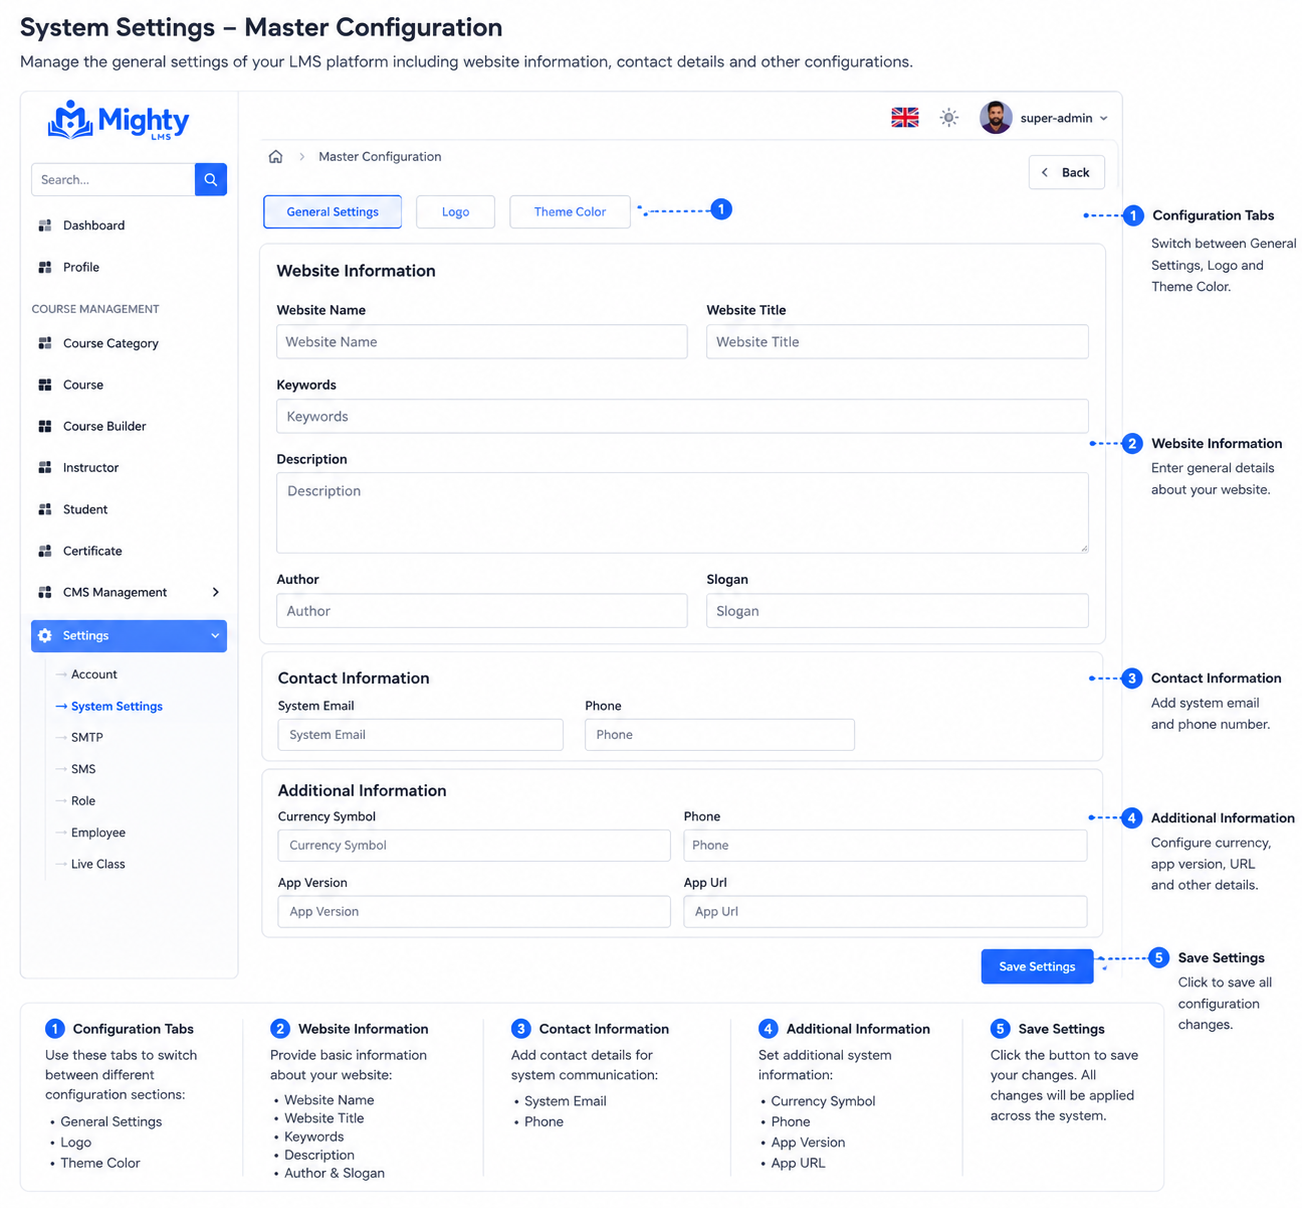
Step 6: Platform Settings
- Navigate to Settings from the menu.
- Configure platform-wide settings such as:
- Site name and description
- Logo and branding
- Payment gateway configuration
- Email and notification settings
- System maintenance mode
Step 7: View Reports
- Navigate to Reports.
- Access enrollment reports, revenue reports, and user analytics.
- Export data for external analysis if needed.
👨🏫 Instructor Guide
Step 1: Login
- Open the Mighty LMS Mobile App.
- Enter your Instructor Email and Password.
- Tap Login.
Step 2: Create a Course
- Navigate to My Courses from the menu.
- Tap the + or Create Course button.
- Enter course details:
- Course Title and Description
- Category
- Course Thumbnail/Image
- Price (Free or Paid)
- Difficulty Level
- Tap Save or Publish.
Step 3: Add Lessons
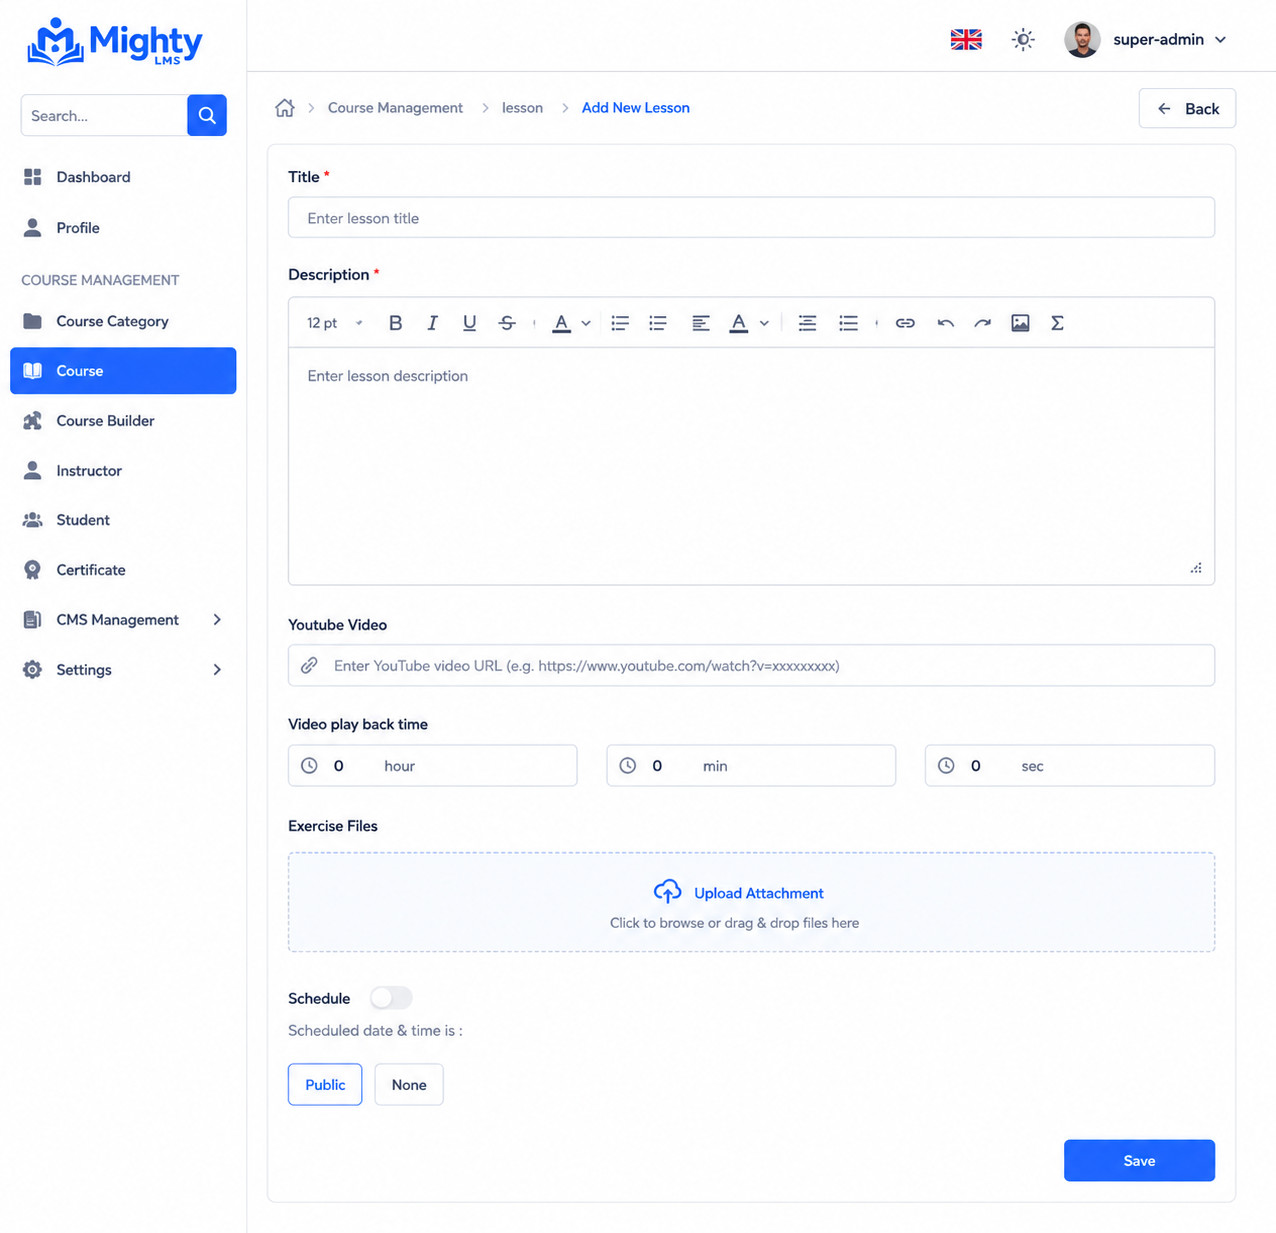
- Open the course you created.
- Navigate to Lessons tab.
- Tap Add Lesson.
- Enter lesson title, content, video URL (if any), and attachments.
- Set the lesson order and tap Save.
Step 4: Create Quizzes
- Open your course and go to Quizzes.
- Tap Create Quiz.
- Enter quiz title, instructions, duration, and pass marks.
- Add questions with multiple-choice options.
- Mark the correct answer for each question.
- Tap Publish Quiz.
Step 5: Manage Students
- Navigate to Enrollments from your course.
- View enrolled students and their progress.
- Monitor quiz scores and lesson completion.
Step 6: View Analytics
- Go to Analytics from the menu.
- Review course performance, student engagement, and quiz results.
👨🎓 Student Guide
Step 1: Register / Login
- Open the Mighty LMS Mobile App.
- If you are new, tap Register and fill in your details.
- If you already have an account, enter your Email and Password.
- Tap Login.
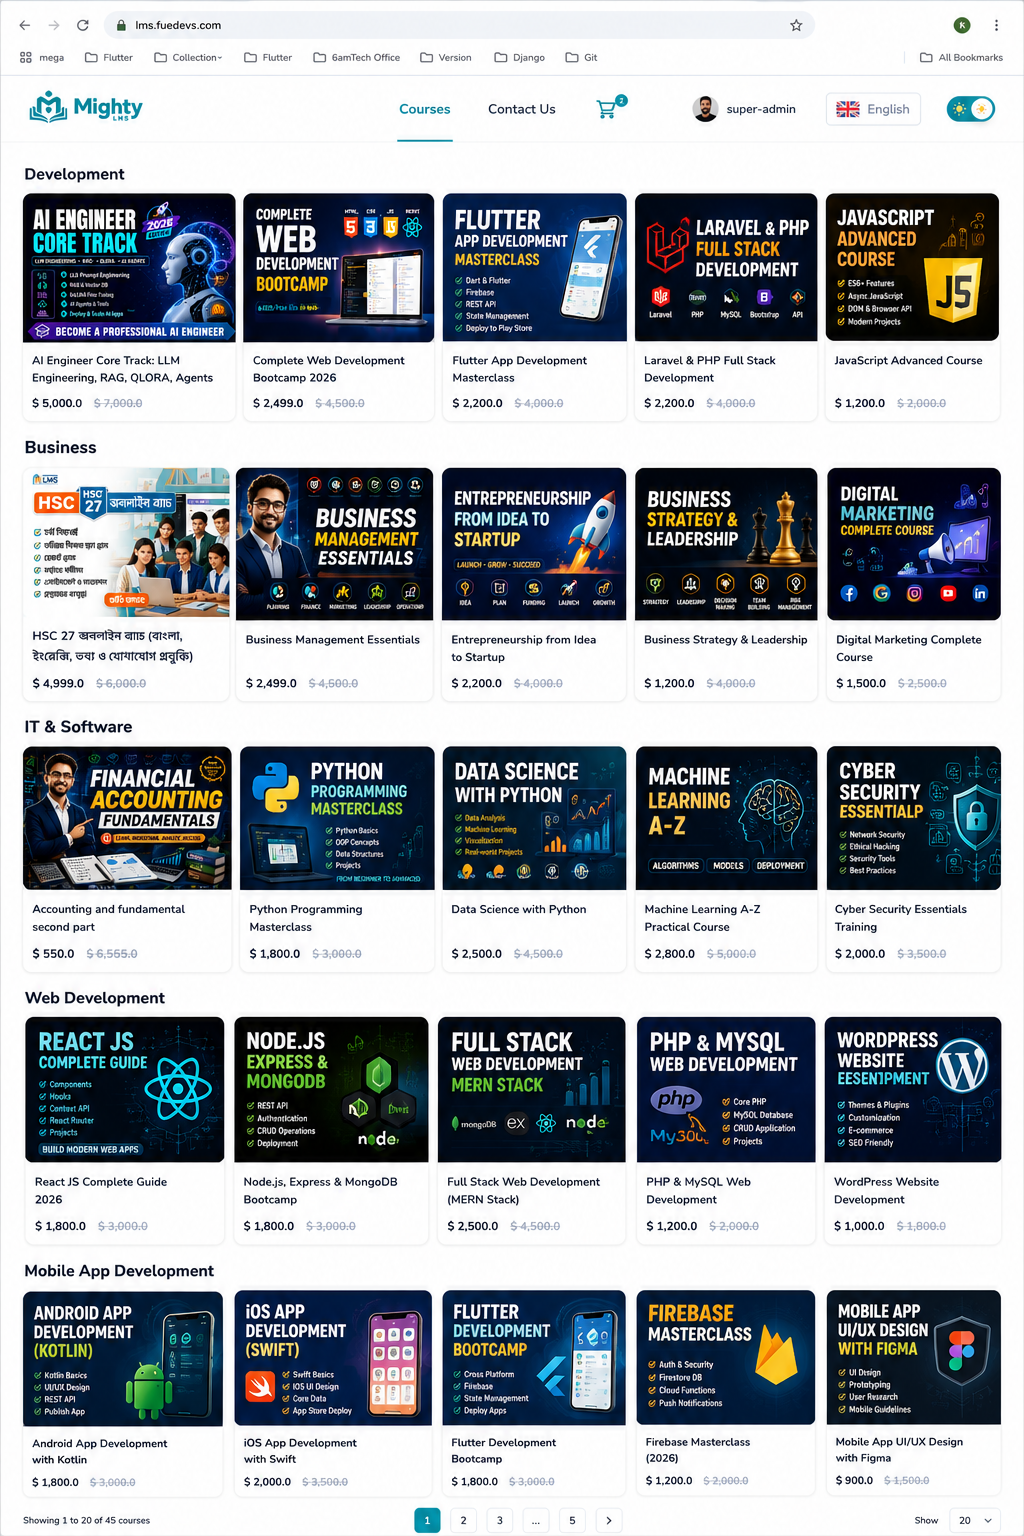
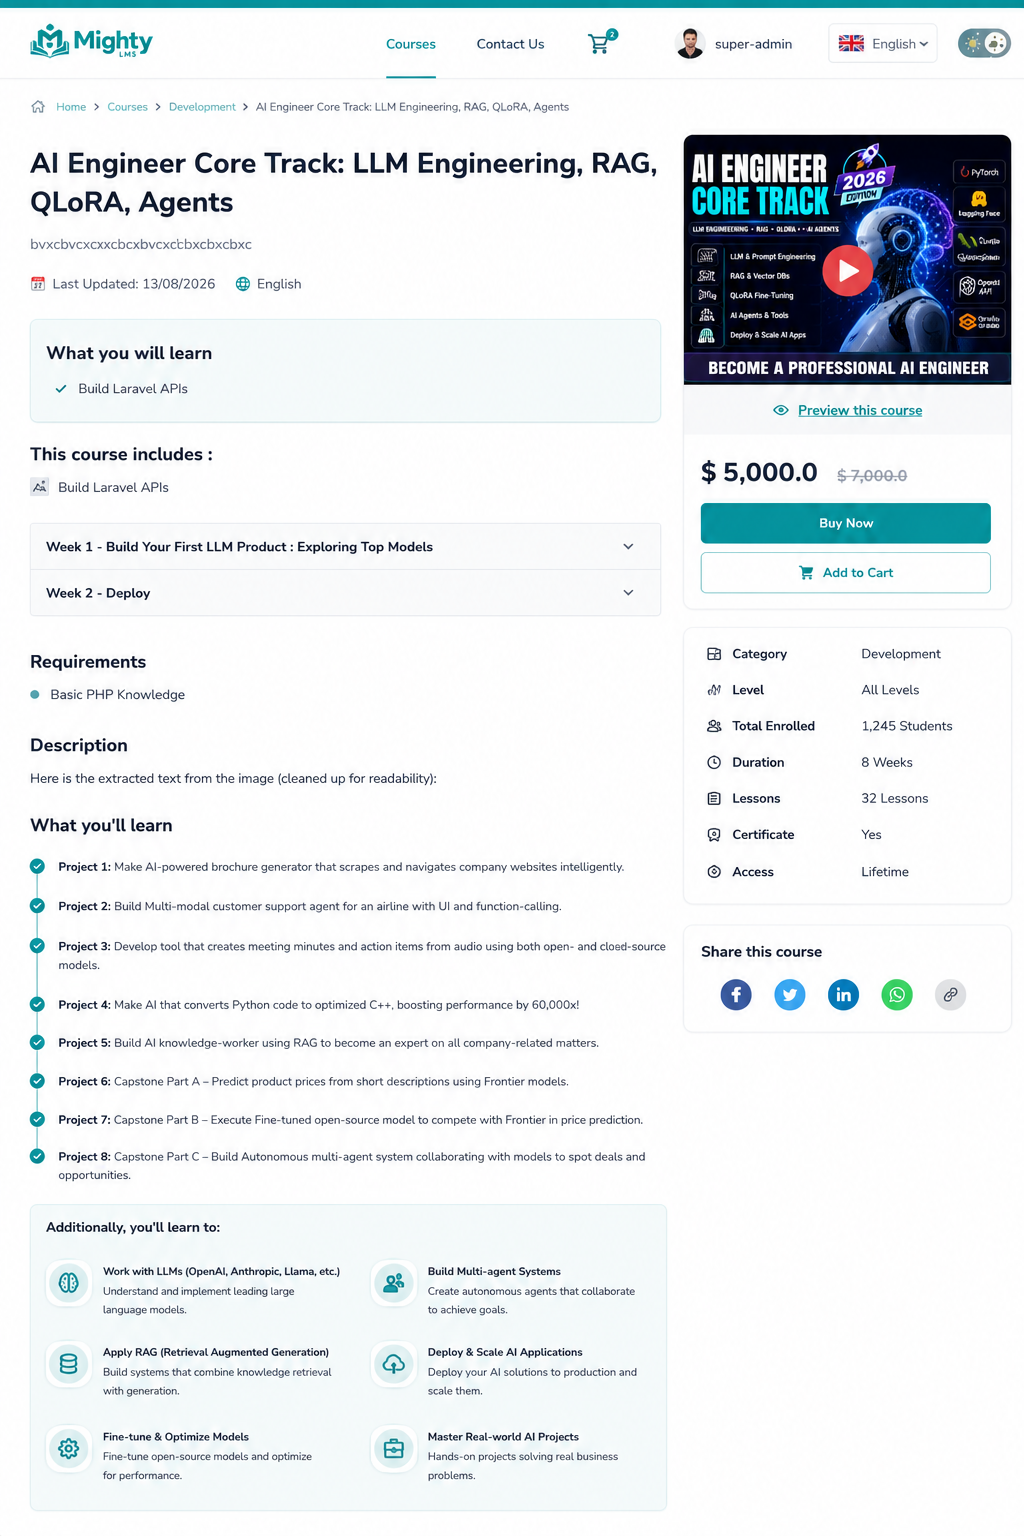
Step 2: Browse Courses
- On the home screen, browse featured and popular courses.
- Use the search bar to find specific courses.
- Filter by category or difficulty level.
Step 3: Enroll in a Course
- Tap on a course to view its details.
- Review the syllabus, instructor info, and lessons.
- Tap Enroll Now (for free courses) or Buy Now (for paid courses).
- Complete payment if required.
Step 4: Access Lessons
- Go to My Courses from the menu.
- Tap on an enrolled course.
- Select a lesson to start learning.
- Mark lessons as complete as you progress.
Step 5: Take Quizzes
- Navigate to the Quizzes section of your course.
- Tap Start Quiz.
- Answer all questions within the time limit.
- Submit to view your score and correct answers.
Step 6: Track Progress
- Go to My Profile or Dashboard.
- View your overall learning progress, completed lessons, and quiz scores.
- Download certificates for completed courses (if enabled).
🔔 Push Notifications
All users receive real-time push notifications for important events:
- Students: Course enrollment confirmation, new lesson alerts, quiz reminders, certificate issued
- Instructors: New enrollments, student queries, course approval updates
- Administrators: New user registrations, revenue updates, system alerts
🔧 Technical Reference
This section is intended for developers who want to integrate with the Mighty API directly, understand how data is structured in the database, extend the Laravel backend with custom functionality, manage environment configuration, or safely apply updates and migrations.
API Endpoints
The Mighty backend exposes a REST API built on Laravel, secured with Laravel Passport (OAuth2). All endpoints are versioned and served from your API subdomain, for example:
https://api.yoursite.com/api/v1
Authentication
Most endpoints require a Bearer token obtained via the login endpoint. Include the token in
the Authorization header of every authenticated request:
Authorization: Bearer {access_token}
Accept: application/json
| Method | Endpoint | Description |
|---|---|---|
POST |
/auth/login |
Authenticate a user and issue an access token |
POST |
/auth/register |
Register a new student or instructor account |
POST |
/auth/logout |
Revoke the current access token |
GET |
/courses |
List available courses with filters and pagination |
GET |
/courses/{id} |
Retrieve details, lessons, and materials for a course |
POST |
/courses/{id}/enroll |
Enroll the authenticated student in a course |
GET |
/quizzes/{id} |
Fetch quiz questions and options for an exam attempt |
POST |
/quizzes/{id}/submit |
Submit quiz answers and receive scoring results |
GET |
/results/{userId} |
Retrieve a user's exam history and analytics |
GET |
/certificates/{userId} |
List certificates earned by a user |
GET |
/settings |
Fetch platform/app configuration used by the Flutter app |
A complete, importable Postman collection is included with the download package (see Postman Collection) and documents request/response payloads, required parameters, and error formats for every endpoint.
Endpoint names and payloads may vary slightly between releases. Always confirm the current
routes with php artisan route:list on your installed copy, or refer to the
bundled Postman collection, rather than hard-coding assumptions into third-party integrations.
Sample Request & Response Payloads
The examples below illustrate the shape of the JSON returned by the most commonly used endpoints. Field names, pagination metadata, and error formats follow the same structure across the rest of the API. Treat these as illustrative — always confirm exact fields against the bundled Postman collection for your installed version.
POST /auth/login
{
  "status": true,
  "message": "Login successful",
  "data": {
    "access_token": "eyJ0eXAiOiJKV1QiLCJhbGciOiJIUzI1NiJ9...",
    "token_type": "Bearer",
    "expires_in": 3600,
    "user": {
      "id": 102,
      "name": "Jane Cooper",
      "email": "jane.cooper@example.com",
      "role": "student",
      "avatar": "https://api.yoursite.com/storage/avatars/102.png"
    }
  }
}
GET /courses
{
  "status": true,
  "data": {
    "current_page": 1,
    "per_page": 10,
    "total": 42,
    "items": [
      {
        "id": 15,
        "title": "Introduction to Data Science",
        "category": "Data & Analytics",
        "price": 49.99,
        "is_free": false,
        "thumbnail": "https://api.yoursite.com/storage/courses/15/thumb.png",
        "instructor": {
          "id": 8,
          "name": "Alex Morgan"
        },
        "enrolled_count": 231,
        "rating": 4.7
      }
    ]
  }
}
GET /courses/{id}
{
  "status": true,
  "data": {
    "id": 15,
    "title": "Introduction to Data Science",
    "description": "A beginner-friendly path into data analysis and statistics.",
    "price": 49.99,
    "is_free": false,
    "difficulty": "Beginner",
    "lessons": [
      { "id": 101, "title": "What is Data Science?", "order": 1, "duration_minutes": 12 },
      { "id": 102, "title": "Setting Up Your Environment", "order": 2, "duration_minutes": 18 }
    ],
    "instructor": {
      "id": 8,
      "name": "Alex Morgan",
      "bio": "Data scientist and educator with 10+ years of experience."
    }
  }
}
POST /courses/{id}/enroll
{
  "status": true,
  "message": "Enrollment successful",
  "data": {
    "enrollment_id": 5821,
    "course_id": 15,
    "user_id": 102,
    "enrolled_at": "2026-08-07T09:15:32Z",
    "progress_percent": 0
  }
}
GET /quizzes/{id}
{
  "status": true,
  "data": {
    "id": 42,
    "title": "Data Science Fundamentals Quiz",
    "duration_minutes": 20,
    "pass_marks": 70,
    "questions": [
      {
        "id": 301,
        "question": "Which of the following is a supervised learning algorithm?",
        "options": [
          { "id": 1, "text": "K-Means" },
          { "id": 2, "text": "Linear Regression" },
          { "id": 3, "text": "PCA" },
          { "id": 4, "text": "DBSCAN" }
        ]
      }
    ]
  }
}
POST /quizzes/{id}/submit
{
  "status": true,
  "message": "Quiz submitted",
  "data": {
    "attempt_id": 9143,
    "quiz_id": 42,
    "score": 85,
    "total_marks": 100,
    "passed": true,
    "correct_answers": 17,
    "total_questions": 20,
    "submitted_at": "2026-08-07T09:42:10Z"
  }
}
GET /results/{userId}
{
  "status": true,
  "data": [
    {
      "attempt_id": 9143,
      "quiz_title": "Data Science Fundamentals Quiz",
      "course_title": "Introduction to Data Science",
      "score": 85,
      "passed": true,
      "submitted_at": "2026-08-07T09:42:10Z"
    }
  ]
}
GET /certificates/{userId}
{
  "status": true,
  "data": [
    {
      "certificate_id": 771,
      "course_id": 15,
      "course_title": "Introduction to Data Science",
      "issued_at": "2026-08-07T10:00:00Z",
      "download_url": "https://api.yoursite.com/storage/certificates/771.pdf"
    }
  ]
}
GET /settings
{
  "status": true,
  "data": {
    "app_name": "Mighty LMS",
    "currency": "USD",
    "currency_symbol": "$",
    "logo_url": "https://api.yoursite.com/storage/branding/logo.png",
    "payment_gateways": {
      "stripe": true,
      "paypal": false
    },
    "maintenance_mode": false
  }
}
Error Response Format
Failed requests follow a consistent shape so client apps can handle errors generically:
{
  "status": false,
  "message": "The given data was invalid.",
  "errors": {
    "email": ["The email field is required."],
    "password": ["The password must be at least 8 characters."]
  }
}
Database Schema Overview
The backend uses a relational MySQL/MariaDB schema managed entirely through Laravel migrations
located in database/migrations. Below is a high-level overview of the core tables;
refer to the migration files for exact columns, indexes, and foreign keys.
| Table | Purpose |
|---|---|
users |
Stores students, instructors, and admin accounts with role assignment |
shops |
Platform/tenant settings, including primary domain and branding |
courses |
Course metadata: title, description, category, pricing, instructor |
lessons |
Individual lessons belonging to a course, ordered by sequence |
enrollments |
Links students to courses and tracks progress state |
quizzes |
Quiz/exam definitions, timing rules, and pass criteria |
questions |
Question bank entries, linked to one or more quizzes |
question_options |
Answer choices for each question, with a correctness flag |
quiz_attempts |
Records of a user's answers and score for a given attempt |
certificates |
Issued certificates linked to a user and completed course/exam |
payments |
Transaction records for paid course purchases and subscriptions |
notifications |
Queued and sent notifications for users |
To inspect the live schema on your own installation, you can generate an entity diagram or dump the structure with standard tools, for example:
php artisan schema:dump
# or, using mysqldump
mysqldump -u DB_USER -p --no-data DB_NAME > schema.sql
Extending Functionality
The backend follows standard Laravel conventions, which makes it straightforward to add custom features without modifying core files directly.
-
Add new routes. Define additional API routes in
routes/api.php, grouped under your own prefix and middleware:Route::prefix('v1')->middleware('auth:api')->group(function () { Route::get('/custom-feature', [CustomFeatureController::class, 'index']); }); -
Create a controller. Use the Artisan generator to scaffold new controllers,
models, and migrations:
php artisan make:controller CustomFeatureController
php artisan make:model CustomFeature -m
-
Register service providers. For larger add-ons (custom payment gateways,
notification channels, third-party integrations), create a dedicated service provider in
app/Providersand register it inbootstrap/providers.php(orconfig/app.phpon older Laravel versions). -
Extend the admin panel. Admin views and controllers live under
resources/viewsandapp/Http/Controllers/Admin. New sections can be added by following the existing module structure (route, controller, view, and, if needed, a migration for supporting data). -
Extend the Flutter app. New screens and API bindings can be added under
lib/, following the existing folder structure (models, providers/controllers, screens, and API service classes) so new features stay consistent with the rest of the app.
Environment Variables & Configuration
Application configuration is controlled through the .env file at the project root,
which is read into the various files under config/. This file is not included in
version control and must be configured per environment (local, staging, production).
Key variables you will typically need to review or update:
| Variable | Purpose |
|---|---|
APP_URL |
Base URL of the API server (used for generated links and assets) |
APP_ENV / APP_DEBUG |
Environment name and debug mode; set APP_DEBUG=false in production |
DB_HOST, DB_DATABASE, DB_USERNAME, DB_PASSWORD |
Database connection credentials |
MAIL_* |
SMTP settings used for account, notification, and receipt emails |
FILESYSTEM_DISK |
Storage driver for uploaded content (local, S3, or another supported driver) |
PASSPORT_PRIVATE_KEY / PASSPORT_PUBLIC_KEY |
OAuth key paths used for issuing and verifying API tokens |
Payment gateway keys (e.g. STRIPE_KEY, PAYPAL_CLIENT_ID) |
Credentials for any payment gateways enabled on the platform |
After changing any .env value, clear the configuration cache so the change takes effect:
php artisan config:clear
php artisan config:cache
.env file, database credentials, or Passport keys to public source
control. Treat these values the same way as the key.properties file used for Android
signing.
System Updates & Migrations
Follow this process when applying a new version of the system to an existing installation.
-
Back up first. Take a full backup of the database and the
storagedirectory before updating anything — see Database Backup & Restore for the exact commands:mysqldump -u DB_USER -p DB_NAME > backup_$(date +%F).sql
-
Enable maintenance mode so users are not affected while files are replaced:
php artisan down
-
Replace application files with the new release, keeping your existing
.envfile,storagedirectory, and any custom code untouched. -
Install/update dependencies:
composer install --no-dev --optimize-autoloader
-
Run any new database migrations:
php artisan migrate --force
The
--forceflag is required to run migrations in a production environment. Review the release notes for that version to confirm whether new migrations are included. -
Clear and rebuild caches:
php artisan config:clear
php artisan cache:clear
php artisan route:clear
php artisan view:clear
php artisan optimize
-
Disable maintenance mode once you have verified the update:
php artisan up
-
Rebuild the Flutter app(s) only if the update includes changes to
lib/or API contracts, following the same steps described in Build for Android, Build for iOS, and Web Setup. If the build fails after pulling new dependencies, see Flutter Build Troubleshooting.
Always test updates on a staging copy of your site and database before applying them to production. Record the applied version in the Changelog so the update history stays traceable.
💳 Payment Gateway Setup
Mighty LMS supports selling paid courses through Stripe and PayPal. Both gateways are
configured in two places: your Laravel .env file (for the API keys) and the
Admin Panel Settings → Payment Gateway screen (to enable/disable each
gateway and set the display currency).
Always test with sandbox/test-mode credentials first. Only switch to live keys once a full test purchase has been completed successfully end-to-end (checkout → webhook → enrollment).
Stripe Setup
Step 1 — Create/Access Your Stripe Account
- Sign up or log in at https://dashboard.stripe.com/.
- Complete Stripe's account activation (business details) before going live — test mode works without this.
Step 2 — Get Your API Keys
- In the Stripe Dashboard, go to Developers → API keys.
- Toggle Test mode (top-right) on while integrating.
- Copy the Publishable key (starts with
pk_) and the Secret key (starts withsk_).
Step 3 — Add Keys to Your Laravel .env File
STRIPE_KEY=pk_test_xxxxxxxxxxxxxxxxxxxxxxxx
STRIPE_SECRET=sk_test_xxxxxxxxxxxxxxxxxxxxxxxx
Step 4 — Configure a Webhook (Required)
Stripe notifies your backend when a payment succeeds via a webhook. Without this, course enrollment will not be confirmed automatically after payment.
- In the Stripe Dashboard, go to Developers → Webhooks → Add endpoint.
- Set the endpoint URL to:
https://api.yoursite.com/api/v1/payments/stripe/webhook
- Select the
checkout.session.completedandpayment_intent.succeededevents. - Copy the generated Signing secret (starts with
whsec_) and add it to.env:STRIPE_WEBHOOK_SECRET=whsec_xxxxxxxxxxxxxxxxxxxxxxxx
Step 5 — Enable Stripe in the Admin Panel
- Log in to the Admin Panel and navigate to Settings → Payment Gateway.
- Toggle Stripe to enabled.
- Save changes and run
php artisan config:clearon the server.
PayPal Setup
Step 1 — Create a PayPal Developer App
- Log in at https://developer.paypal.com/dashboard/.
- Go to Apps & Credentials.
- Switch between the Sandbox and Live tabs depending on which credentials you need.
- Click Create App, give it a name (e.g., "Mighty LMS"), and select a Sandbox business account if using test mode.
Step 2 — Get Your Client ID and Secret
- Open the app you just created.
- Copy the Client ID and Secret shown on the app details page.
Step 3 — Add Credentials to Your Laravel .env File
PAYPAL_MODE=sandbox
PAYPAL_CLIENT_ID=your_paypal_client_id_here
PAYPAL_CLIENT_SECRET=your_paypal_client_secret_here
Set PAYPAL_MODE=live only once you switch to your Live app credentials from the
Live tab of the developer dashboard.
Step 4 — Enable PayPal in the Admin Panel
- Navigate to Settings → Payment Gateway in the Admin Panel.
- Toggle PayPal to enabled and save.
- Run
php artisan config:clearon the server.
Step 5 — Test a Purchase
- Use a Sandbox buyer account to complete a test purchase from the app or web build.
- Confirm the enrollment appears under the test student's My Courses.
- Confirm the corresponding row appears in the
paymentstable.
📧 SMTP Email Configuration
Mighty LMS sends transactional emails — registration confirmations, password resets, course enrollment receipts, and certificate notifications — through Laravel's mail system. You must configure an SMTP provider before these emails will be delivered.
Step 1 — Choose an SMTP Provider
Any standard SMTP provider works, for example your hosting's built-in mail service, Gmail (via an app password), or a transactional provider such as Mailgun, SendGrid, Amazon SES, or Brevo. Transactional providers are recommended for production since they offer better deliverability and rate limits than a personal inbox.
Step 2 — Get Your SMTP Credentials
The exact steps vary by provider, but you will always need: an SMTP host, a port, a username, a password (or API key used as the password), and an encryption type (TLS or SSL). Example for Gmail:
- Enable 2-Step Verification on the Google account you'll send from.
- Go to Google Account → App Passwords and generate a new app password for "Mail".
- Use that generated 16-character password as
MAIL_PASSWORDbelow (not your normal Gmail password).
Step 3 — Add SMTP Settings to Your .env File
MAIL_MAILER=smtp
MAIL_HOST=smtp.yourprovider.com
MAIL_PORT=587
MAIL_USERNAME=your_smtp_username
MAIL_PASSWORD=your_smtp_password_or_api_key
MAIL_ENCRYPTION=tls
MAIL_FROM_ADDRESS="no-reply@yourdomain.com"
MAIL_FROM_NAME="${APP_NAME}"
Use port 587 with MAIL_ENCRYPTION=tls for most providers, or port
465 with MAIL_ENCRYPTION=ssl. Check your provider's documentation
if emails fail to send with the default settings.
Step 4 — Clear the Configuration Cache
php artisan config:clear
php artisan config:cache
Step 5 — Send a Test Email
From your server's terminal, run Laravel's Tinker console to send a quick test email and confirm delivery:
php artisan tinker
Mail::raw('Mighty LMS SMTP test', function ($msg) {
    $msg->to('you@example.com')->subject('SMTP Test');
});
Alternatively, trigger a real flow such as a new student registration or a password-reset request from the app, and confirm the email arrives (check spam/junk folders too).
Step 6 — Where Emails Are Triggered
- New account registration (verification/welcome email)
- Password reset requests
- Course enrollment confirmation
- Payment/purchase receipts
- Certificate issued notifications
storage/logs/laravel.log
first — most SMTP authentication and connection errors are logged there with the exact
rejection reason from your provider.
🏢 Multi-Tenant Domain Management (shops table)
Mighty LMS stores platform/tenant-level configuration — most importantly the primary domain
your installation is served from — in the shops database table. This section
explains what the table controls and how to update it safely.
What the shops Table Controls
The shops table holds settings tied to your specific installation instance,
including:
- The
domaincolumn — the primary domain your API/app expects to be served from - Platform branding fields used as fallbacks (name, description) before admin-panel overrides apply
- Base configuration referenced during first-time setup and license/domain validation
As noted in Installation Step 20, you must set the
domain column correctly the first time you install the system. If it does not
match the domain you're actually browsing from, you may see authentication, CORS, or
license-validation errors.
Viewing the Table
You can inspect the current values using phpMyAdmin, Adminer, or the MySQL CLI:
SELECT * FROM shops;
Updating the Domain (First-Time Setup or Domain Change)
- Open phpMyAdmin (or your preferred MySQL client) and select your Mighty LMS database.
- Open the
shopstable and switch to the Edit view for the relevant row (typicallyid = 1for a single-tenant install). - Update the
domaincolumn to your current API domain, e.g.api.yoursite.com— do not includehttps://or a trailing slash unless your existing value already follows that format. - Save the change.
- Clear the configuration cache on the server:
php artisan config:clear
php artisan cache:clear
If You Migrate to a New Domain Later
- Update the
domaincolumn in theshopstable to the new domain, following the steps above. - Update
APP_URLin your.envfile to match. - Update
baseUrlinlib/util/app_constants.dart(see Set Base URL) and rebuild the mobile/web apps so they point at the new domain. - Re-verify the license/domain check (see the notice in Installation Step 1) since it is tied to the domain on record.
shops table directly for the domain/branding fields described here.
Avoid manually editing other tables unless you are comfortable working directly with the
Laravel schema — prefer the Admin Panel UI for day-to-day settings changes wherever it's
available.
🛠️ Common Server-Side Error Logs
Most server-side issues (blank/white screens, HTTP 500 responses, failed installs, or API calls that silently fail) leave a trace in Laravel's log files. Checking the logs first is almost always faster than guessing at a fix.
Where to Find the Logs
The default Laravel log file lives at:
storage/logs/laravel.log
By default, Laravel writes a single rolling laravel.log file. If daily log
rotation is enabled in config/logging.php, you will instead see one file per
day:
storage/logs/laravel-2026-07-28.log
storage/logs/laravel-2026-07-27.log
You can view the most recent entries directly from SSH/terminal:
tail -n 100 storage/logs/laravel.log
Or watch it live while reproducing an issue:
tail -f storage/logs/laravel.log
If you don't have terminal access, open storage/logs/laravel.log directly
from your hosting File Manager. On shared hosting, also check your control panel's
Error Log viewer (cPanel → Metrics → Errors) for lower-level PHP/webserver
errors that never reach Laravel's own log.
The storage directory must be writable (see
Step 13 — Set Folder Permissions) or Laravel cannot write to
the log file at all, and you will see a blank white page with no log entry to debug from.
Common Errors and How to Resolve Them
| Log Message / Symptom | Likely Cause | Fix |
|---|---|---|
| Blank white page, no visible error | APP_DEBUG=false hiding the real error, or storage not writable |
Temporarily set APP_DEBUG=true in .env on a staging copy, reproduce the issue, then check storage/logs/laravel.log; also verify folder permissions |
SQLSTATE[HY000] [1045] Access denied for user |
Wrong database credentials in .env |
Re-check DB_DATABASE, DB_USERNAME, DB_PASSWORD, DB_HOST, then run php artisan config:clear |
SQLSTATE[42S02]: Base table or view not found |
Migrations were never run, or ran against the wrong database | Run php artisan migrate --force and confirm you're pointed at the correct database |
The stream or file "...laravel.log" could not be opened: failed to open stream: Permission denied |
storage/storage/logs not writable by the web server |
chmod -R 775 storage bootstrap/cache (adjust owner/group to match your web server user) |
No application encryption key has been specified |
Missing APP_KEY in .env |
Run php artisan key:generate, then php artisan config:cache |
Class "App\Http\Controllers\...Controller" not found |
Stale autoload cache after new files were uploaded | composer dump-autoload, then clear config/route/view caches |
| 401 Unauthorized on authenticated API calls | Missing/expired Bearer token, or Passport keys missing | Confirm the Authorization: Bearer {token} header is sent; verify storage/oauth-private.key / oauth-public.key exist (see Step 20 notes) and re-run php artisan passport:install if missing |
| 419 Page Expired / CSRF token mismatch (admin panel) | Session/cookie domain mismatch or expired session | Confirm APP_URL and session cookie domain match the domain you're browsing on; clear browser cookies and retry |
| 500 error only on image/file upload | storage/app/public not writable, or storage symlink missing |
Run php artisan storage:link and check permissions on storage/app/public |
| Installer fails at license/purchase-code step | Server cannot reach the external verification domain | Allowlist outbound HTTPS access to codenichebd.com (see the license verification notice in Step 1) and confirm no firewall/proxy is blocking it |
Enabling More Verbose Logging Temporarily
If the default log entries aren't enough to diagnose an issue, you can temporarily raise
the log level in your .env file:
LOG_CHANNEL=stack
LOG_LEVEL=debug
Then clear the config cache so the change takes effect:
php artisan config:clear
APP_DEBUG=true or a debug log level enabled on a live
production site can expose sensitive stack traces, file paths, and configuration values to
visitors. Always revert to APP_DEBUG=false and a less verbose log level once
you're done troubleshooting.
When to Contact Support
If you've checked storage/logs/laravel.log, your hosting error log, and the
table above without finding a resolution, contact support through the CodeCanyon support
channel with:
- The exact error message and stack trace from
storage/logs/laravel.log - PHP version, MySQL/MariaDB version, and hosting type (shared, VPS, cloud)
- Steps to reproduce the issue
- Your purchase code
🧩 Flutter Build Troubleshooting
Most build-time failures in the Flutter app come from dependency version mismatches, stale caches, or a local toolchain that doesn't match the versions the project was built against. Work through the steps below in order — the first two resolve the large majority of reported build issues.
Step 1 — Clean the Project First
Before investigating anything else, always start with a full clean:
flutter clean
flutter pub get
This removes the build/ and .dart_tool/ directories and
re-resolves every package, which clears out a large share of "phantom" errors caused by
stale generated files.
Step 2 — Check Your Flutter & Dart SDK Versions
The project targets a specific Flutter/Dart SDK range defined in pubspec.yaml.
Confirm what you have installed:
flutter --version
flutter doctor -v
If flutter doctor reports a Dart SDK outside the range declared under
environment: sdk: in pubspec.yaml, switch to a matching Flutter
version using a version manager such as fvm, or install the required SDK
directly from Flutter's
release archive.
Step 3 — Resolve Dependency Version Conflicts
If flutter pub get fails with a message such as
"version solving failed" or lists two packages that require incompatible versions
of the same dependency, use these commands to diagnose it:
flutter pub deps
flutter pub outdated
flutter pub outdated shows which packages have newer versions available and
flags ones that are constrained by another dependency. Common fixes:
-
Pin a conflicting package to the version already declared in
pubspec.yamlrather than upgrading it independently — mixed manual upgrades are the most frequent cause of solver conflicts. -
If you added a new plugin, check its
pubspec.yamlon pub.dev for its own SDK/dependency constraints before installing it, rather than after. -
As a last resort for a single stubborn package, override its resolved version under
dependency_overridesinpubspec.yaml— use this sparingly, and remove the override once the upstream packages catch up.
Step 4 — Reset the Local Pub Cache
If pub get succeeds but the build still references outdated package code
(mismatched method signatures, missing classes that exist in the changelog), the local pub
cache may be corrupted:
flutter pub cache repair
Then repeat Step 1.
Step 5 — Android-Specific Build Errors
-
Gradle/Kotlin version mismatch (e.g. "Could not resolve
org.jetbrains.kotlin..." or "Minimum supported Gradle version..."):
check the Gradle version in
android/gradle/wrapper/gradle-wrapper.propertiesand the Android Gradle Plugin / Kotlin versions inandroid/settings.gradle(orandroid/build.gradleon older projects) match what your installed Android Studio / command-line tools expect. -
"Duplicate class" errors after adding a new plugin usually mean two
dependencies bundle the same underlying library at different versions. Run
./gradlew app:dependenciesfrom theandroid/folder to see the dependency tree and identify which plugin needs to be excluded or upgraded. -
After changing any Gradle or Kotlin version, always run:
cd android
./gradlew clean
cd ..
flutter clean
flutter pub get
Step 6 — iOS-Specific Build Errors
-
CocoaPods version conflicts (e.g. "CocoaPods could not find
compatible versions for pod..."): update the local Pod repository and reinstall pods:
cd ios
pod repo update
pod install --repo-update
cd ..
-
If pods remain out of sync after a dependency change, delete the generated iOS pod
files and reinstall from scratch:
cd ios
rm -rf Pods Podfile.lock
pod install
cd ..
-
Confirm the
platform :iosversion at the top ofios/Podfilemeets the minimum iOS version required by any newly added plugin.
Avoid manually editing version numbers inside pubspec.lock,
Podfile.lock, or Gradle's cache files directly. Let flutter pub get,
pod install, and Gradle regenerate these automatically after you adjust the
source constraints — hand-editing lock files usually creates a second, harder-to-diagnose
conflict.
Step 7 — Still Stuck?
Run a verbose build and capture the full output before reaching out for support — the first error in a long Gradle/Xcode log is almost always the real cause, with everything after it being a downstream symptom:
flutter build apk --verbose
# or
flutter build ios --verbose
Include this output, your flutter doctor -v results, and the relevant section
of pubspec.yaml when contacting support (see
When to Contact Support for backend issues, or the
CodeCanyon support channel for app build issues).
💾 Database Backup & Restore
Your course, user, enrollment, and payment data all live in the MySQL/MariaDB database. Taking regular backups — and knowing how to restore one — is one of the most important things you can set up, even if you're not familiar with server management. This section walks through both the point-and-click (phpMyAdmin) method and the command-line method.
Always take a fresh backup before installing an update, changing server settings, or
editing anything directly in the database (such as the shops table). See
System Updates & Migrations for when a backup is required
as part of the update process.
Option A — Backup via phpMyAdmin (No Terminal Required)
- Log in to your hosting control panel (cPanel or DirectAdmin).
- Open phpMyAdmin from the Databases section.
- Select your Mighty LMS database from the left-hand list.
- Click the Export tab at the top.
- Choose the Quick export method and SQL as the format — this is enough for most day-to-day backups.
- Click Go and save the downloaded
.sqlfile somewhere safe (a separate drive or cloud storage, not the same server).
Option B — Backup via Command Line (mysqldump)
If you have SSH access, this is the fastest and most reliable method:
mysqldump -u DB_USER -p DB_NAME > backup_$(date +%F).sql
Replace DB_USER and DB_NAME with the credentials from your
.env file. You'll be prompted for the database password interactively — this
avoids leaving it in your shell history. To also compress the backup:
mysqldump -u DB_USER -p DB_NAME | gzip > backup_$(date +%F).sql.gz
Option C — Automating Regular Backups (Recommended)
For production sites, don't rely on remembering to back up manually. Most hosting control panels include a built-in scheduler:
- cPanel: use the Backup Wizard or Backup tool to schedule automatic full or database-only backups, and configure a remote destination (FTP, Google Drive, Amazon S3) so backups don't live only on the same server.
-
Cron job (SSH access): add a scheduled task that runs
mysqldumpdaily and prunes old backups, for example viacrontab -e. Replace the path with your own account's home directory:0 2 * * * mysqldump -u DB_USER -pDB_PASSWORD DB_NAME | gzip > /home/YOUR_USERNAME/backups/lms_$(date +\%F).sql.gz
Also Back Up the storage Directory
Uploaded files — course thumbnails, lesson attachments, certificates, and user avatars —
are stored on disk under storage/app/public, not in the database. Back this
folder up alongside your database export:
tar -czf storage_backup_$(date +%F).tar.gz storage/app/public
Restoring a Backup
Restore via phpMyAdmin
- Open phpMyAdmin and select the target database (create a new empty database first if restoring to a fresh server).
- Click the Import tab.
- Click Choose File and select your saved
.sql(or.sql.gz) backup file. - Click Go and wait for the import to complete — large databases can take several minutes.
Restore via Command Line
mysql -u DB_USER -p DB_NAME < backup_2026-07-15.sql
For a compressed backup:
gunzip < backup_2026-07-15.sql.gz | mysql -u DB_USER -p DB_NAME
After Restoring, Always:
- Restore the matching
storage/app/publicbackup so file references in the database (thumbnails, certificates, attachments) point to files that actually exist. - Confirm the
domaincolumn in theshopstable still matches the site you're running on — see Multi-Tenant Domain Management if it needs updating. - Clear the application cache:
php artisan config:clear
php artisan cache:clear
Always test a restore on a staging copy of the site before restoring over a live production database — an interrupted or partial import can leave the database in an inconsistent state.
📮 Postman Collection
A complete, ready-to-import Postman collection covering every API endpoint listed in API Endpoints is included directly inside your delivered package — you do not need to build requests manually or search for it separately.
Where to Find It
Inside the downloaded/extracted delivery package, look for:
documentation/postman/Mighty-LMS.postman_collection.json
If your download also includes an environment file (containing variables such as
base_url and a sample access_token), it will sit alongside it as:
documentation/postman/Mighty-LMS.postman_environment.json
How to Import It
- Open the Postman desktop app (or the web version).
- Click Import in the top-left corner.
- Drag in — or browse to — the
Mighty-LMS.postman_collection.jsonfile from the path above. - If an environment file is included, import it the same way, then select it from the environment dropdown in the top-right corner of Postman.
-
Update the
base_urlvariable to point at your own API subdomain, e.g.https://api.yoursite.com/api/v1.
Using the Collection
- Run the Login request first with a valid user's email/password.
-
Copy the returned
access_tokeninto the collection/environment'stokenvariable so subsequent requests are sent withAuthorization: Bearer {{token}}automatically. - Work through the remaining folders (Courses, Quizzes, Enrollments, Results, Certificates, Settings) to confirm each endpoint responds as expected on your installation — this is exactly the check described in Step 20 — Test API Using Postman.
Can't locate the file in your package? Confirm you downloaded
All Files & Documentation from Envato (not just the installable
application files) as described in
Step 1 — Download Script From Envato, then re-check the
documentation/postman/ folder.
Changelog
This changelog documents the version history of Mighty, including new features, improvements, and bug fixes.
- Version 1.0.0 – Initial release with core features, including quiz creation, question bank management, exams, and result analysis.
Note: Remember to update this changelog for every new version of the app to keep users informed about updates and changes.
Frequently Asked Questions (FAQ)
1. Does MightyLMS include both mobile apps and a web application?
Yes. MightyLMS includes Flutter applications for Android, iOS, and Web, allowing students and instructors to access courses from any device.
2. Is the Laravel API source code included?
Yes. The package includes the Laravel API backend for managing courses, instructors, students, enrollments, payments, certificates, and platform settings.
3. What are the minimum server requirements?
The server should support PHP 8.2 or higher, MySQL 5.7+ (or MariaDB), Composer, and the required PHP extensions listed in the installation guide.
4. Can I customize the app name, logo, and branding?
Yes. You can easily customize the app name, logo, app icon, splash screen, colors, fonts, and other branding elements to match your business.
5. Can instructors create and manage courses?
Yes. Instructors can create, edit, publish, and manage courses, organize lessons, upload learning materials, and monitor student enrollments.
6. Can students enroll in courses and track their progress?
Yes. Students can browse courses, enroll, watch lessons, track learning progress, complete quizzes, and download certificates (if enabled).
7. Does MightyLMS support paid courses?
Yes. You can sell premium courses using supported payment gateways and monetize your eLearning platform with one-time course purchases or subscription plans.
8. Can I publish the mobile app on Google Play and the App Store?
Yes. After configuring your package name, bundle identifier, app signing, and store assets, you can publish the apps to Google Play Store and Apple App Store.
9. How do I update the API Base URL?
Open lib/util/app_constants.dart and update the
baseUrl value with your Laravel API URL, then rebuild the application.
10. Does MightyLMS support multiple languages?
Yes. The Flutter application supports localization and can be extended to include multiple languages based on your requirements.
11. Can I host the platform on shared hosting?
Yes. The Laravel backend can run on most modern shared hosting providers that support PHP 8.2+, MySQL, Composer, and the required PHP extensions. For better performance, a VPS or cloud server is recommended. See Deployment Environments for a full comparison.
12. How do I get support if I face any issues?
If you encounter any installation, configuration, or usage issues, please contact our support team through the CodeCanyon support channel. Include screenshots, error logs, and your purchase code for faster assistance.